
Owner's Manual
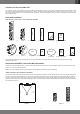
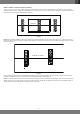
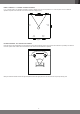
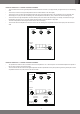
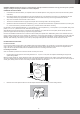
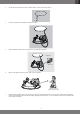

Table Of Contents
- THANK YOU FOR CHOOSING JBL®
- PACKAGE CONTENTS
- SPEAKER PLACEMENT FOR IN-CEILING AND IN-WALL
- IN-WALL SPEAKER - LEFT AND RIGHT PLACEMENT
- IN-WALL SPEAKER - CENTER CHANNEL PLACEMENT
- IN-WALL SPEAKER - SURROUND PLACEMENT
- IN-WALL SPEAKEAR - 5.1-CHANNEL SYSTEMS PLACEMENT
- IN-WALL SPEAKEAR - 7.1-CHANNEL SYSTEMS PLACEMENT
- IN-CEILING SPEAKER - LEFT AND RIGHT PLACEMENT
- IN-CEILING SPEAKEAR - 5.1-CHANNEL SYSTEMS PLACEMENT
- IN-CEILING SPEAKEAR - 7.1-CHANNEL SYSTEMS PLACEMENT
- IN-CEILING INSTALLATION GUIDE
- PAINTING THE GRILLE
- BOUNDARY COMPENSATION CONTROL
- SPECIFICATIONS
- MERCI D'AVOIR CHOISI JBL®
- CONTENU DE L’EMBALLAGE
- POSITIONNEMENT DES ENCEINTES DANS UN PLAFOND ET DANS UN MUR
- ENCEINTE ENCASTRÉE - POSITIONNEMENTS GAUCHE ET DROIT
- ENCEINTE ENCASTRÉE - POSITIONNEMENT DU CANAL CENTRAL
- ENCEINTE ENCASTRÉE - POSITIONNEMENT DU SURROUND
- ENCEINTE ENCASTRÉE - POSITIONNEMENT DU SYSTÈME POUR 5.1 CANAUX
- ENCEINTE ENCASTRÉE - POSITIONNEMENT DU SYSTÈME POUR 7.1 CANAUX
- ENCEINTE EN PLAFOND - POSITIONNEMENTS GAUCHE ET DROIT
- ENCEINTE EN PLAFOND - POSITIONNEMENT DU SYSTÈME POUR 5.1 CANAUX
- ENCEINTE EN PLAFOND - POSITIONNEMENT DU SYSTÈME POUR 7.1 CANAUX
- GUIDE D’INSTALLATION EN PLAFOND
- PEINTURE DE LA GRILLE
- COMMANDE DE COMPENSATION DE BORD
- CARACTÉRISTIQUES TECHNIQUES
- VIELEN DANK FÜR DEN KAUF EINES JBL®-PRODUKTS!
- LIEFERUMFANG
- LAUTSPRECHERPOSITIONIERUNG FÜR DECKEN- UND WANDEINBAU
- WANDEINBAU-LAUTSPRECHER -–LINKE UND RECHTE POSITIONIERUNG
- WANDEINBAU-LAUTSPRECHER – POSITIONIERUNG DES CENTER-KANALS
- WANDEINBAU-LAUTSPRECHER – SURROUND-POSITIONIERUNG
- UNTERPUTZ-LAUTSPRECHER – POSITIONIERUNG VON 5.1-KANAL-SYSTEMEN
- UNTERPUTZ-LAUTSPRECHER – POSITIONIERUNG VON 7.1-KANAL-SYSTEMEN
- DECKENEINBAULAUTSPRECHER – POSITIONIERUNG LINKS UND RECHTS
- DECKENEINBAU-LAUTSPRECHER – POSITIONIERUNG VON 5.1-KANAL-SYSTEMEN
- DECKENEINBAU-LAUTSPRECHER – POSITIONIERUNG VON 7.1-KANAL-SYSTEMEN
- DECKENEINBAUANLEITUNG
- ANSTRICH DES GITTERS
- BOUNDARY-COMPENSATION-STEUERUNG
- TECHNISCHE DATEN
- MUITO OBRIGADO POR ESCOLHER A JBL®
- CONTEÚDO DA EMBALAGEM
- POSICIONAMENTO DA CAIXA DE SOM NO TETO E NA PAREDE
- CAIXA DE SOM DE PAREDE - POSICIONAMENTO COM DUAS CAIXAS (ESQUERDA E DIRETA)
- CAIXAS DE SOM DE PAREDE - POSICIONAMENTO DO CANAL CENTRAL
- CAIXAS DE SOM DE PAREDE - POSICIONAMENTO SURROUND
- CAIXA DE SOM DE PAREDE - POSICIONAMENTO DE SISTEMA DE 5.1 CANAIS
- CAIXA DE SOM DE PAREDE - POSICIONAMENTO DE SISTEMA DE 7.1 CANAIS
- CAIXA DE SOM DE TETO - POSICIONAMENTO COM DUAS CAIXAS (ESQUERDA E DIRETA)
- CAIXA DE SOM DE TETO - POSICIONAMENTO DE SISTEMA DE 5.1 CANAIS
- CAIXA DE SOM DE TETO - POSICIONAMENTO DE SISTEMA DE 7.1 CANAIS
- INSTRUÇÕES PARA INSTALAÇÃO NO TETO
- PINTURA DA GRADE
- CHAVE DE COMPENSAÇÃO DE PROXIMIDADE
- INFORMAÇÕES TÉCNICAS
- БЛАГОДАРИМ ВАС ЗА ВЫБОР ПРОДУКЦИИ JBL®
- КОМПЛЕКТАЦИЯ
- УСТАНОВКА АКУСТИЧЕСКИХ СИСТЕМ В ПОТОЛКЕ И В СТЕНЕ
- НАСТЕННАЯ АКУСТИЧЕСКАЯ СИСТЕМА: РАЗМЕЩЕНИЕ ЛЕВОЙ И ПРАВОЙ КОЛОНКИ
- РАЗМЕЩЕНИЕ АКУСТИЧЕСКИЙ СИСТЕМЫ ЦЕНТРАЛЬНОГО КАНАЛА
- АКУСТИЧЕСКАЯ СИСТЕМА ДЛЯ МОНТАЖА В СТЕНУ: РАЗМЕЩЕНИЕ КОЛОНОК ОБЪЕМНОГО ЗВУЧАНИЯ
- РАЗМЕЩЕНИЕ 5.1-КАНАЛЬНЫХ СИСТЕМ
- РАЗМЕЩЕНИЕ 7.1-КАНАЛЬНЫХ СИСТЕМ
- АКУСТИЧЕСКАЯ СИСТЕМА ДЛЯ МОНТАЖА В ПОТОЛОК: РАЗМЕЩЕНИЕ АКУСТИЧЕСКИХ СИСТЕМ ЛЕВОГО И ПРАВОГО КАНАЛОВ
- ПОТОЛОЧНАЯ АКУСТИЧЕСКАЯ СИСТЕМА: РАЗМЕЩЕНИЕ 5.1-КАНАЛЬНЫХ СИСТЕМ
- ПОТОЛОЧНАЯ АКУСТИЧЕСКАЯ СИСТЕМА: РАЗМЕЩЕНИЕ 7.1-КАНАЛЬНЫХ СИСТЕМ
- РУКОВОДСТВО ПО МОНТАЖУ В ПОТОЛКЕ
- ПОКРАСКА ЗАЩИТНОЙ РЕШЕТКИ
- НАСТРОЙКА ГРАНИЧНОЙ КОМПЕНСАЦИИ
- Технические характеристики
- 感谢您选择 JBL®
- 包装内容
- 扬声器吸顶式及入墙式摆放
- 规格
- JBL®을 선택해 주셔서 감사합니다
- 패키지 구성품
- 천장 설치형 및 벽 설치형 스피커 배치
- 사양

English
English
9
3. Cut the ceiling drywall along the mark you made in Step 2 to create the mounting opening.
4. Connect the speaker to the amplier as explained on page 8.
5. Attach the speaker's seismic tab to a support line, as per local safety regulations.
Support Line
Seismic Tab
6. Make sure all speaker clamps are in their "ready-to-mount" position.
Speaker Clamps in
Ready-to-Mount Positon
7. Insert the speaker straight into the mounting opening. Tighten the speaker clamp screws on the front of the speaker bafe. The speaker
clamps will automatically rotate into position and begin clamping the speaker. When you notice resistance on the screws the speaker has
been clamped successfully.