SYNTHESIS® SDEC-3000 SDEC-4000 DIGITAL EQUALIZER WITH DACS CALIBRATION CHECKLIST & MANUAL
1 2 3 4 Introduction................................................................................................... 4 Equipment Required: .................................................................................... 4 Calibration Checklist .................................................................................... 5 SDEC Hardware Connection ........................................................................ 6 4.1 Audio Connections....................................................
11 Saving Your Work ...................................................................................... 20 11.1 Save a copy using SAVE AS ............................................................ 20 11.2 Save to Network Device ................................................................... 20 12 Recalling Saved Settings............................................................................. 20 12.1 Recalling from a Saved File..............................................................
1 Introduction Welcome to the JBL Synthesis and DACS user guide. The below information is designed to help an installer use the SDEC and DACS kit to properly test and calibrate a room. This guide is designed to help guide you through the calibration process when using the original DACS Digital Acoustic Calibration System with the newly introduced SDEC-3000 and SDEC-4000 digital EQ systems. NEED HELP? CALL. . .
3 Calibration Checklist The calibration process is more than just measuring and applying EQ to achieve a preset target. It includes examining the entire signal chain and confirming that all parts of the system are accurately connected. Use the below checklist to make sure you have completed all the steps to ensure that your system meets the standards for the best audio system possible.
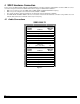
4 SDEC Hardware Connection Please refer to the SDEC Installers Manual for detailed hardware connection instructions and diagrams. Check the SDEC for correct connection using the below chart for SDEC-3000 and the next page for SDEC-4000 installations: • Make sure you have access to the SDEC-3000 or SDEC-4000P and SDEC-4000X Ethernet port(s). • Make sure you are using the correct interconnect kit, S3000IC or S4000IC.
SDEC-4000 with Bi-Amplified Fronts SDEC-4000 with Full-Range Fronts Surround Processor to SDEC4000P Inputs Surround Processor to SDEC4000P Inputs S4000IC Number Channel SDEC4000P S4000IC Number Channel SDEC4000P 1 Left Front A1 1 2 Right Front A2 3 Center Front A3 4 Left Side 5 Left Front A1 2 Right Front A2 3 Center Front A3 A4 4 Left Side A4 Right Side B1 5 Right Side B1 6 Left Rear B2 6 Left Rear B2 7 Right Rear B3 7 Right Rear B3 8 Subwoofer (Mono Sub L)
4.2 Ethernet Connection For all SDEC-3000 installations you will need either a crossover Ethernet cable or the SDEC will need to be connected to an Ethernet hub (figure 3). For all SDEC-4000 installations both the SDEC-4000P and SDEC-4000X, as well as your computer must be connected to an Ethernet hub and on the same network (figure 4). NOTE: The below instructions assume you will be using an Ethernet hub or router. If you are using the SDEC-3000 you can optionally use a crossover cable and not use a hub.
5.1.2 Distance/Delay settings 5 Software Operation using the Java Remote Measure the distance from the center of the listening area (or the “hot seat”) to each speaker location. The measurement is accurate to less then one inch. The SDEC can be controlled and configured from any computer that has access to the network via Ethernet.
6 Software Operation using London Architect™ View this Network panel to see the attached devices. NOTE: While it is possible to use a WIFI access point to control and configure the SDEC we do not recommend using this method for initial setup when using London Architect. For the most reliable connection it is highly recommended that you use a wired connection. 6.
not have the file you should be able to retrieve it from the SDEC directly. 6.2.4 HiQnet Node Address If the below HiQnet node address message appears, click NO. We want to maintain the address of the device in the design, and then click OK. The device will be rebooted. You will need to wait for the unit to reboot and click Online as described above. NOTE: To access the design file you will need a user name and password • User Login: JBL Synthesis Dealer • Password: synthesis . Figure 9. 6.2.
6.3 ONLINE Mode When in ONLINE mode you are actively controlling the SDEC-3000 or SDEC-4000. The SDEC-4000 can be configured for Full Range (factory default) or Bi-amp mode. The SDEC-4000 is set to full range to ensure that the bi-amp speakers without built in crossovers will not be damaged accidentally. Use the below diagram to help you navigate the system while using the DACS measurement system to calibrate your room. 6.3.
6.3.2 EQ Controls Entering the EQ settings can be accomplished simply by clicking inside the boxes and typing in your settings. Any channel can be accessed by selecting from the channel list on the left. Enter the EQ filter settings here Figure 12. Click on the channel button to show the EQ available - 13 - SDEC -X000 DACS Calibration Manual v1.0.
6.3.3 Channel Delay (Speaker Distance Offset Correction) Do not enter the distance measured into the channel distance box. Use the longest measured distance as your 0 reference and SUBTRACT each speaker distance from this reference. This result is the number you should enter. For example: If the Left is 10 ft from the primary listening seat and the center is 8 ft, you should enter 0 ft into the left (10 ft – 10 ft = 0ft) and 2 ft (10 ft – 8 ft =2 ft) into the center.
6.3.4 Channel Output Use each output to adjust each channel to give the same output level using an SPL meter. 6.3.5 Level Matching Multiple Surround and Subwoofer Channels The SDEC-4000 has multiple outputs for Subwoofers and Side Surrounds. These will need to be level matched to each other before final output levels are set. 1. Using the internal noise test of the SDP test each output individually. It will be necessary to mute the output you are not testing. Make sure the Trim Link is off (not RED). 2.
Synthesis Four: 7 Speaker Sound Check L-C-R Tweeters (-) L-C-R Mid-range (-) L-C-R Mid-bass drivers (+) Subwoofers (+) Use the circulating noise generator of the Surround Processor to confirm that all channels have output and that each speaker is connected to its corresponding channel.
are two slide switches and a pulse indicating LED. Slide the ON/OFF switch to the ON position and the output selector to the LO position. You should now hear pops at one second intervals from the speaker under test. If a higher level is required, set the output selector to HI. 8.2.2 Dipole Surrounds Regardless of model there is one standard for phase configuration of Dipole surrounds. 8.3.2 Cricket-R The receiver contains a microphone and phase analysis circuitry.
3. 9 Setting Output Level 4. 9.1 Setting Levels before Calibrating Using the internal noise generator of the SDP set all outputs to achieve 75dB using the “C” weighting and “SLOW” response. This will maintain the best signal to noise and headroom possible by optimizing the gain structure of the system. Slide the WEIGHTING Selector to "C" weighting for channel balance tests. "A" weighting cuts low frequencies. This will cause errors when measuring subwoofers.
Test each channel using the DACS calibration kit and copy EQ filter suggestions from DACS to London Architect. It will be necessary to test each channel using the DACS. If you use F4 the DACS will test and suggest filters to use. Copy these filters for each channel. 10 DACS Measurement System 10.1 DACS Hardware Setup Unpack the DACS Kit and setup the microphone array. Make all standard connections except for connecting to the SDEC. Use the below diagram as a guide.
10.2.1 Parametric Filter Values Parametric Filter Values 12 Recalling Saved Settings Octave Width Fractions Decimals 1/12 0.08 1/10 0.10 1/9 0.11 1/8 0.13 1/7 0.14 1/6 0.17 1/5 0.20 1/4 0.25 1/3 0.33 2/5 0.40 Recalling your settings assumes that you are using London Architect to open and control the SDEC. If you are using the web interface (version 1.01 of the design file or higher) you will not need to recall settings as the settings will automatically be recalled.
normally open the default setting of 0dB will be active. When the contact is closed the -2.5dB setting will be triggered. 13 Advanced Features 13.2 Multiple EQ Presets 13.1 Cinema/Music Subwoofer Output Up to two EQ presets can be stored and recalled. All channels can be changed and are saved and recalled together. Due to the advanced nature of this process it should only be done under the supervision of JBL Synthesis factory personnel.
Figure 21. Figure 22. Figure 23. - 22 - SDEC -X000 DACS Calibration Manual v1.0.
14 Troubleshooting Guide Symptom Probable Cause Cannot see the units in the Network Wrong network card selected control panel Solution Check IP properties in application preferences Ethernet cable unplugged Check connections Wrong network card selected Check IP properties in application preferences Ethernet cable unplugged Check connections Device default name changed Use “Auto Match Devices” to reconfigure Cannot save settings Cannot save while online Go offline first No Audio No Input Check
- 24 - SDEC -X000 DACS Calibration Manual v1.0.