C-130 Quick Start Guide Page -1Copyright ©2007 JBM Electronics, Inc.
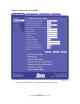
Table of Contents Quick Start Guide ............................................................................................................... 3 Unpacking Instructions ................................................................................................... 3 Preparation ...................................................................................................................... 3 Accessing the Graphical Management Interface ...........................................................
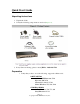
Quick Start Guide Unpacking Instructions 1. Unpack the C130. 2. Verify the following components are enclosed (Figure A). 3. If any items are missing, please contact JBM at 1-800-489-7781. Preparation 1. Verify that you have one of the following, supported cellular cards: 1xRTT/1xEVDO Audiovox/UTSStarcom: 5740 Kyocera: KPC-650 Novatel: S/V-620, S/V-720 Sierra Wireless: 555, 580, 5220 GPRS/Edge/HSDPA Sierra Wireless: 750, 775, 860 Sony Ericsson: GC-83 Page -3Copyright ©2007 JBM Electronics, Inc.
2. Using the instructions that accompanied the card, verify that the card is properly activated and functioning correctly prior to installing the car into the JBM Gateway: • Install the software that came with the aircard on a laptop. • Install the aircard into the laptop. • Follow the carrier provided procedures to properly activate the card, and unlock the card if necessary. • Using the browser on the laptop insure that you are able to browse the Internet. 3.
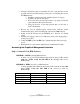
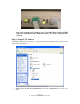
Note: This example shows cabling to a PC. The link LED is not lit for ETH1. Without a link LED lit either Method 1 must be used or the cabling must be checked. Step 2: Setup PC IP Address Set the PC’s IP Address by going to control panel and selecting network connections, the screen below will appear: • Right Click “Local Area Connection” and select “Properties” (as shown to the left). Page -5Copyright ©2007 JBM Electronics, Inc.
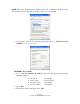
NOTE: The screens and instructions displayed are based on Windows XP. Your system may be different. If you have any problems contact your system admin. • Scroll down to the bottom of the following items and select “Internet Protocol (TCP/IP)” (as shown to the left). METHOD 1: PC to ETH0 • Select “Use the following IP address” and fill in the blank fields with the information below: • • • • • • IP address: Subnet mask: Default gatewa:y Preferred DNS: 192.168.0.2 255.255.255.0 192.168.0.1 192.168.0.
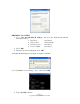
METHOD 2: PC to ETH1 • Select “Use the following IP address” and fill in the blank fields with the information below: • IP address: 192.168.1.2 • Subnet mask: 255.255.255.0 • Default gatewa:y 192.168.1.1 • Preferred DNS: 192.168.1.1 • Click “OK” • The previous screen will appear Click “OK” Verify that the IP change was accepted or acquired on the PC. Select “Start>Run on your desktop ” Type “cmd” Click “OK” • Type “ipconfig” Page -7Copyright ©2007 JBM Electronics, Inc.
• • METHOD 1 should display an IP of 192.168.0.2 METHOD 2 should display an IP of 192.168.1.2 Step 3: Access JBM Webserver • Open a web browser and enter the following in the address bar: METHOD 1: http://192.168.0.1:10000/ METHOD 2: http://192.168.1.
Cellular Card Configuration Your JBM Gateway is able to detect many cellular cards, but others must still be configured manually. If you are using either one of the older 1xRTT/CDMA cards, or a GPRS/EDGE/HSDPA card that requires the use of a userid, password, and APN, you will need to configure your car manually, as covered in the next section.
Step 1: Cellular Carrier Selection • Select the cellular carrier you are using from the drop-down menu. Page -10Copyright ©2007 JBM Electronics, Inc.
• Select the Aircard you are using: Page -11Copyright ©2007 JBM Electronics, Inc.
Step 2: Set the Userid, password and APN • If you are using a GPRS, Edge, or HSDPA based card, enter the userid, password, and APN that was provided by your cellular carrier. This information should have been packaged with your card. If you do not have this information please contact your carrier account representative or the carrier’ support department before proceeding. Note: The userid, password, and APN are case specific. Be certain that you use the exact information as provided by your carrier.
Note: Depending on the provisioning of your card, particularly in corporate applications in which the JBM Gateway is providing cellular backup connectivity to wired circuits, your card may be restricted from Internet access. If this is the case, you may want to instead test to insure that you are able to access your corporate network. If you have any question as to your configuration please check with your network administration.
Verifying IP Connectivity First, let’s check to make sure that you card is connecting to the cellular network and obtaining an IP address. Navigate to the GAU screen shown below: If your screen looks similar to the one shown above, you are having signal reception difficulties. As you will notice, the card is neither connected to the cellular network, nor has it been able to obtain an IP address from the network.
Minimal Reception On occasion, you can find yourself in a situation where you have just enough signal to be able to communicate with the cellular tower, and obtain an IP address, but not enough reception to be able to sustain a viable connection.
Re-verify your userid, password, and APN information. Be sure to pay close attention, as all three of these items are case specific and must be entered exactly in order to properly log into the cellular network. Don’t forget to click “Save” and “Apply” if you make any changes.
HARDWARE STATUS LEDS Power: Yellow – Power Connection Status (PWR) ON Power is being received by the C130 OFF Power is not being received by the C130 Ethernet Ports: Green – LAN Connection Status (LINK) ON C130 is connected to LAN OFF C130 is not connected to the LAN, or the C130 is in the process of being reset RED – Data Transmit Activity Status (T) ON-OFF-ON (Flickering) C130 is transmitting packets Green – Data Receive Activity Status (R) ON-OFF-ON (Flickering) C130 is receiving packets RS232 Ports:
Software Licensing Terms and Conditions Software supplied with each JBM Electronics' product remains the exclusive property of JBM Electronics. JBM grants with each unit a perpetual license to use this software with the express limitation that the software may not be copied or used in any other product for any purpose. It may not be reverse engineered, or used for any other purpose other than in and with the computer hardware sold by JBM Electronics.
Warranty JBM Electronics provides a limited hardware warranty for the Gateway, which consists of the following: • • • • • This warranty is effective for one year from the delivery date of the Gateway to the purchaser. The purchaser is responsible for returning the defective unit to our factory, freight prepaid. If the Gateway is under warranty, we will repair it at our cost and return it, freight prepaid, via UPS ground service.