
User's Manual


RADIOBAND SYSTEM INSTALLATION MANUAL V2.2 / 7
JCM TECHNOLOGIES S.A. ALL RIGHTS RESERVED
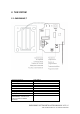
INSTALLATION AND CONNECTIONS
Fix the back of the box to the door. Install the transmitter following the technical
manual and avoid placing metallic surfaces between the receiver and the
transmitter. Pass the cables through the bottom of the transmitter. Connect a
resistive 8K2 safety band directly to terminal B1 and ensure that the safety edge
keeps totally waterproof. Fix the front of the transmitter to the back with the screws
supplied for the purpose.
N.B.: If a non-resistive element (with a contact normally closed) needs to be
connected, the jumper JP4 must be bridged. This application does not comply with
safety standard EN 12453 for the use of motorised garage doors, since the
connection of the resistive element to the RADIOBAND/T is not checked.
OPERATION
The receiver checks that all the programmed bands are working properly. If a band
is activated or if there is an error in its operation, the receiver activates the output
relay.
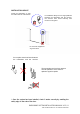
PROGRAMMING RADIOBAND/T
If the receiver is in programming, press the transmitter button to programme it into
the receiver.
TRANSMITTER BATTERY LOW INDICATOR (RADIOBAND/T)
If the battery of a transmitter programmed into the receiver becomes low, it will
give out 4 short signals every 20 seconds. If there is more than one transmitter
programmed, the safety band must be activated to check whether the receiver then
makes these 4 short signals. If this is the case, the transmitter connected to the
activated safety band will be the one with the low battery. Change it.
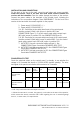
CHANGING THE BATTERY
Remove the box cover. The batteries are positioned on the back of the cover.
Replace the two used batteries with new ones, taking into account the polarity
indicated by the connector. Check that the new batteries support the same
temperature range as those they are replacing.