
User's Manual


RADIOBAND SYSTEM INSTALLATION MANUAL V2.3 beta version / 10
JCM TECHNOLOGIES S.A. ALL RIGHTS RESERVED
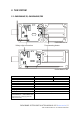
LIGHT INDICATORS
RADIOBAND/R
U-RC-RCS
In operation In programming
Relay 1 LED Normally off.
Indicates the status of the relay output.
If R1 is not connected, on.
On. Indicates the channel to be
programmed.
Relay 2 LED Normally off.
Indicates the status of the relay output.
If R2 is not connected, on.
On. Indicates the channel to be
programmed.
OPERATION
The receiver checks that all the programmed bands are working properly. If a band
is activated or if there is an error in its operation, the receiver activates the output
relay.
MANUAL PROGRAMMING
RADIOBAND/RU makes it possible to store 6 RADIOBAND/TAs and/or
RADIOBAND/TBXs (3 on Relay 1 and 3 on Relay 2).
Press the receiver programming PROG button for 1s; a sound signal will be heard.
The receiver will go into programming the first relay. If the programming button is
kept pressed, the receiver will go into programming the second relay, moving
cyclically from one really to another. Once the programming relay has been chosen
for the transmitter you want to start using, send the programming code by pressing
the transmitter. Every time a transmitter is programmed, the receiver will emit a
sound signal for 0.5s. If 10 seconds pass without programming, the receiver will
go out of programming mode, emitting two 1s sound signals. If, when
programming a transmitter, the receiver's memory is full, it will emit 7 sound
signals lasting 0.5s and come out of programming.
Note: For a right operation of the system, the transmitter has to be programmed
in one receiver only.
RADIOBAND/TA, RADIOBAND/TBX replacement: In case you need to replace a
RADIOBAND/TA or a RADIOBAND/TBX, it is necessary to reset the system (see
TOTAL RESET on next page) and reprogram all RADIOBAND/TA and/or
RADIOBAND/TBX used in the installation.
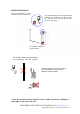
SYSTEM CHECK
This function has to be used to check the operation and range of all the devices
once the installation has been carried out.
Press the receiver’s CHECK button for at least 1 second to enter check mode. The
indicator light will come on and four beeps will be heard.
Perform a complete door opening and closing manoeuvre. During the system
check a beep will be heard every 1,5 seconds.
CORRECT OPERATION OF THE SYSTEM
If no other acoustic signal is heard on completing the manoeuvre, the system is
operating correctly. Either press the CHECK button again or wait 5 minutes and the