
User's Manual


1248xxx_Rev0.0 RB3 OSE916 Page 3/4
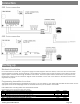
PRESS RPROG PUSHBUTTON LED TURNS ON PRESS TRANSMITTER PROG ONE BEEP & PROGRAMMED
PRESS RPROG PUSHBUTTON LED TURNS OFF & END PROG
Check the correct operation
Press each safety edge connected to assure that the appropriate relay on the receiver is activated.
If not, see the Leds and Beeps indication table, to check what is happening and how to solve it.
Maintenance
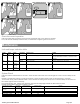
Leds and beeps indication table
R1/R2
Led
Check
Led
Beeps
Equipment
Message / error
Solution
ON
OFF
No beeps
RB3 T
Detection of the safety edge
Verify that the IN1/IN2 led of the RB3 T is at ON when
you press PROG button of RB3 T, to check the correct
operation.
RB3 R
Communication failure between RB3 R and RB3 T
Verify the radio signal with the Check function.
OFF
OFF
4 beeps
each 20
seconds
RB3 R
RB3 T low battery
Verify the batteries of the transmitter
ON
OFF
4 beeps
each 20
seconds
RB3 R
RB3 T only one battery connected
Verify and connect the second battery.
OFF
ON
No beeps
RB3 R
Check function. See coverage and signal quality table.
---
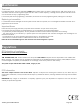
System Check
Press the receiver’s CHECK button for at least 1 second to enter check mode. The indicator light will come on and four beeps will be
heard.
Perform a complete door opening and closing manoeuvre. During the system check a beep will be heard every 1,5 seconds.
To exit Check mode, press the CHECK button or wait 5 minutes. On exiting check mode, seven consecutive beeps will be heard and
the indicator light will flash continuously.
If the communication fails, halt the door manoeuvre and press the safety edges installed to detect what has failed.
Perform another system check until the result is correct.
Press the safety edges
Nº flashes
check led
Signal coverage
Result of check
Solution
Three consecutive beeps
are heard
1
Very weak
Safety edge failure
Change the orientation of the transmitting-receiving aerials.
2
Weak
OK
The battery consumption will be higher
A single beep is heard
3
Normal
OK
A single beep is heard
4
Good
OK
A single beep is heard
5
Very good
OK