Jeep.com (U.S.) Jeep.ca (Canada) DOWNLOAD A FREE ELECTRONIC COPY of the Owner’s Manual and Warranty Booklet by visiting: www.jeep.com/en/owners/manuals or www.jeep.com/en/warranty (U.S.); www.owners.mopar.ca/en (Canada). © 2015 FCA US LLC. All Rights Reserved. Jeep is a registered trademark of FCA US LLC. 16MK49-926-AA Compass Second Edition Rev 1 User Guide 2016 CO MPASS U S E R GU I DE 2126532_16b_Brandsite_Compass_UG_080415.
This guide has been prepared to help you get quickly acquainted with your new Jeep ® Brand Vehicle and to provide a convenient reference source for common questions. However, it is not a substitute for your Owner’s Manual. For complete operational instructions, maintenance procedures and important safety messages, please consult your Owner’s Manual, Navigation/Uconnect Manuals and other Warning Labels in your vehicle.
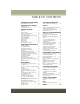
TABLE OF CONTENTS INTRODUCTION/WELCOME OFF-ROAD CAPABILITIES WELCOME FROM FCA US LLC FOUR-WHEEL DRIVE OPERATION ...... 2 . . . 83 CONTROLS AT A GLANCE UTILITY DRIVER COCKPIT . . . . . . . . . . . . . . 6 INSTRUMENT CLUSTER . . . . . . . . . . 8 TRAILER TOWING WEIGHTS (MAXIMUM TRAILER WEIGHT RATINGS) . . . . . . . 85 RECREATIONAL TOWING (BEHIND MOTORHOME, ETC.) . . . . . . . . . . . . 86 GETTING STARTED KEY FOB . . . . . . . . . . . . . . . . . . REMOTE START . . . . . . . . . . . . . .
INTRODUCTION/WELCOME WELCOME FROM FCA US LLC Congratulations on selecting your new FCA US LLC (“FCA US”) vehicle. Be assured that it represents precision workmanship, distinctive styling, and high quality - all essentials that are traditional to our vehicles. Your new FCA US vehicle has characteristics to enhance the driver's control under some driving conditions. These are to assist the driver and are never a substitute for attentive driving. They can never take the driver's place. Always drive carefully.
INTRODUCTION/WELCOME VEHICLES SOLD IN CANADA With respect to any vehicles sold in Canada, the name FCA US LLC shall be deemed to be deleted and the name FCA Canada Inc. used in substitution (excluding legal lines). WARNING! • Pedals that cannot move freely can cause loss of vehicle control and increase the risk of serious personal injury. • Always make sure that objects cannot fall into the driver foot well while the vehicle is moving.
INTRODUCTION/WELCOME Rollover Warning WARNING! • Pedals that cannot move freely can cause loss of vehicle control and increase the risk of serious personal injury. • Always make sure that objects cannot fall into the driver foot well while the vehicle is moving. Objects can become trapped under the brake pedal and accelerator pedal causing a loss of vehicle control.
INTRODUCTION/WELCOME USE OF AFTERMARKET PRODUCTS (ELECTRONICS) The use of aftermarket devices including cell phones, MP3 players, GPS systems, or chargers may affect the performance of on-board wireless features including Keyless Enter-N-Go and Remote Start range. If you are experiencing difficulties with any of your wireless features, try disconnecting your aftermarket devices to see if the situation improves. If your symptoms persist, please see an authorized dealer.
CONTROLS AT A GLANCE DRIVER COCKPIT 1. Electronic Vehicle Information Center (EVIC) Controls pg. 75 2. Turn Signal/Lights Lever (behind steering wheel) pg. 30 3. Instrument Cluster pg. 8 4. Electronic Vehicle Information Center (EVIC) Display 5. Tachometer 6. Electronic Speed Control pg. 34 7. Wiper/Washer Lever pg. 32 8. Audio System pg. 42 9.
CONTROLS AT A GLANCE 10. Lower Storage 11. Climate Controls pg. 38 12. Power Outlet pg. 82 13. Shift Lever pg. 38 14. Switch Panel • Heated Seat Switches pg. 27 • Electronic Stability Control (ESC) OFF pg. 92 • Hazard Switch 15. Ignition Switch (behind steering wheel) 16. Power Mirrors 17. Power Windows 18.
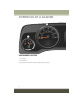
CONTROLS AT A GLANCE INSTRUMENT CLUSTER 1. Fuel Gauge 2. Speedometer (See page 87 for Instrument Cluster Warning Light information.
CONTROLS AT A GLANCE 3. Tachometer 4. Engine Temperature Gauge (See page 91 for Instrument Cluster Indicator Light information.
GETTING STARTED KEY FOB Locking And Unlocking The Doors And Liftgate Lock The Doors And Liftgate Push and release the LOCK button on the RKE transmitter to lock all doors and liftgate. The turn signal lights will flash, and the horn will chirp to acknowledge the signal. Unlock The Doors And Liftgate Push and release the UNLOCK button on the RKE transmitter once to unlock the driver’s door or twice within five seconds to unlock all doors and liftgate.
GETTING STARTED WARNING! • Before exiting a vehicle, always shift the automatic transmission into PARK or the manual transmission into FIRST gear or REVERSE, apply the parking brake, turn the vehicle OFF, remove the key fob from the ignition and lock your vehicle. • Never leave children alone in a vehicle, or with access to an unlocked vehicle. Allowing children to be in a vehicle unattended is dangerous for a number of reasons. A child or others could be seriously or fatally injured.
GETTING STARTED WARNING! • Do not start or run an engine in a closed garage or confined area. Exhaust gas contains Carbon Monoxide (CO) which is odorless and colorless. Carbon Monoxide is poisonous and can cause serious injury or death when inhaled. • Keep Key Fob transmitters away from children. Operation of the Remote Start System, windows, door locks or other controls could cause serious injury or death.
GETTING STARTED SEAT BELT SYSTEMS Lap/Shoulder Belts • All seating positions in your vehicle are equipped with lap/shoulder belts. • Be sure everyone in your vehicle is in a seat and using a seat belt properly. • Position the lap belt so that it is snug and lies low across your hips, below your abdomen. To remove slack in the lap belt portion, pull up on the shoulder belt. To loosen the lap belt if it is too tight, tilt the latch plate and pull on the lap belt.
GETTING STARTED SUPPLEMENTAL RESTRAINT SYSTEM (SRS) — AIR BAGS Air Bag System Components Your vehicle may be equipped with the following air bag system components: • Occupant Restraint Controller (ORC) • Air Bag Warning Light • Steering Wheel and Column • Instrument Panel • Knee Impact Bolsters • Advanced Front Air Bags • Supplemental Side Air Bags • Front and Side Impact Sensors • Seat Belt Pretensioners • Seat Belt Buckle Switch • Seat Track Position Sensors Advanced Front Air Bags • This vehicle has Adv
GETTING STARTED • If it is necessary to modify the air bag system for persons with disabilities, contact your authorized dealer. • Refer to the Owner's Manual on the DVD for further details regarding the Supplemental Restraint System (SRS). WARNING! • Relying on the air bags alone could lead to more severe injuries in a collision. The air bags work with your seat belt to restrain you properly. In some collisions, the air bags won't deploy at all. Always wear your seat belts even though you have air bags.
GETTING STARTED WARNING! • Side Air Bags need room to inflate. Do not lean against the door or window. Sit upright in the center of the seat. • Being too close to the Side Air Bags during deployment could cause you to be severely injured or killed. • Relying on the Side Air Bags alone could lead to more severe injuries in a collision. The Side Air Bags work with your seat belt to restrain you properly. In some collisions, Side Air Bags won’t deploy at all.
GETTING STARTED Air Bag Warning Light • The air bags must be ready to inflate for your protection in a collision. The Occupant Restraint Controller (ORC) monitors the internal circuits and interconnecting wiring associated with air bag system electrical components. • The ORC monitors the readiness of the electronic parts of the air bag system whenever the ignition switch is in the START or ON/RUN position.
GETTING STARTED These data can help provide a better understanding of the circumstances in which crashes and injuries occur. NOTE: EDR data are recorded by your vehicle only if a non-trivial crash situation occurs; no data are recorded by the EDR under normal driving conditions and no personal data (e.g., name, gender, age, and crash location) are recorded.
GETTING STARTED Locating LATCH Anchorages The lower anchorages are round bars that are found at the rear of the seat cushion where it meets the seatback. They are just visible when you lean into the rear seat to install the child restraint. You will easily feel them if you run your finger along the gap between the seatback and seat cushion. Lower Anchors Locating Tether Anchorages In addition, there are tether strap anchorages located on the back of the seat.
GETTING STARTED Center Seat LATCH Do not install child restraints with rigid lower attachments in the center seating position. Only install this type of child restraint in the outboard seating positions. Child restraints with flexible, webbing mounted lower attachments can be installed in any rear seating position. In the center position, the inner anchorages are 15.5 inches (390 mm) apart.
GETTING STARTED 4. To lock the seat belt, pull down on the shoulder part of the belt until you have pulled all the seat belt webbing out of the retractor. Then, allow the webbing to retract back into the retractor. As the webbing retracts, you will hear a clicking sound. This means the seat belt is now in the Automatic Locking mode. 5. Try to pull the webbing out of the retractor. If it is locked, you should not be able to pull out any webbing. If the retractor is not locked, repeat the last step. 6.
GETTING STARTED WARNING! • In a collision, an unrestrained child, even a tiny baby, can become a projectile inside the vehicle. The force required to hold even an infant on your lap could become so great that you could not hold the child, no matter how strong you are. The child and others could be severely injured or killed. Any child riding in your vehicle should be in a proper restraint for the child's size. • Never place a rear-facing child restraint in front of an air bag.
GETTING STARTED WARNING! • A loose head restraint thrown forward in a collision or hard stop could cause serious injury or death to occupants of the vehicle. Always securely stow removed head restraints in a location outside the occupant compartment. • ALL the head restraints MUST be reinstalled in the vehicle to properly protect the occupants. Follow the re-installation instructions above prior to operating the vehicle or occupying a seat.
GETTING STARTED WARNING! • Adjusting a seat while driving may be dangerous. Moving a seat while driving could result in loss of control which could cause a collision and serious injury or death. • Seats should be adjusted before fastening the seat belts and while the vehicle is parked. Serious injury or death could result from a poorly adjusted seat belt. CAUTION! Do not place any article under a power seat or impede its ability to move as it may cause damage to the seat controls.
GETTING STARTED Manual Front Seat Adjustment On models equipped with manual seats, the adjusting bar is located at the front of the seats, near the floor. While sitting in the seat, lift up on the bar and move the seat forward or rearward. Release the bar once you have reached the desired position. Then, using body pressure, move forward and rearward on the seat to be sure that the seat adjusters have latched. Manual Seat Adjusting Bar WARNING! • Adjusting a seat while driving may be dangerous.
GETTING STARTED Manual Lumbar The lumbar adjustment handle is located on the inboard or outboard side of the seatback. Rotate the lever downward to increase the lumbar support or rotate the lever upward to decrease the lumbar support. Driver's Seatback Recline To adjust the seatback, lift the lever located on the outboard side of the seat, lean back to the desired angle and release the lever. To return the seatback, lift the lever, lean forward and release the lever.
GETTING STARTED Reclining Rear Seat For additional comfort, pull the strap forward just enough to release the seatback latch. Then push the seatback to a reclined position, approximately 35 degrees maximum, and release the strap. WARNING! Do not ride with the seatback reclined so that the shoulder belt is no longer resting against your chest. In a collision you could slide under the seat belt and be seriously or even fatally injured. Use the recliner only when the vehicle is parked.
GETTING STARTED WARNING! • Persons who are unable to feel pain to the skin because of advanced age, chronic illness, diabetes, spinal cord injury, medication, alcohol use, exhaustion or other physical condition must exercise care when using the seat heater. It may cause burns even at low temperatures, especially if used for long periods of time. • Do not place anything on the seat or seatback that insulates against heat, such as a blanket or cushion. This may cause the seat heater to overheat.
OPERATING YOUR VEHICLE ENGINE BREAK-IN RECOMMENDATIONS A long break-in period is not required for the engine and drivetrain (transmission and axle) in your vehicle. Drive moderately during the first 300 miles (500 km). After the initial 60 miles (100 km), speeds up to 50 or 55 mph (80 or 90 km/h) are desirable. While cruising, brief full-throttle acceleration within the limits of local traffic laws contributes to a good break-in.
OPERATING YOUR VEHICLE MULTIFUNCTION LEVER The multifunction lever controls the operation of the headlights, parking lights, turn signals, headlight beam selection, instrument panel light dimming, interior lights, the passing lights, and the fog lights. The multifunction lever is located on the left side of the steering column. Turn Signal/Lights Lever Headlights And Parking Lights Turn the end of the multifunction lever to the first detent to turn on the parking lights.
OPERATING YOUR VEHICLE Flash-To-Pass You can signal another vehicle with your headlights by lightly pulling the multifunction lever toward you. This will turn on the high beam headlights until the lever is released. NOTE: If the multifunction lever is held in the flash-to-pass position for more than 20 seconds, the high beams will shut off. If this occurs, wait 30 seconds for the next flash-to-pass operation.
OPERATING YOUR VEHICLE WINDSHIELD WIPERS AND WASHERS Wiper/Washer Lever CAUTION! • Turn the windshield wipers off when driving through an automatic car wash. Damage to the windshield wipers may result if the wiper control is left in any position other than off. • In cold weather, always turn off the wiper switch and allow the wipers to return to the “Park” position before turning off the engine.
OPERATING YOUR VEHICLE NOTE: The wiper delay times depend on vehicle speed. If the vehicle is moving less than 10 mph (16 km/h), delay times will be doubled. Windshield Washers To use the washer, pull the control lever toward you and hold while spray is desired. If the lever is pulled while in the delay range, the wiper will operate in low-speed while the lever is pulled and for two wipe cycles after the lever is released, and then resume the intermittent interval previously selected.
OPERATING YOUR VEHICLE Rear Window Wiper/Washer The rear wiper/washer is controlled by a rotary switch located on the center portion of the control lever. The control lever is located on the right side of the steering column. Rotate the center portion of the lever upward to the first detent position for rear wiper operation. NOTE: The rear wiper operates in an intermittent mode only. Rotate the center portion of the lever past the first detent to activate the rear washer.
OPERATING YOUR VEHICLE To Activate Push the ON/OFF button. The Cruise Indicator Light in the instrument cluster will illuminate. To turn the system off, push the ON/OFF button a second time. The Cruise Indicator Light will turn off. The system should be turned off when not in use. WARNING! Leaving the Electronic Speed Control system on when not in use is dangerous. You could accidentally set the system or cause it to go faster than you want. You could lose control and have an accident.
OPERATING YOUR VEHICLE • If the button is continually pushed, the set speed will continue to increase until the button is released, then the new set speed will be established. Metric Speed (km/h) • Pushing the RES (+) button once will result in a 1 km/h increase in set speed. Each subsequent tap of the button results in an increase of 1 km/h. • If the button is continually pushed, the set speed will continue to increase until the button is released, then the new set speed will be established.
OPERATING YOUR VEHICLE WARNING! Electronic Speed Control can be dangerous where the system cannot maintain a constant speed. Your vehicle could go too fast for the conditions, and you could lose control and have an accident. Do not use Electronic Speed Control in heavy traffic or on roads that are winding, icy, snow-covered or slippery. PARKVIEW REAR BACK-UP CAMERA You can see an on-screen image of the rear of your vehicle whenever the shift lever is put into REVERSE.
OPERATING YOUR VEHICLE SIX-SPEED AUTOMATIC TRANSMISSION This electronically-controlled transmission provides a precise shift schedule. The transmission electronics are self-calibrating; therefore, the first few shifts on a new vehicle may be somewhat abrupt. This is a normal condition, and precision shifts will develop within a few hundred miles (kilometers). The transmission shift lever has only PARK, REVERSE, NEUTRAL, and DRIVE shift positions. Manual shifts can be made using the AutoStick shift control.
OPERATING YOUR VEHICLE AUTOMATIC TEMPERATURE CONTROLS (ATC) Automatic Temperature Controls 1 — Rotate Blower Control 2 — Push Air Recirculation Button 3 — Rotate Temperature Control 4 — Push A/C Button 5 — Rotate Mode Control 6 — Push Rear Window Defroster Automatic Operation • Turn the Mode and Blower Controls to the AUTO position. • Select the desired temperature by rotating the Temperature Control. • The system will maintain the set temperature automatically.
OPERATING YOUR VEHICLE POWER SUNROOF The power sunroof switch is located on the overhead console. WARNING! • Never leave children alone in a vehicle, or with access to an unlocked vehicle. Never leave the Key Fob in or near the vehicle, or in a location accessible to children. Occupants, particularly unattended children, can become entrapped by the power sunroof while operating the power sunroof switch. Such entrapment may result in serious injury or death.
OPERATING YOUR VEHICLE Pinch Protect Feature This feature will detect an obstruction in the opening of the sunroof during Express Close operation. If an obstruction in the path of the sunroof is detected, the sunroof will automatically retract. Remove the obstruction if this occurs. Next, push the switch forward and release to Express Close. Venting Sunroof — Express Push and release the Vent button within one half second and the sunroof will open to the vent position.
ELECTRONICS YOUR VEHICLE'S SOUND SYSTEM 1. Uconnect Voice Command Button pg. 72 2. Uconnect Phone Button pg. 70 3. Steering Wheel Audio Controls (Right – Behind Steering Wheel) pg. 68 4. Steering Wheel Audio Controls (Left – Behind Steering Wheel) pg.
ELECTRONICS 5. USB Port on Radio pg. 57 6. Audio Jack pg. 52 7. Front Power Outlet pg. 82 8. USB Port (inside glove box) pg.
ELECTRONICS UCONNECT 130 Uconnect 130 1 2 3 4 5 6 7 8 — — — — — — — — CD Eject Button Seek Down Button Seek Up Button AM/FM Button Disc Mode Button AUX Mode Button Rewind Button Fast Forward Button 9 — Set Clock Button 10 — Audio Settings/Rotate To Tune 11 — Radio Sales Code 12 — Audio Jack 13 — Set Preset/CD Random Play 14 — Station Presets Buttons 15 — ON/OFF/Rotate For Volume NOTE: • Your radio has many features that add to the comfort and convenience for you and your passengers.
ELECTRONICS 5. Push the TUNE/SCROLL control knob to save the changes. 6. Push any button/knob or wait five seconds to exit. Equalizer, Balance And Fade 1. Push the TUNE/SCROLL control knob and “BASS” will display. 2. Rotate the TUNE/SCROLL control knob to select the desired setting. 3. Continue pushing the TUNE/SCROLL control knob to display and set “MID RANGE,” “TREBLE,” “BALANCE” and “FADE.
ELECTRONICS UCONNECT 130 WITH SiriusXM SATELLITE RADIO Uconnect 130 With SiriusXM Satellite Radio 1 — CD Eject Button 2 — Seek Down Button 3 — Seek Up Button 4 — Voice Command Button 5 — Uconnect Phone Button 6 — Station Info Button 7 — Rewind Button 8 — Fast Forward Button 9 — Set Clock Button 10 — Audio Settings/Rotate To Tune 11 — Radio Sales Code 12 13 14 15 16 17 18 19 20 21 — — — — — — — — — — Audio Jack Set Preset/CD Random Play Station Preset Buttons ON/OFF/Rotate For Volume AM/FM Mode Button L
ELECTRONICS Clock Setting 1. Push and hold the TIME button until the hours blink. 2. Turn the TUNE/SCROLL control knob to set the hours. 3. Push the TUNE/SCROLL control knob until the minutes begin to blink. 4. Turn the TUNE/SCROLL control knob to set the minutes. 5. Push the TUNE/SCROLL control knob to save the changes. 6. Push any button/knob or wait five seconds to exit. Equalizer, Balance And Fade 1. Push the TUNE/SCROLL control knob and “BASS” will display. 2.
ELECTRONICS SiriusXM Satellite Radio SiriusXM services require subscriptions, sold separately after the 12-month trial included with the new vehicle purchase. If you decide to continue your service at the end of your trial subscription, the plan you choose will automatically renew and bill at then-current rates until you call SiriusXM at 1-866-635-2349 to cancel. See SiriusXM Customer Agreement for complete terms at www.siriusxm.com. All fees and programming subject to change.
ELECTRONICS UCONNECT 230 Uconnect 230 1 — CD Eject Button 2 — Seek Down Button 3 — Seek Up Button 4 — Scan Radio Stations Button 5 — Voice Command Button 6 — Uconnect Phone Button 7 — Set Clock Button 8 — Station Info Button 9 — Rewind Button 10 — Fast Forward Button 11 — Push To Load CD’s 12 — Audio Settings/Rotate To Tune 13 14 15 16 17 18 19 20 21 22 23 24 — — — — — — — — — — — — Audio Jack Radio Sales Code AUX Mode Button Station Preset Buttons Set Preset Button ON/OFF/Rotate For Volume AM/FM Butto
ELECTRONICS Clock Setting 1. Push and hold the TIME button until the hours blink. 2. Turn the TUNE/SCROLL control knob to set the hours. 3. Push the TUNE/SCROLL control knob until the minutes begin to blink. 4. Turn the TUNE/SCROLL control knob to set the minutes. 5. Push the TUNE/SCROLL control knob to save the changes. 6. Push any button/knob or wait five seconds to exit. Equalizer, Balance And Fade 1. Push the TUNE/SCROLL control knob and “BASS” will display. 2.
ELECTRONICS SiriusXM Satellite Radio SiriusXM services require subscriptions, sold separately after the 12-month trial included with the new vehicle purchase. If you decide to continue your service at the end of your trial subscription, the plan you choose will automatically renew and bill at then-current rates until you call SiriusXM at 1-866-635-2349 to cancel. See SiriusXM Customer Agreement for complete terms at www.siriusxm.com. All fees and programming subject to change.
ELECTRONICS • Pushing the AUX button will change the mode to auxiliary device if the Audio Jack is connected, allowing the music from your portable device to play through the vehicle's speakers. The functions of the portable device are controlled using the device buttons, not the buttons on the radio. However, the volume may be controlled using the radio or portable device.
ELECTRONICS Clock Setting 1. Turn the radio on, then press the screen where the time is displayed. 2. Press the “User Clock” button on the touchscreen or the time display (Navigation radio only). 3. To adjust the hours, press either the “Hour Forward” or “Hour Backward” button on the touchscreen. 4. To adjust the minutes, press either the “Minute Forward” or “Minute Backward” button on the touchscreen. 5. To save the new time setting, press the screen where the word “Save” is displayed.
ELECTRONICS Equalizer, Balance And Fade Audio Control Menu • Push the AUDIO button on the faceplate on the right side of the radio. • Use either the “arrow” buttons on the touchscreen or the cross-hair on the screen to change Balance and Fade. The “CENTER” button on the touchscreen resets the settings. • Press the “Equalizer” button on the Audio Control Menu touchscreen and use either the arrow buttons on the touchscreen or the sliders on the screen to adjust BASS, MID, and/or TREBLE.
ELECTRONICS Radio Operation Radio Operation 1 2 3 4 5 — — — — — Radio Tuner Tabs Individual Presets Search/Browse Radio Station/Track Info Sort Presets 6 7 8 9 — — — — Station Scan Seek Down Direct Tune Seek Up • To access Radio Mode, push the RADIO button on the left side of the faceplate, then press the “AM,” “FM” or “SAT” button at the top of the screen to select the band.
ELECTRONICS • Once the desired station is found, press and hold one of the “PRESET” buttons on the touchscreen in the list to the right, until you hear a confirmation beep. NOTE: If the Presets are not visible on the right side of the screen, press the “PRESETS” button on the touchscreen.
ELECTRONICS Insert a CD/DVD Disc • To insert a disc, push the LOAD button on the faceplate. • With the printed side upwards, insert the disc into the disc slot of the radio. The radio pulls the disc in automatically and closes the flip screen. The radio selects the appropriate mode after the disc is recognized, and starts playing the first track. The display shows “Reading...” during this process.
ELECTRONICS • Press the “Add Music Files to HDD” button on the touchscreen, then press the “Disc” button on the touchscreen in the next screen to start the process. NOTE: • You might need to select the folder or title depending on the CD, then push “DONE” to start the copy process. • The copy progress is shown in the lower left corner of the screen. Copying Music From CD Copying Music From USB • The USB port on the radio face plate allows you to copy files to your hard drive.
ELECTRONICS Copying Pictures To The HDD • Insert either a CD or a USB device containing your pictures in JPEG format. • Push the MY FILES button on the faceplate. • Press the “My Pictures” button on the touchscreen to get an overview of the currently stored images, then press the “Add” button on the touchscreen. • Press the “Disc” or “USB” button on the touchscreen, then select the folders or pictures you wish to copy to the HDD.
ELECTRONICS Playing Music From The HDD • Push the MEDIA button on the faceplate to display the media source tabs at the top of the screen. Press the “HDD” button on the touchscreen. Press the desired track button on the touchscreen to play or press the “SEARCH/BROWSE” button on the touchscreen to search by artist, by album, by song, by genre, from a folder, or from Favorites.
ELECTRONICS Garmin Navigation • Uconnect 430N integrates Garmin’s consumer-friendly navigation into your vehicle. Garmin Navigation includes a database with over six million points of interest. • Press the “NAV” button on the touchscreen in the upper right corner of the screen to access the Navigation system. Garmin Navigation Changing the Navigation Voice Prompt Volume 1. Program a destination. 2.
ELECTRONICS Finding A Place By Spelling The Name • From the Main Navigation Menu press the “Where To?” button on the touchscreen. Next, press the “Points of Interest” button on the touchscreen then press the “Spell Name” button on the touchscreen. • Enter the name of your destination. • Press the “Done” button on the touchscreen. • Select your destination and press the “Go” button on the touchscreen.
ELECTRONICS Following Your Route Your route is marked with a magenta line on the map. If you depart from the original route, your route is recalculated. A speed limit icon could appear as you travel on major roadways.
ELECTRONICS Taking A Detour To take a detour you must be navigating a route. • Press the “back arrow” icon button on the touchscreen multiple times to return to the Main Navigation menu. • Press the “Detour” button on the touchscreen. NOTE: If the route you are currently taking is the only reasonable option, the device might not calculate a detour. Acquiring Satellites The GPS Satellite strength bars indicate the strength of your satellite reception. • Acquiring satellite signals can take a few minutes.
ELECTRONICS Search/Browse • Press the “magnifying glass” button on the touchscreen to search/browse the SiriusXM channel listing by Favorites and Categories such as Song, Artist and Channel Name. The Search/Browse also allows you manage your Favorites. SAT Browse SiriusXM Satellite Radio Favorites (SAT Favorites) You can save 50 favorite songs and 50 favorite artists.
ELECTRONICS Display SAT Favorites List • Press the “Search/Browse” button on the touchscreen and select “Favorites” from the SAT Browse screen. • Press the desired favorites button on the touchscreen to switch the SAT tuner to the corresponding channel.
ELECTRONICS Replay Option Option Description Fast Forward/FW Forwards the content, and works similarly to Rewind/RW. However, Fast Forward/FW can only be used when content has been previously rewound. Replay Time Displays the amount of time in the upper center of the screen by which your content lags the live channel. Live Resumes playback of live content at any time while replaying rewound content.
ELECTRONICS • To access Travel Link, push the MENU button on the faceplate, then the “Travel Link” button on the touchscreen. 1 – Favorites 2 – Forecast 3 – Ski Info 4 – Fuel Prices 5 – Movies 6 – Sports View and store your favorite location, theater and sport teams for quick access. View detailed weather conditions, forecasts and ski/ snowboarding conditions at resorts. View ski and snowboarding conditions at ski resorts. View detailed price information for fuel stations.
ELECTRONICS AUX/USB/MP3 CONTROL There are many ways to play music from MP3 players or USB devices through your vehicle's sound system. The remote USB port, located in the glove box, allows you to connect an AUX/USB into the vehicle's sound system. • Non-Touchscreen Radios: To hear audio from devices connected to the USB port, push the “AUX” button on the radio faceplate.
ELECTRONICS UCONNECT PHONE The Uconnect Phone is a voice-activated, hands-free, in-vehicle communications system with Voice Command Capability (see Voice Command section). • To determine if your vehicle is equipped with Uconnect Phone, push the Uconnect located on the radio faceplate. If your vehicle has this feature, Phone button you will hear a voice prompt. If not, you will see a message on the radio stating “Uconnect phone not available.
ELECTRONICS • You will then be prompted to give the phone pairing a name (each phone paired should have a unique name). • Next you will be asked to give this new pairing a priority of 1 through 7 (up to seven phones may be paired); 1 is the highest and 7 is the lowest priority. The system will only connect to the highest priority phone that exists within the proximity of the vehicle. • You will then need to start the pairing procedure on your cell phone.
ELECTRONICS Receiving A Call — Accept (And End) • When an incoming call rings/is announced on Uconnect, push the “Phone” . button • To end a call, push the “Phone” button . Mute (Or Unmute) Microphone During Call • During a call, push the “Voice Command” button . • After the BEEP, say “mute” (or “mute off”). Transfer Ongoing Call Between Handset And Vehicle • During a call, push the “Voice Command” button . • After the BEEP, say “transfer call.
ELECTRONICS NOTE: U.S. residents visit driveuconnect.com for more info on which voice command features apply to your vehicle. Canadian residents visit driveuconnect.ca for more info on which voice command features apply to your vehicle. • Start a dialogue by pushing the “Voice Command” button , you will hear a beep. The beep is your signal to give a command.
ELECTRONICS While In: Memo Mode Voice Command Example: To switch to the voice recorder mode, say “Memo.” The following are common voice commands for this mode: “New Memo” (to record a new memo) — During the recording, you may push the Voice Command button to stop recording.
ELECTRONICS Bluetooth STREAMING AUDIO If equipped with Uconnect Voice Command, your Bluetooth-equipped iPod devices, cell phones or other media players, may also be able to stream music to your vehicle's speakers. Your connected device must be Bluetooth-compatible, and paired with your radio (see Uconnect Phone for pairing instructions). Non-Touchscreen Radios: Push the “AUX” button on the radio faceplate until “BT” or “Audio Streaming” is displayed on the radio screen.
ELECTRONICS Compass Calibration This compass is self-calibrating, which eliminates the need to set the compass manually. When the vehicle is new, the compass may appear erratic, and the EVIC will display “CAL” until the compass is calibrated. You may also calibrate the compass by completing one or more 360 degree turns (in an area free from large metal or metallic objects) until the “CAL” message displayed in the EVIC turns off. The compass will now function normally.
ELECTRONICS Auto Unlock Doors On Exit To have all of the vehicle doors unlock when any door is opened: • Enter your vehicle and close all the doors, and fasten your seat belt. • Cycle the ignition switch between the LOCK and ON position four times, ending in the LOCK position (do not start the engine). • Push the power door UNLOCK switch to unlock the doors. A single chime will indicate that programming is complete.
ELECTRONICS UNIVERSAL GARAGE DOOR OPENER (HomeLink) • HomeLink replaces up to three hand-held transmitters that operate devices such as garage door openers, motorized gates, lighting or home security systems. The HomeLink unit is powered by your vehicles 12 Volt battery. • The HomeLink buttons that are located in the overhead console or sunvisor designate the three different HomeLink channels. • The HomeLink indicator is located above the center button.
ELECTRONICS Programming A Rolling Code NOTE: For programming Garage Door Openers that were manufactured after 1995. These Garage Door Openers can be identified by the “LEARN” or “TRAIN” button located where the hanging antenna is attached to the Garage Door Opener. It is NOT the button that is normally used to open and close the door. The name and color of the button may vary by manufacturer. 1. Place the ignition switch into the ON/RUN position. 2.
ELECTRONICS Programming A Non-Rolling Code NOTE: For programming Garage Door Openers manufactured before 1995. 1. Turn the ignition switch to the ON/RUN position. 2. Place the hand-held transmitter 1 to 3 inches (3 to 8 cm) away from the HomeLink button you wish to program while keeping the HomeLink indicator light in view. 3. Push and hold the HomeLink button you want to program while you push and hold the hand-held transmitter button. 4. Continue to hold both buttons and observe the indicator light.
ELECTRONICS POWER INVERTER A 115 Volt, 150 Watt AC power inverter is located on the front of the center console. This outlet can power cellular phones, electronics and other low power devices requiring power up to 150 Watts. NOTE: The power inverter is designed with built-in overload protection. If the power rating of 150 Watts is exceeded, the power inverter will automatically shut down. Once the electrical device has been removed from the outlet, the inverter should automatically reset.
ELECTRONICS POWER OUTLET The power outlet is located on the instrument panel below the climate control and is powered when the ignition switch is in the ON/RUN position. The outlet can operate a conventional cigar lighter unit or power accessories designed for use with a standard power outlet adapter. NOTE: • Do not exceed the maximum power of 160 Watts (13 Amps) at 12 Volts. If the 160 Watt (13 Amp) power rating is exceeded, the fuse protecting the system will need to be replaced.
OFF-ROAD CAPABILITIES FOUR-WHEEL DRIVE OPERATION This vehicle has two full time, on-demand, four-wheel-drive (4WD) systems available, Freedom Drive I and Freedom-Drive II. They provide for all-weather, all-terrain capability for added driving security in less-than-ideal road conditions.
OFF-ROAD CAPABILITIES • This can be done on the fly, at any vehicle speed. To deactivate, simply pull on the T-handle one more time. The “4WD Indicator Light” will then turn off.
UTILITY TRAILER TOWING WEIGHTS (MAXIMUM TRAILER WEIGHT RATINGS) Engine/ Transmission 2.0L Auto/Man 2.4L Auto/Man Frontal Area 22 sq ft (2.04 sq m) 22 sq ft (2.04 sq m) Max. GTW (Gross Trailer Wt.) Max. Tongue Wt. (See Note) 1,000 lbs (450 kg) 150 lbs (68 kg) 1,000 lbs (450 kg) 150 lbs (68 kg) 2.4L Auto/Man with Trailer Tow 32 sq ft 2,000 lbs (907 kg) 300 lbs (136 kg) Prep Package (3.0 sq m) (AHC) 2.4L Auto With Freedom Drive 32 sq ft 2,000 lbs (907 kg) 300 lbs (136 kg) II Off Road (3.
UTILITY RECREATIONAL TOWING (BEHIND MOTORHOME, ETC.
WHAT TO DO IN EMERGENCIES ROADSIDE ASSISTANCE Dial toll-free 1-800-521-2779 for U.S. Residents or 1-800-363-4869 for Canadian Residents. • Provide your name, vehicle identification number, license plate number, and your location, including the telephone number from which you are calling. • Briefly describe the nature of the problem and answer a few simple questions. • You will be given the name of the service provider and an estimated time of arrival.
WHAT TO DO IN EMERGENCIES If a problem is detected, the light will come on while the engine is running. Cycle the ignition when the vehicle has completely stopped and the shift lever is placed in the PARK position; the light should turn off. If the light remains lit with the engine running, your vehicle will usually be drivable. However, see an authorized dealer immediately.
WHAT TO DO IN EMERGENCIES NOTE: Tire pressures change by approximately 1 psi (7 kPa) per 12° F (7° C) of air temperature change. Keep this in mind when checking tire pressure inside a garage, especially in the Winter. Example: If garage temperature is 68°F (20°C), and the outside temperature is 32°F (0°C), then the cold tire inflation pressure should be increased by 3 psi (21 kPa), which equals 1 psi (7 kPa) for every 12°F (7°C) for this outside temperature condition.
WHAT TO DO IN EMERGENCIES The light also will turn on when the parking brake is applied with the ignition switch in the ON/RUN position. NOTE: This light shows only that the parking brake is applied. It does not show the degree of brake application. WARNING! Driving a vehicle with the red brake light on is dangerous. Part of the brake system may have failed. It will take longer to stop the vehicle. You could have a collision. Have the vehicle checked immediately.
WHAT TO DO IN EMERGENCIES – Seat Belt Reminder Light When the ignition switch is first turned to the ON/RUN position, this light will turn on for four to eight seconds as a bulb check. During the bulb check, if the driver's seat belt is unbuckled, a chime will sound. After the bulb check or when driving, if the driver or front passenger seat belt remains unbuckled, the Seat Belt Indicator Light will flash or remain on continuously.
WHAT TO DO IN EMERGENCIES – Front Fog Light Indicator This indicator will illuminate when the front fog lights are on. – Vehicle Security Light This light will flash rapidly for approximately 15 seconds when the vehicle security alarm is arming. The light will flash at a slower speed continuously after the alarm is set. The security light will also come on for about three seconds when the ignition is first turned on. – 4WD Indicator This light indicates the vehicle is in 4-wheel drive (4WD) mode.
WHAT TO DO IN EMERGENCIES IF YOUR ENGINE OVERHEATS In any of the following situations, you can reduce the potential for overheating by taking the appropriate action: • On the highways — slow down. • In city traffic — while stopped, shift the transmission to NEUTRAL, but do not increase engine idle speed. NOTE: There are steps that you can take to slow down an impending overheat condition: • If your air conditioner (A/C) is on, turn it off.
WHAT TO DO IN EMERGENCIES JACKING AND TIRE CHANGING WARNING! • Do not attempt to change a tire on the side of the vehicle close to moving traffic. Pull far enough off the road to avoid the danger of being hit when operating the jack or changing the wheel. • Being under a jacked-up vehicle is dangerous. The vehicle could slip off the jack and fall on you. You could be crushed. Never put any part of your body under a vehicle that is on a jack.
WHAT TO DO IN EMERGENCIES Preparations For Jacking 1. Park the vehicle on a firm level surface, avoiding ice or slippery areas. WARNING! Do not attempt to change a tire on the side of the vehicle close to moving traffic, pull far enough off the road to avoid the danger of being hit when operating the jack or changing the wheel. 2. Turn on the Hazard Warning flasher. 3. Set the parking brake. 4. Place the shift lever in PARK (automatic transmission) or REVERSE (manual transmission). 5.
WHAT TO DO IN EMERGENCIES Jacking Instructions WARNING! Carefully follow these tire changing warnings to help prevent personal injury or damage to your vehicle: • Always park on a firm, level surface as far from the edge of the roadway as possible before raising the vehicle. • Turn on the Hazard Warning flasher. • Block the wheel diagonally opposite the wheel to be raised. • Set the parking brake firmly and set an automatic transmission in PARK; a manual transmission in REVERSE.
WHAT TO DO IN EMERGENCIES CAUTION! Do not attempt to raise the vehicle by jacking on locations other than those indicated in the Jacking Instructions for this vehicle. NOTE: Refer to “Tires — General Information” in “Starting And Operating” in the Owner’s Manual on the DVD for further information about the spare tire, it's use, and operation. 1. Remove the scissors jack and lug wrench from the spare wheel as an assembly.
WHAT TO DO IN EMERGENCIES CAUTION! Do not attempt to raise the vehicle by jacking on locations other than those indicated. Do not raise the vehicle until you are sure the jack is securely engaged. 3. Turn the jack screw to the left until the jack can be placed under the jacking location. Once the jack is positioned, turn the jack screw to the right until the jack head is properly engaged with the lift area closest to the wheel to be changed.
WHAT TO DO IN EMERGENCIES 5. Remove the wheel nuts and pull the wheel and wheel covers, where applicable, off the hub. Install the spare wheel and wheel nuts with the cone shaped end of the nuts toward the wheel. Lightly tighten the nuts. WARNING! To avoid the risk of forcing the vehicle off the jack, do not tighten the wheel nuts fully until the vehicle has been lowered. Failure to follow this warning may result in serious injury.
WHAT TO DO IN EMERGENCIES 7. Finish tightening the nuts. Push down on the wrench while at the end of the handle for increased leverage. Tighten the lug nuts in a star pattern until each nut has been tightened twice. The correct wheel nut torque is 100 ft/lbs (135 N·m). If you doubt that you have tightened the nuts correctly, have them checked with a torque wrench by your authorized dealer or service station 8. Remove the wheel blocks and lower the jack until it is free. Release the parking brake.
WHAT TO DO IN EMERGENCIES Road Tire Installation Vehicles Equipped With Wheel Covers 1. Mount the road tire on the axle. 2. Align the valve notch in the wheel cover with the valve stem on the wheel. Install the cover by hand. Do not use a hammer or excessive force to install the cover. 3. Install the five wheel lug nuts with the cone shaped end of the nut toward the wheel. Lightly tighten the lug nuts.
WHAT TO DO IN EMERGENCIES Vehicles Without Wheel Covers 1. Mount the road tire on the axle. 2. Install the remaining lug nuts with the cone shaped end of the nut toward the wheel. Lightly tighten the lug nuts. WARNING! To avoid the risk of forcing the vehicle off the jack, do not fully tighten the lug nuts until the vehicle has been lowered. Failure to follow this warning may result in serious injury. 3. Lower the vehicle to the ground by turning the jack handle counterclockwise. 4.
WHAT TO DO IN EMERGENCIES Preparations For Jump-Start The battery in your vehicle is located in the front of the engine compartment below the air intake duct. To access the battery remove the air intake duct by turning the two finger screws, located on the radiator support.
WHAT TO DO IN EMERGENCIES WARNING! • Take care to avoid the radiator cooling fan whenever the hood is raised. It can start anytime the ignition switch is ON. You can be injured by moving fan blades. • Remove any metal jewelry such as rings, watch bands and bracelets that could make an inadvertent electrical contact. You could be seriously injured. • Batteries contain sulfuric acid that can burn your skin or eyes and generate hydrogen gas which is flammable and explosive.
WHAT TO DO IN EMERGENCIES 4. Connect the opposite end of the negative (-) jumper cable to a good engine ground (exposed metal part of the discharged vehicle’s engine) away from the battery and the fuel injection system. WARNING! Do not connect the jumper cable to the negative (-) post of the discharged battery. The resulting electrical spark could cause the battery to explode and could result in personal injury. Only use the specific ground point, do not use any other exposed metal parts. 5.
WHAT TO DO IN EMERGENCIES 4. Turn the ignition switch to the ACC or ON/RUN position, but do not start the engine. 5. Press and maintain firm pressure on the brake pedal. 6. Insert the screwdriver or similar tool into the access port, and push and hold the override release lever forward. 7. Move the shift lever to the NEUTRAL position. 8. The vehicle may then be started in NEUTRAL. 9. Reinstall the shift lever override access cover.
WHAT TO DO IN EMERGENCIES FREEING A STUCK VEHICLE If your vehicle becomes stuck in mud, sand or snow, it can often be moved using a rocking motion. Turn the steering wheel right and left to clear the area around the front wheels. Then shift back and forth between DRIVE and REVERSE (with automatic transmission) or 2nd gear and REVERSE (with manual transmission), while gently pressing the accelerator.
WHAT TO DO IN EMERGENCIES ENHANCED ACCIDENT RESPONSE SYSTEM (EARS) This vehicle is equipped with an Enhanced Accident Response System. Please refer to “Supplemental Restraint System (SRS) — Air Bags” in “Getting Started” in this guide for further information on the Enhanced Accident Response System (EARS) function. EVENT DATA RECORDER (EDR) This vehicle is equipped with an event data recorder (EDR).
MAINTAINING YOUR VEHICLE TO OPEN AND CLOSE THE HOOD To open the hood, two latches must be released. 1. Pull the hood release lever located on the left kick panel. 2. Move the safety latch, located outside the vehicle under the front edge of the hood, toward the center and raise the hood. Lift the hood prop rod, clipped to the right side (left side facing hood) of the engine compartment to secure the hood in the open position. Place the hood prop at the location stamped into the inner hood surface.
MAINTAINING YOUR VEHICLE ENGINE COMPARTMENT — 2.0L 1. Washer Fluid Reservoir 2. Brake Fluid Reservoir 3. Integrated Power Module (Fuses) 4. Air Cleaner Filter 5.
MAINTAINING YOUR VEHICLE 6. Engine Oil Fill 7. Engine Coolant Pressure Cap 8. Engine Oil Dipstick 9. Engine Coolant Reservoir 10.
MAINTAINING YOUR VEHICLE ENGINE COMPARTMENT — 2.4L 1. Washer Fluid Reservoir 2. Brake Fluid Reservoir 3. Integrated Power Module (Fuses) 4. Air Cleaner Filter 5.
MAINTAINING YOUR VEHICLE 6. Engine Oil Fill 7. Engine Coolant Pressure Cap 8. Engine Oil Dipstick 9. Engine Coolant Reservoir 10.
MAINTAINING YOUR VEHICLE FLUID CAPACITIES U.S. Metric Fuel (Approximate) 13.6 Gallons 51 Liters Engine Oil with Filter 2.0L and 2.4L Engine 4.5 Quarts 4.26 Liters (SAE 5W-20, API Certified) Cooling System * 2.0L and 2.4L Engine (MOPAR Antifreeze/ Engine Coolant 10 Year/ 7.2 Quarts 6.8 Liters 150,000 Mile Formula or equivalent) * Includes heater and coolant recovery bottle filled to MAX level.
MAINTAINING YOUR VEHICLE CAUTION! • Mixing of engine coolant (antifreeze) other than specified Organic Additive Technology (OAT) engine coolant (antifreeze), may result in engine damage and may decrease corrosion protection. Organic Additive Technology (OAT) engine coolant is different and should not be mixed with Hybrid Organic Additive Technology (HOAT) engine coolant (antifreeze) or any “globally compatible” coolant (antifreeze).
MAINTAINING YOUR VEHICLE MAINTENANCE PROCEDURES For information on the maintenance procedures for your vehicle, please refer to “Maintenance Procedures” in “Maintaining Your Vehicle” in your Owner’s Manual or applicable supplement on the DVD for further details. MAINTENANCE SCHEDULE Your vehicle is equipped with an automatic oil change indicator system. The oil change indicator system will remind you that it is time to take your vehicle in for scheduled maintenance.
MAINTAINING YOUR VEHICLE Once A Month Or Before A Long Trip: • Check engine oil level • Check windshield washer fluid level • Check the tire inflation pressures and look for unusual wear or damage • Check the fluid levels of the coolant reservoir, brake master cylinder, power steering and fill as needed • Check function of all interior and exterior lights Required Maintenance Intervals. Refer to the maintenance schedules on the following page for the required maintenance intervals.
X Inspect brake linings, replace if necessary. Check park brake function, adjust if necessary. X Change the automatic transmission fluid and filter. (CVT only) X Change automatic transmission fluid and filter if using your vehicle for any of the following: police, taxi, fleet, or frequent trailer towing. (CVT only) X X X X X Replace power transfer unit (PTU) fluid. X X 50,000 X X 40,000 X 60,000 Replace rear drive assembly (RDA) fluid.
48,000 20,000 32,000 Or Kilometers: 70,000 60,000 50,000 40,000 30,000 90,000 80,000 X • You can be badly injured working on or around a motor vehicle. Do only service work for which you have the knowledge and the right equipment. If you have any doubt about your ability to perform a service job, take your vehicle to a competent mechanic. • Failure to properly inspect and maintain your vehicle could result in a component malfunction and effect vehicle handling and performance.
120 20,000 Miles (32,000 km) or 2 Years 30,000 Miles (48,000 km) or 3 Years 40,000 Miles (64,000 km) or 4 Years 50,000 Miles (80,000 km) or 5 Years 60,000 Miles (96,000 km) or 6 Years 70,000 Miles (112,000 km) or 7 Years 80,000 Miles (128,000 km) or 8 Years Odometer MAINTENANCE RECORD Date Signature, Authorized Service Center 90,000 Miles (144,000 km) or 9 Years 100,000 Miles (160,000 km) or 10 Years 110,000 Miles (176,000 km) or 11 Years 120,000 Miles (192,000 km) or 12 Years 130,000 Miles (208,000 km)
MAINTAINING YOUR VEHICLE FUSES WARNING! • When replacing a blown fuse, always use an appropriate replacement fuse with the same amp rating as the original fuse. Never replace a fuse with another fuse of higher amp rating. Never replace a blown fuse with metal wires or any other material. Failure to use proper fuses may result in serious personal injury, fire and/or property damage.
MAINTAINING YOUR VEHICLE 122 Cavity 12 Cartridge Fuse – Mini-Fuse 20 Amp Yellow 13 14 15 16 – – 40 Amp Green – 20 Amp Yellow 10 Amp Red – 15 Amp Lt Blue 17 – 10 Amp Red 18 19 20 21 40 Amp Green – – – – 20 Amp Yellow 15 Amp Lt Blue 10 Amp Red 22 23 24 – – – 10 Amp Red 15 Amp Lt Blue 15 Amp Lt Blue 25 – 10 Amp Red 26 27 – – 15 Amp Lt Blue 10 Amp Red 28 – 10 Amp Red 29 – – 30 – 20 Amp Yellow 31 – 10 Amp Red 32 33 30 Amp Pink – – 10 Amp Red 34 35 36 30 Amp Pink 40 Amp Gree
MAINTAINING YOUR VEHICLE CAUTION! • When installing the IPM cover, it is important to ensure the cover is properly positioned and fully latched. Failure to do so may allow water to get into the IPM, and possibly result in an electrical system failure. • When replacing a blown fuse, it is important to use only a fuse having the correct amperage rating. The use of a fuse with a rating other than indicated may result in a dangerous electrical system overload.
MAINTAINING YOUR VEHICLE WARNING! • Overloading of your tires is dangerous. Overloading can cause tire failure, affect vehicle handling, and increase your stopping distance. Use tires of the recommended load capacity for your vehicle. Never overload them. • Improperly inflated tires are dangerous and can cause collisions. Underinflation increases tire flexing and can result in over-heating and tire failure. Over-inflation reduces a tire’s ability to cushion shock.
MAINTAINING YOUR VEHICLE Do not install a wheel cover or attempt to mount a conventional tire on the compact spare wheel, since the wheel is designed specifically for the compact spare tire. Do not install more than one compact spare tire and wheel on the vehicle at any given time. WARNING! Compact spares are for temporary emergency use only. With these spares, do not drive more than 50 mph (80 km/h). Temporary use spares have limited tread life.
MAINTAINING YOUR VEHICLE WHEEL AND WHEEL TRIM CARE All wheels and wheel trim, especially aluminum and chrome plated wheels, should be cleaned regularly with a mild soap and water to prevent corrosion. To remove heavy soil and/or excessive brake dust, use MOPAR Wheel Cleaner or equivalent or select a non-abrasive, non-acidic cleaner. CAUTION! Do not use scouring pads, steel wool, a bristle brush, or metal polishes. Do not use oven cleaner. These products may damage the wheel's protective finish.
CUSTOMER ASSISTANCE FCA US LLC CUSTOMER CENTER P.O. Box 21–8004 Auburn Hills, MI 48321–8004 Phone: 1-877-426-5337 FCA CANADA INC. CUSTOMER CENTER P.O. Box 1621 Windsor, Ontario N9A 4H6 Phone: 1-800-465-2001 (English) Phone: 1-800-387-9983 (French) ASSISTANCE FOR THE HEARING IMPAIRED To assist customers who have hearing difficulties, the manufacturer has installed special TDD (Telecommunication Devices for the Deaf) equipment at its customer center.
CUSTOMER ASSISTANCE • Replacement User Guide kits or DVDs or, if you prefer, additional printed copies of the Owner's Manual, Warranty Booklet or Radio Manuals may be purchased by visiting www.techauthority.com or by calling 1-877-890-4038 (U.S.) or 1-800-387-1143 (Canada). Visa, Master Card, American Express and Discover orders are accepted. If you prefer mailing your order, please call the above numbers for an order form. NOTE: • A street address is required when ordering manuals (no P.O. Boxes).
MOPAR® ACCESSORIES AUTHENTIC ACCESSORIES BY MOPAR In choosing Authentic Accessories you gain far more than expressive style, premium protection, or extreme entertainment, you also benefit from enhancing your vehicle with accessories that have been thoroughly tested and factory-approved. The following highlights just some of the many Authentic Jeep Accessories by MOPAR featuring a fit, finish, and functionality specifically for your Jeep Compass.
FAQ FREQUENTLY ASKED QUESTIONS GETTING STARTED • How do I install my LATCH Equipped Child Seat? pg. 18 • How do my heated seats operate? pg. 27 ELECTRONICS • Which radio is in my vehicle? • Uconnect 130 pg. 44 • Uconnect 130 with Satellite Radio pg. 46 • Uconnect 230 pg. 49 • Uconnect 430/430N pg. 52 • How do I activate the Audio Jack? • Uconnect 130 pg. 51 • Uconnect 130 with Satellite Radio pg. 51 • Uconnect 230 pg. 51 • Uconnect 430/430N pg. 57 • How do I set the clock on my radio? • Uconnect 130 pg.
FAQ MAINTAINING YOUR VEHICLE • Where is my Fuse Block located? pg. 121 • What type of oil do I use? pg. 114 • How often should I change my engine’s oil? pg. 116 • What should my tire pressure be set at? pg.
INDEX Adding Engine Coolant (Antifreeze). . . . . . . . . . . . .116 Adding Washer Fluid . . . . . . . . .116 Adjust Down . . . . . . . . . . . . . . . . .24 Forward . . . . . . . . . . . . . . .24 Rearward . . . . . . . . . . . . . .24 Up . . . . . . . . . . . . . . . . . .24 Air Bag Advanced Front Air Bag . . . . . .14 Advance Front Air Bag . . . . . .14 Air Bag Components . . . . . . . .14 Air Bags . . . . . . . . . . . . . . .14 Air Bag Warning Light . . . . .14, 17 Enhanced Accident Response . . . . .
INDEX Electronic Stability Control (ESC) Activation/Malfunction Indicator Light . . . . . . . . . . . . . . . .91 Electronic Throttle Control (ETC) Indicator Light . . . . . . . . . . .87 Front Fog Light Indicator . . . . .92 High Beam Indicator . . . . . . .91 Instrument Cluster Warning Lights . . . . . . . . . . . . . . . .87 Malfunction Indicator Light (MIL) . . . . . . . . . . . . . . . . .91 Oil Pressure Warning Light . . . .87 Tire Pressure Monitoring System (TPMS) Light . . . . . . . . . . . .
INDEX Four Wheel Drive Operation . Freeing A Stuck Vehicle . . . Fuel Capacity . . . . . . . . . . Octane Rating . . . . . . Tank Capacity . . . . . . Fuses. . . . . . . . . . . . . . . . . . .83 . . . .107 . . . . . . . . . . . . .114 .114 .114 .121 Garage Door Opener (HomeLink) . . . . . . . . . . .78, 80 Gasoline (Fuel) . . . . . . . . . . . .114 Gear Select Lever Override. . . . . .105 General Maintenance. . . . . . . . .116 Glass Cleaning . . . . . . . . . . . .116 GPS Navigation (Uconnect GPS) .
INDEX Hill Descent Control Indicator . .92 Instrument Cluster . . . . . . . .30 Low Fuel . . . . . . . . . . . . . .87 Seat Belt Reminder . . . . . . . .91 Security Alarm . . . . . . . . . . .92 Tire Pressure Monitoring (TPMS) . . . . . . . . . . . . . . .88 Transmission Warning . . . . . . .90 Turn Signal . . . . . . . . . .30, 31 Locks Liftgate, Tailgate . . . . . . . . . .10 Lubrication, Body . . . . . . . . . . .116 Lumbar Support . . . . . . . . . . . .26 Maintenance Free Battery . . . . . .
INDEX Replacement Bulbs. . . . . . . . . .126 Reporting Safety Defects. . . . . . .128 Restraint, Head . . . . . . . . . . . . .22 Roll Over Warning . . . . . . . . . . . .4 Stuck, Freeing. . . . . . . . . . . . .107 Sun Roof . . . . . . . . . . . . . . . .40 Supplemental Restraint System - Air Bag . . . . . . . . . . . . . . . . . .14 Satellite Radio (Uconnect Studios) . . . . . . . . . .46, 48, 51 Schedule, Maintenance . . . . . . .116 Seat Belt Seat Belt Pretensioner . . . . . .
INDEX Warning, Roll Over . . . . . . . . . . . .4 Washer Adding Fluid . . . . . . . . . . .116 Washers, Windshield . . . . . . . . . .33 Washing Vehicle. . . . . . . . . . . .116 Wheel And Wheel Trim . . . . . . . .116 Wheel And Wheel Trim Care. .116, 126 Wind Buffeting . . . . . . . . . . . . .41 Windshield Washers . . . . . . . .32, 33 Windshield Wiper Blades . . . . . .116 Windshield Wipers . . . . . . . . . . .32 Wiper Blade Replacement . . . . . .116 Wipers, Intermittent . . . . . . . . . .
NOTES 138
NOTES 139
NOTES 140
NOTES 141
NOTES 142
NOTES 143
NOTES 144
This guide has been prepared to help you get quickly acquainted with your new Jeep ® Brand Vehicle and to provide a convenient reference source for common questions. However, it is not a substitute for your Owner’s Manual. For complete operational instructions, maintenance procedures and important safety messages, please consult your Owner’s Manual, Navigation/Uconnect Manuals and other Warning Labels in your vehicle.
Jeep.com (U.S.) Jeep.ca (Canada) DOWNLOAD A FREE ELECTRONIC COPY of the Owner’s Manual and Warranty Booklet by visiting: www.jeep.com/en/owners/manuals or www.jeep.com/en/warranty (U.S.); www.owners.mopar.ca/en (Canada). © 2015 FCA US LLC. All Rights Reserved. Jeep is a registered trademark of FCA US LLC. 16MK49-926-AA Compass Second Edition Rev 1 User Guide 2016 CO MPASS U S E R GU I DE 2126532_16b_Brandsite_Compass_UG_080415.