
Instructions / Assembly
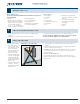
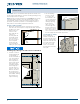
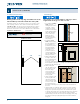
Table Of Contents

4
3
Installation Instructions
for Interior Door Slabs (JII110)
TITLE 1
3. The latch stile/edge
may have a pre-cut
2˚ or 3˚ bevel. This
bevel maintains a 1/8"
clearance between the
strike jamb and latch
stile/edge, improving
the t when the
slab is closed. If the
latch stile/edge is not
beveled, and a bevel is
preferred, use a wood
plane or ne-toothed
saw to cut a bevel so that the slab face that rests against the stop
becomes slightly narrower than the oppositeface.
Test Slab Fit in Jambs
Before installing any
hardware, t the slab into
the frame and verify it will
t properly. Looking at the
hinge side of the slab when
it is closed, there should
be a min. of 1/16" and
a min. of 1/8" between
the slab and the head and
strike jamb.
INSTALL SLAB
IMPORTANT: The door slab should be nished (painted or stained) on all
six sides with an equal number of coats after all routing, trimming, boring
and touch-ups have been completed.
NOTE: If hinges are already installed on the slab, DO NOT remove hinges
for nishing. Failure to nish on all six sides and install into a square,
level and plumb condition could result in denial of warranty claims for
operational or performance problems. See our nishing document at
www.jeld-wen.com for nishing requirements and details.
Prepare Jambs and Slab
1. Measure the existing frame (not the stop) from oor to head and
from side to side in several places to verify the slab will t. The frame
should be 3/16" wider
than the slab (1/16"
clearance on the
hinge jamb and 1/8"
clearance on
the strike jamb) and
tall enough (usually
3/8"-1/2" taller) to
allow 1/8" clearance
on the head jamb
and allow the slab
to operate without
rubbing on any ooring.
Frame
Stop
Bottom
rail
Stile
1/4"
1/4"
1/4"
Top rail
Trim-able
portion
Trim-able
portion
Slab
Bevel
Stop
1/16"
1/8"
1/8"
Trimming any other type of slab is NOT recommended.
2. A hollow or solid core
molded and ush slab
can be trimmed, if
needed. A maximum of
1/4" can be trimmed
from each edge. For
the best appearance,
trim an equal amount
from opposite sides.
To minimize chipping,
stick masking tape
along the cut line to
each face of the slab.
Make the cuts with a
ne-toothed circular
saw (height) and wood
plane (width). Trimming
beveled edges may
require re-beveling.