
Installation Guide


INSTALLATION INSTRUCTIONS
for Replacement Exterior Entry Doors (JII113)
5
INSTALL DOOR
4
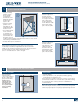
INSTALL WEATHERSTRIP STOPS
1. On the exterior,
measure the head
at the inside of the
jambs and cut a stop
to fit.
2. Make sure door is
latched in closed
position. Set the stop
with the weatherstrip
against the door
(projecting side up)
until the weatherstrip
is compressed on
the door. If the gap
is too large for the
weatherstrip to
properly contact
the door, the
weatherstrip can
be positioned 1/16"
lower by removing
the weatherstrip from
the stop and flipping
the stop over. Push
the weatherstrip
back into the stop
and secure 2" from
each end and in the
middle with three
6d galvanized finish
nails.
3. The jamb
weatherstrip stops
will be installed in
a similar manner as
the head stop. The
stops have a pre-cut
bevel on both ends
to conform to the
sill profile. Make
sure when trimming,
the bevel is on the
correct end. Measure
between the bottom
of the head trim and
the top of the new sill
and cut jamb stops to fit. At the head, trim the jamb weatherstrip to
fit around the head weatherstrip. Secure with five of the provided 6d
galvanized finish nails on each jamb.
4. Run a continuous
bead of sealant
where each stop
meets the existing
jambs.
Warning! To avoid injury, use at least two people to install. Adequately
support the door until fully installed.
1. Apply a 3/8"
continuous bead
of sealant to the
interior face the
existing jambs. From
the inside, tilt the
entire pre-hung door
into the center of the
opening.
2. Temporarily fasten
the door by driving
a 6d common nail
through four narrow
slots in the nailing fin
into existing jambs
(not into drywall). Do
not completely set
nails yet.
3. Remove the shipping
clip. Be sure the
door opens freely
and that the space
between the door
and the jamb is even
on all sides. Adjust if
necessary.
4. Install one of the
provided #9 x 2 1/2"
screws in the top
hinge through the
open hole as shown,
driving it through
the hinge jamb and
into the studs.
5. In the same manner,
install one screw
into each of the
remaining hinges.
6. Verify the door
unit is square, then
securely fasten the strike jamb through each pre-drilled hole with the
provided #9 x 2 1/2" screws. Use the deadbolt strike supplied with the
door (not the one that comes with the lockset) and latch strike from
lockset. Drive screws through all four holes.
7. If adjusting is necessary, loosen the appropriate fasteners and adjust
until the unit is square.
8. Completely drive in temporary fasteners and drive additional nails
through the remaining narrow slots in the frame.
9. Install lockset hardware per manufacturer's instructions.
Fastener
Interior
Fastener
Weatherstrip
Install screw
Top
Hinge
Shown
Ideal Compression
Dashed Line
Shows Flipped
Position
Head stop
Jamb
stop
Measure
Sealant
joints
Replacement
door
Interior
Existing
jamb
Stop
Nailing
fin
Jamb
stop
Bevel
Measure
height
here