
Installation Guide
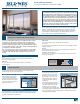


INSTALLATION INSTRUCTIONS
for Aluminum Windows with Nailing Fin (JII004)
5
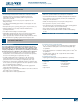
SECURE WINDOW
Areas such as Florida and the Texas TDI region have different anchoring
requirements based on product certification. For information on specific
products, visit www.floridabuilding.org or www.tdi.texas.gov and
follow the anchoring schedule given in the drawings for the product
instead of the anchoring schedule in this document.
Note! Fastener (anchor) heads must be flush. Do not dent nailing fin.
• Fasten windows through the
nail n holes 3" - 7" from
the corners and 8" apart all
the way around the window.
• Remove the shims from the
side jambs.
INSTALL WINDOW - CONTINUED
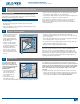
FLASH WINDOW - WINDOWS INSTALLED INTO STUD-FRAMING ONLY
5
6
APPLY THE SELF-ADHESIVE FLASHING
Note! Keep the edge of the
self-adhesive flashing as
close to the window frame as
possible and apply over the
nail fin.
1. Apply the side pieces
starting 3" above the header
and overlap the ashing on
the sill as shown.
2. Install drip cap if required.
Pre drill through the nailing
n if required.
3. Center and apply the header
piece above the header,
overlapping the side pieces
as shown.
4. Press the ashing down with
a J-roller, being careful to
remove any gaps or bubbles
beneath self-adhesive
ashing (remove and
replace if necessary).
SPRAY ADHESIVE/PRIMER
Protect window from
overspray and apply spray
adhesive according to
instructions on the product to
nailing n and building wrap
around the window as shown.
S
p
r
a
y
A
d
h
e
s
i
v
e
Cut pieces of self-adhesive ashing as follows:
MIN. SIZES OR
OTHER SPECIFIED
PG50 or below
(4" flashing)
Above PG50
(6" flashing)
One header piece 10" longer than
theheader
14" longer than
theheader
Two side pieces 8" longer than
thejamb
12" longer than
thejamb
Window
Window
Mull joint
Nail n
#10 x 1 1/2" Truss head screw
4"
4" 4"
8"
3"- 7"
3"
1"
1"
Flashing
Width of ashing
See
table