
How to Guide


PRODUCT GUIDE
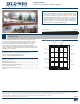
Aluminum Sliding/Rolling Windows (JPG003)
2
NEEDED TOOLS
Note! Each tool is not required for every task.
• Screwdrivers
• Allen wrenches
• Drill with bits
• Prying tool
• Tape measure
• 2' or 4' Level
• Putty knife
• Utility knife
• Follow all manufacturers’ instructions and labels.
• Use proper and safe equipment and precautions when cleaning and
servicing the exterior side of windows above ground level.
• Window insect screens are not security devices and will not prevent a
child, other person, or pet from falling through.
• Use extra care when driving screws near glass unit to avoid breakage.
• Use caution when tightening screws to avoid stripping the
screwholes.
• Sash removal can be awkward and could cause physical injury or
product damage; we recommend the help of a second person.
PRECAUTIONS AND SAFETY
NEEDED TOOLS AND MATERIALS
SASH REMOVAL AND INSTALLATION
NEEDED MATERIALS
• String
• Tape
OPERATING SASH REMOVAL AND INSTALLATION
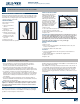
REMOVAL
1. On the interior,
unlock sash and
glide to the middle
or further.
2. Lift sash up and
over bottom track
and remove to
theinterior.
INSTALLATION
1. Verify the
lock is in the
unlockedposition.
2. In an open position,
place the top of
the sash into the
interior track of the head jamb.
3. Push up into the track and then swing the bottom of the sash over
the sill and into the interior sill track.
4. Test operation. Remove and replace if necessary.
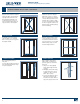
FIXED SASH REMOVAL AND INSTALLATION
Some xed sashes are not removable, but have the glass xed, or
directly set, in the frame. Call us for replacement options. If the xed
sash is removable, it will be held in place to the jamb with screws or
screws and brackets.
REMOVAL
1. From the interior, Remove operating sash as described above.
2. Remove inside screw in xed sash (if applicable) and set aside
forreinstallation.
3. From the exterior, Locate screws in xed sash; remove and set aside
for reinstallation.
4. If the sash is held in place with brackets, remove the screws
andbrackets.
5. Slide sash open half way.
6. Lift sash up and over sill track.
INSTALLATION
1. Set top rail into the header track; carefully drop sash into sill track.
2. Slide sash back into its original position. Verify the sash is square in
the frame.
3. If the sash was held in place with brackets, apply silicone sealant
around each bracket.
4. Line each screw up with screw holes in the frame; drive screws
through the sash to secure.
5. Install operating sash.
6. Test operation. Remove and replace if necessary.