
Operating Guide

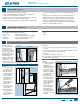


PRODUCT GUIDE
Aluminum Single-Hung Windows (JPG002)
4
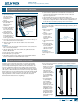
BLOCK & TACKLE BALANCE
REMOVAL
3FNPWFUIFTBTI
as explained in
“SASH REMOVAL &
INSTALLATION.”
2. Tightly grip both
ends of balance.
Pull down to release
balance top from
metal takeout clip.
'JSNMZIPMECPUI
ends of balance (do
not grip underside of
CBMBODFPSJOKVSZNBZ
result), and allow
balance to lift up to
release tension.
4. Remove cord hook
on bottom back
side of balance
from mounting hole
JOTJEFKBNCBOE
remove balance.
INSTALLATION
3FWFSTFSFNPWBMTUFQTGPSUIFCBMBODF
2. Reinstall sash.
5FTUTBTIPQFSBUJPOBOENBLFTVSFMPDLGVMMZFOHBHFT*GUIFTBTIEPFT
not move freely or the lock does not engage, remove and reinstall.
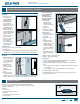
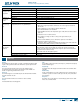
SPIRAL BALANCE
REMOVAL
8JUIUIFTBTIDMPTFE
remove sash stop (if
present) by pulling
on one end until it
comes out.
2. Lift and pull off
balance cover (if
present) to expose
balance.
$PNQMFUFMZPQFO
sash.
4. Grip bottom end
of spiral rod with
BEKVTUNFOUUPPM1VMM
EPXOUIFOMJGUPVUPGDMJQDMJQSFNBJOTBUUBDIFEUPTBTICPUUPN
Note! If you do not
have a spiral balance
adjustment tool,
use locking needle
nose pliers, but with
extreme caution.
5JHIUMZIPME
BEKVTUNFOUUPPM
and allow spiral
rod to move up and
unwind.
-PXFSTBTI
7. At the top, unscrew
and remove balance.
INSTALLATION
4DSFXUPQPGOFX
balance into place in
TJEFKBNC
2. Raise sash all the
way.
(SJQCPUUPNFOE
of spiral rod with
BEKVTUNFOUUPPM1VMM
down and rotate
clockwise six turns to
set tension. Maintain
grip on tool for next
step.
4. Pull spiral rod down
and fully engage into
clip.
3FQMBDFCBMBODFDPWFSJGQSFTFOU
3FQMBDFTBTITUPQJGQSFTFOU
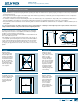
ADJUSTMENT
%JTDPOOFDUTQJSBMSPEGSPNDMJQXJUIBEKVTUNFOUUPPMBTEFTDSJCFE
above in “SPIRAL BALANCE REMOVAL” above.
"EKVTUBTGPMMPXTCVUEPOPUFYDFFENPSFUIBOUXPGVMMUVSOTBUB
time:
If sash drops, rotate clockwise to add tension. Add tension to both t
sides equally.
If sash pops up, rotate counter-clockwise to decrease tension.t
3FDPOOFDUTQJSBMSPEJOUPDMJQ
4. Reinstall sash and test operation. If necessary, repeat process until
sash operates smoothly.
BALANCE REPLACEMENT & ADJUSTMENT - CONTINUED
LOCK REPLACEMENT
The lock sits on the top rail of the lower sash and engages into
the frame. The lock keeper is part of the frame and not a separate
hardware component.
Removal
6OMPDLTBTI
2. Unscrew and remove old lock.
Installation
*OTUBMMOFXMPDLJOUIFTBNFQMBDF
2. Test operation.
Sash
stop
Balance
cover
Spiral
Balance
Adjust-
ment
Tool
Balance
clip
Balance rod
"EKVTUNFOUUPPM
Sash