
How to Guide


PRODUCT GUIDE
Aluminum Sliding/Rolling Windows (JPG003)
3
HARDWARE REPLACEMENT AND ADJUSTMENT
HARDWARE REPLACEMENT & ADJUSTMENT
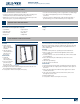
Replace the lock if it is broken. The lock sits on the meeting stile of the
operating sash and engages into the frame, or the meeting stile of the
fixed sash. The lock keeper is part of the frame/fixed sash and is not a
separate hardware component.
LOCK REPLACEMENT
Unlock and open sash or
remove sash.
1. Unscrew and remove
oldlock.
2. Install new lock in the
same place.
If replacing the sash:
1. Measure old screw holes
on old sash and carefully
transfer to new sash.
2. Pre-drill holes with a
1/16"bit.
3. Install lock on sash.
4. Reinstall sash and test operation.
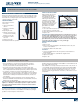
GLIDE BUTTON ADJUSTMENT
Many windows do not have
adjustable glide buttons.
This adjustment only applies
to glide buttons with an
Allen key, all others are not
adjustable (some windows
use rollers instead of glide
buttons; these rollers are not
adjustable). Adjust the sash
by raising or lowering the
glide buttons as follows.
1. Remove sash.
2. Use a 5/32" Allen wrench to raise or lower the glide button.
3. Turn clockwise to lower the sash.
4. Turn counterclockwise to raise the sash.
5. Replace sash.
Important Note! Adjusting glide buttons too high will increase risk of
air/water leaks. Adjusting the buttons too low can cause sash to drag
on lower track. Ideal adjustment for sash is as low as possible but
just high enough to avoid drag. Keep the stiles parallel to frame. One
glide button may need to be raised and one lowered. Check by almost
closing the sash and looking for an even, parallel gap.
GLIDE BUTTON REPLACEMENT
Removal
1. Remove sash.
2. Remove the screw attaching the sash lift button to the sash; save
screws for reinstallation.
3. Carefully pry button off sash bottom.
Installation
1. Set new sash lift button in the same position and orientation as
previous button.
2. Secure sash lift button to sash with the original screws.
3. Adjust as necessary.
4. Replace sash.
Glide button
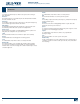
PROPER WINDOW INSTALLATION
Side jamb
Head jamb
Head jamb
Measure
here
• Proper installation is essential for keeping windows operating
smoothly. If a window fails to operate properly, an inspection is
necessary to determine if it was installed correctly.
• These inspection instructions apply to at window types. Bow
windows, bay windows, and unusual geometric-shaped windows are
more complicated and should be inspected by a window professional.
• A contractor or installer can assist in determining the cause of a
window being “out of specication” and possibly correct it. Window
problems due to improper installation are usually not covered by the
manufacturer’s warranty. For installation instructions, contact us or
your supplier.
• The specications and measurements referenced in this guide are
taken from ASTM E2112 Standard Practice for Installation of Exterior
Windows, Doors and Skylights.
Note: These instructions do not address inspection for proper “water
tightness” or flashing. A “water tight” inspection requires removal of
the exterior siding around the window. Seek professional assistance
regarding this issue.
LEVEL INDICATOR
Accurate measurements are essential in determining level and plumb.
Most carpenters' levels have several bubble level indicators, making it
possible to measure all parts of the window.
Examine the horizontal indicator. If the bubble is centered between the
lines of the indicator, it is level.
If the bubble is not exactly centered, measure how far “out of level” or
“out of plumb” by maneuvering the end of the level until the bubble
is exactly centered. Measure the farthest gap between the level and
the surface. On a 2' level, the gap must not exceed 1/16", or on a 4'
level (or longer), the gap must not exceed 1/8", or the surface is out of
level/plumb.