
Installation Guide
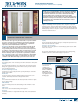


INSTALLATION INSTRUCTIONS
for Swinging French and Patio Doors (JII105)
4
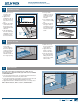
2. Mark a line across
the front and back
of the sill pan.
3. Apply three 3/8"
beads of sealant
between the lines.
4. Place the sill pan in
the rough opening.
Firmly press the sill
pan into the sealant
with a J-roller.
1. Set the sill pan
in the rough
opening, aligning
the front edge (for
continuous slab) or
folded down edge
(for step down)
with the exterior of
the rough opening.
4
INSTALL SILL PAN
Sealant
5
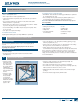
PREPARE BUCK
5. For step-down
landings, cut 1/2" in
at this line on both
sides of the sheet
material.
6. For continuous slab,
cut across the folding
line.
'PMEUIFUISFFCBDL
sides up to make a
3-sided box, and, for
step-down landings,
fold the front ap
down.
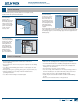
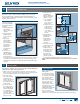
1. Cut a piece of sheet
material to the
length shown.
2. Lightly crease
folding lines 1/2" in
from the two short
sides and one long
side.
3. Measure the width
of the frame from
the interior to the
nailing n/trim and
BEE
4. Take this distance
from the back edge
and lightly crease a
folding line across
the sheet material.
PREPARE SILL PAN
3
Note! This section applies to installations into a buck only. For
installations into a stud-framed wall, begin with section 6, “PREPARE
STUD-FRAMED WALL.”
1. Seal any joint larger than 1/16" (1.5 mm) in the buck and between
the buck and the concrete/masonry with sealant.
2. Cover the buck and the surrounding concrete/masonry at the head
and jambs and sill with liquid applied ashing as shown.
3. Apply diamond lath to all ashed surfaces to be covered by stucco.
END of Buck Instructions, SKIP to section 7, “INSTALL DOOR.”
Sealant joints
Diamond lath
Liquid applied
ashing
Frame
width
Folding Line
Length of rough opening sill plus 1"
1/2"
1/2"
Measure
frame
width
Interior
Continuous slab
Step down
Fold sides and back up
Fold corner
forward
Fold front
ap down