
Installation Guide


INSTALLATION INSTRUCTIONS
for Swinging French and Patio Doors (JII105)
5
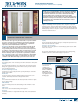
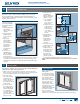
5. Cut two pieces of
JELD-WEN self-
adhesive ashing 6"
wide by the sill pan
width + 3" long.
a. For continuous
slab landings
only, cut out the
inside corner.
b. Adhere the pieces
of ashing to the
inside corners.
Stretch ashing
as needed to
cover corners and
lay at.
6. Smooth gaps or
bubbles beneath
self-adhesive
ashing with a
J-roller (remove
and replace if
necessary).
4FBMCBDLDPSOFSTPG
sill pan with sealant.
8. For step-down
landings only, cut
plastic drain screen
to length of sill +
2" and staple 1/2"
below sill edge.
The drain screen
provides a path for
air to dry any incidental moisture in the rough opening.
END of Stud-Framed Wall Instructions continue with section 7 “INSTALL
DOOR.”
FOR RETROFIT INSTALLATIONS
3FNPWFUIFPMEEPPS3FNPWFTVGåDJFOUTJEJOHUPFYQPTFBUMFBTU
of intact building wrap. If damaged, apply new building wrap in a
TIJQMBQNBOOFS7FSJGZIFBEFSBOEUSJNNFSTUVETBSFTUSVDUVSBMMZTPVOE
Continue with instructions.
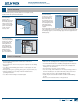
PREPARE BUILDING WRAP
7FSJGZUIFTFTUFQTEP
not void the building
XSBQNBOVGBDUVSFST
warranty.
1. Trim building wrap
ush with the
edges of the rough
opening.
2. At the head, slit
building wrap 6"
at 45°. Tape up as
shown.
3. Apply spray
adhesive/primer
to the sill pan
and surrounding
area. Follow
NBOVGBDUVSFST
instructions
for application
methods.
4. Cut a piece of
JELD-WEN self-
adhesive ashing
the length of the
sill and apply over
the sill pan as shown. The bottom of the sill pan should be completely
covered by the self-adhesive ashing. For step down landings, fold
ashing down as shown. For continuous slabs, trim ush with rough
opening.
6
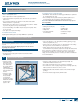
PREPARE STUD - FRAMED WALL
45˚
6"
Sill pan
width
3"
6"
Discard
(for
continuous
slab only)
Continuous Slab
Landing
Sill pan
width
3"
3"
Sealant
1"
1/2"
Step-Down
Landing
Sill pan
width
3"
3"
7
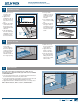
INSTALL DOOR
Warning! To avoid injury, use at least two people to install. Adequately
support the door until completely fastened.
1. Apply a 3/8" bead of sealant where the back of the trim meets the
frame. Tool into a llet shape. Run another bead of sealant along the
back of the n/trim where it will contact the structure.
2. Tilt the door into
the rough opening,
making sure the
inside of the door sill
is fully seated into
the sealant on the sill
pan back dam.
3. Secure the door in
the rough opening
by pre-drilling holes
BOEUIFOESJWJOH
x 3" drywall/deck
screws into the thick
part of the jamb
where shown. Do not
fully seat screws.
SHIM PATIO DOOR
Note! Secure all shims
with sealant.
From the interior, shim
the head and side jambs
6" from the corners and
at 8" intervals. Install
shims at the strike
plate and at each hinge
location so the screws
(installed later) will
each penetrate a shim.
If installing a door with
a hinge jamb in the
middle, shim underneath
the mull for support.
Shim so the door is
square, level and plumb.
7FSJGZUIFSFJTBNBSHJOCFUXFFOUIFGSBNFBOEUIFEPPSQBOFMT