
Instructions / Assembly
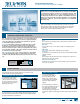

INSTALLATION INSTRUCTIONS
for Aluminum Windows with Nailing Fin (JII004)
6
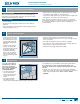
COMPLETE INSTALLATION
7
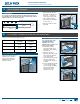
5.Ensureweepholes/channelsareclearofdebrisforproperwater
drainage. Do not seal weep holes/channels.
AFTER INSTALLATION
•Installexteriorwallsurfacewithin30daysofwindowinstallation.
•Maintaingapof1/4"-3/8"betweenwindowframeandnalexterior
wall surface.
•Protectrecentlyinstalledunitsfromdamagefromplaster,paint,etc.
by covering the unit with plastic.
Please visit jeld-wen.com/resources for warranty
and care and maintenance information.
Thank you for choosing
©2009JELD-WEN,inc.|JELD-WENandReliabilityforreallifeareregisteredtrademarksofJELD-WEN,inc.,OregonUSA.
All other trademarks are the property of their respective owners.
(03/09)
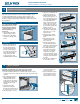
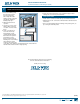
Sealant
1. Release the building wrap
from above the header
(previously taped up)
and overlap the header
ashing. Seal the ends with
self-adhesive ashing or
building wrap tape.
2. Adjust window for best
operation.
3.Sealthetopcornersofthe
window with a 1/4" bead
of sealant. Tool into a llet
shape.
4. Create a continuous air
seal on the interior by
integrating the rough
opening and the window
frame with low expansion
polyurethane foam or
backer rod and sealant. If
installing into wood framing
with a drain mat, apply
sealant to the foam wedge
on the back of the drain mat, integrating the back of the drain mat
with the window frame and the rough opening.
Sealant
Framing
Drain mat