
Installation Guide


INSTALLATION INSTRUCTIONS
for Vinyl Projecting Windows with Integral Nailing Fin (JII023)
6
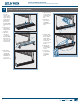
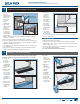
4.Pressthe
adhesive
section of the
drain mat onto
outside section
of sill.
5.Pullrelease
tape on
remaining
section of the
drain mat.
6. Fold the
JELD-WEN
drain mat
down onto the
house wrap.
7. Staple drain
mat to the wall
and seal the
corner edges.
Note! The sill lip is the garden window’s only source of support inside
the rough opening. It is very important that the sill be level and at.
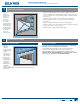
1. Measure the
length of
the sill and
cut a piece
of JELD-WEN
drain mat the
exact length of
the sill.
2. Measure and
draw a line
1/2" from the
exterior edge
ofthesill;this
is where the
JELD-WEN
drain mat will
sit.
3. Remove foam
backing and
release tape
under foam
backing.
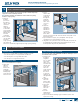
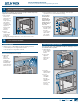
1. If the window
has a pre-
installed cable
support system,
follow the
instructions
provided
by the
manufacturer.
2. If the cable
support system
is not used,
build seat
board bracing
to support at
least750lbsof
total weight
(window plus
window contents). Primary support should be provided under the
mull joints of the unit.
3. Remove temporary support after full support is installed.
4.Releasethebuildingwrapfromabovetheheader(previouslytaped
up) and overlap the header ashing. Seal the ends with self-adhesive
ashing or building wrap tape.
5.Sealallfourcornersofthewindowwitha1/4"beadofsealant.Tool
into a llet shape.
6. The head and seat boards should be protected and insulated with a
structure designed and built as required by local code.
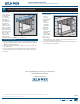
7. Create a
continuous
air seal on
the interior
jambs and
head between
the rough
opening and
the window
frame with
low expansion
polyurethane
foam or
backer rod
and sealant.
On the sill, run
a continuous
bead of sealant along the foam wedge where it meets the window
frame or seat board.
AFTER INSTALLATION
1. Adjust window for best operation.
2. Install exterior wall surface within 30 days of window installation.
3. Maintain gap of 3/8" between window frame and nal exterior wall
surface (siding, stucco, etc.).
4.Protectrecentlyinstalledunitsfromdamagefromplaster,paint,etc.
by covering the unit with plastic.
Note: End of bay/bow installation instructions.
COMPLETE BAY/BOW WINDOW INSTALLATION
7
Bracing Under
the Mull Joints
Seal corners
1/2"
Width of
rough opening
PREPARE SILL FOR GARDEN WINDOW
8
Wicking
Release
tape
Seal
corners
Framing
Foam wedge
Sealant joint