
Installation Guide


INSTALLATION INSTRUCTIONS
for Vinyl Projecting Windows with Integral Nailing Fin (JII023)
7
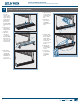
APPLY THE SELF-ADHESIVE FLASHING
Note! Keep the edge of the JELD-WEN self-adhesive ashing as close to
the window frame as possible.
3. Apply the side
pieces starting
2" above the
header.
4.Centerand
apply the
header piece
above the
header.
5.Pressthe
ashing down
with a J-roller.
6. Do not
allow gaps
or bubbles
beneath
self-adhesive
ashing
(remove and
replace if
necessary).
3. Inspect window for square, level, and plumb. Test for proper
operation (remove and reinstall if necessary).
Note! Fastener
heads must be
ush. Do not
dent nailing n.
Always use pre-
punched holes or
pre-drill with a
3/16" bit.
4.Fastenwindow
through nailing
n holes 3"-7"
from the
corners and 8"
apart all the
way around
the window.
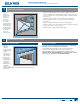
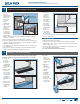
PREPARE FLASHING
1. Cut three pieces of JELD-WEN self-adhesive ashing as follows:
•Oneheaderpiece12"longerthantheheader
•Twosidepieces7"longerthaneachside
SPRAY ADHESIVE/PRIMER
Note! Protect window from overspray.
2. Apply spray
adhesive/
primer as
instructed to
nailing n,
sheathing and
building wrap
at the sides and
head as shown.
3"-7"
8"
3"-7"
8"
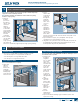
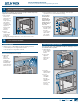
INSTALL GARDEN WINDOW
9
Warning! To avoid injury, use at least two people to install. Temporarily
support the window until fully installed.
1. Place window
sill onto the
drain mat and
tilt into the
rough opening.
The window
sill must rest
on and be fully
supported
by the rough
opening
framing.
2. Fasten
window with
agalvanized
roo ng nail
through the nailing n between 3"-7" from one lower corner.
3"-7"
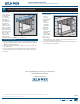
FLASH GARDEN WINDOW
10
S
p
r
a
y
A
d
h
e
s
i
v
e
6"
2"
2"
6"
2"