
User Manual


INSTALLATION INSTRUCTIONS
for Vinyl Windows without Nailing Fin (JII011)
4
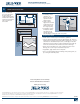
PREPARE WINDOW OPENING - CONTINUED
3
Interior
Width of
rough opening
12"
Measure
frame
width
Sealant
joints
Liquid
applied
ashing
Continuous
support
1/2"
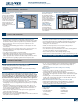
PREPARE MASONRY OPENING WITH BUCK
1. Seal any joint larger
than 1/16" in the buck
and between the buck
and the concrete/
masonry with sealant.
2. Cover the buck and
the surrounding
concrete/masonry at
the head and jambs
with liquid applied
ashing as shown.
3. If installing into a
four-sided buck,
seal the sill in a
similarmanner.
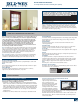
Note! Where the
window will sit on the
sill, shim to provide
continuous support to
the sill. This shimming
must be 1/2" shorter
than the width of the
window frame, be
1/4" narrower than the
depth of the window
frame sill, should level
the rough opening sill
and be no more than
1/4"thick.
4. Center the continuous support on the sill of the opening, ush to the
exterior edge and leaving a 1/2" gap at the ends. Secure in place.
END of Buck Instructions, SKIP to section 4, “INSTALL WINDOW.”
PREPARE STUD-FRAMED WALL
PREPARE BUILDING WRAP
Trim building wrap
ush with the edges of
the rough opening (or
follow manufacturers’
instructions for
trimming).
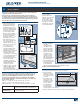
PREPARE/SHIM THE SILL
1. Use self adhesive ashing to waterproof the sill.
2. Flashing must have at least 1"
of material wrapped below
the sill onto the vertical wall.
Flashing width must be at
least frame width + 1".
3. Measure the width of the
frame and subtract 1/4".
Transfer this measurement
from the outside edge of the
rough opening sill and draw
a line all along the rough
opening sill. This is where the
back of the ashing will sit.
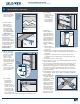
4. Cut a piece of ashing the
length of the sill plus 12".
5. Place ashing on rough
opening sill, wrapping the
ashing up 6" on each jamb
as shown.
6. Pull release tape and set
ashing into place.
7. Fold the ashing down onto
the sheathing. Staple ashing
to the wall, if needed, and seal
the corner edges as shown.
8. Smooth out any bubbles or
creases with a J-roller.
9. Install the continuous support
as follows:
Note! Where the window will
sit on the sill, shim to provide
continuous support to the
sill. This shimming must be
1/2" shorter than the width
of the window frame, be 1/4"
narrower than the depth of
the window frame sill, should
level the rough opening sill
and be no more than 1/4"
thick.
10. Align the shimming on the
sill ush with the exterior
and centered between the side jambs. If installing a mulled unit,
leave gaps at the mull joint(s) so they don't sit on the shimming and
tack into place or secure with sealant.
Continuous
support
Depth of
window
minus 1/4"
Flashing