
User Manual


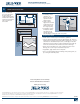

INSTALLATION INSTRUCTIONS
for Vinyl Windows without Nailing Fin (JII011)
5
Warning! To avoid injury, use at least two people to install. Adequately
support the window until fully installed.
Note! Areas such as Florida and the Texas TDI region have different
anchoring requirements based on product certification. For information
on specific products, visit www.floridabuilding.org or www.tdi.texas.gov
and follow the anchoring schedule given in the drawings for the product
instead of the anchoring schedule in this document.
FRAME PREPARATION
• If the window has open
tracks (most sliding and
hung windows), remove
track llers if present. If
installing a sliding window,
remove the operating sash
and the track for access
to the sill pocket. Mark
fastener locations within
the frame track using the
spacing given below in
“Fastener Locations“, or as
required by local code.
• If the window does not
have open tracks (awning,
casement and xed
without open tracks), these
windows can be fastened
one of three ways:
1. Use installation clips
(excludes windows with
pre-applied extension
jamb; provided or available
through dealers). Snap
a clip into the interior
accessory groove according
to the spacing given below
in “Fastener Locations.“
2. Through the frame (screws
can be covered with
dust plugs, provided or
available through dealers)
using the pattern in
“FastenerLocations.“
3. Stopped in place (excludes
windows with pre-applied
extension jamb) with
trim or drywall (excludes
impact). No fasteners are required through the frame.
FASTENER LOCATIONS
Products are fastened according to performance rating (some holes
may be pre-drilled). Performance rating is located on the purchase
paperwork or gold AAMA label fixed somewhere on the frame,
generally in the head jamb. Look for something like this example:
R-PG20-122X76 (48X30)-HS. If this label is missing, use the PG50 and
above fastener pattern.
PG20--3" – 6" from the corners and every 24" on center.
PG35--3" – 6" from each corner and every 18" on center.
PG50 and above--3" – 6" from each corner and every 12" on center.
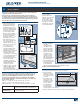
INSTALL WINDOW
4
Weep
hole
Sealant
Weep
hole
Notch
Sill adapter
DRILL CLEARANCE HOLES
At each fastener
location, drill a 3/8"
clearance hole through
ONLY the rst wall
of the frame to allow
the screw head to pass
through. Do not drill
through the outer wall
of the window frame.
IF INSTALLING A FLUSH FIN WINDOW
1. If using an applied
n, apply a
continuous bead
of sealant on the
interior around the
window where the
n meets the frame.
2. Apply a 3/8" bead
of sealant to the
exterior face of the
opening , leaving
gaps at any weep
holes if installing into
an existing frame.
3. Place window in the
opening, making sure
the window rests
on the shimming
support and makes positive contact with the sealant.
Continue with “All INSTALLATIONS.”
IF INSTALLING A FINLESS WINDOW
If installing into an Existing Frame with a Sloped Sill:
1. If a detached sill
adapter is used, cut
to length, and snap
into accessory groove
at the sill.
2. Cut notches in the
lower edge of the
sill adapter to allow
for water drainage;
notches should
be a minimum of
1/8" square and
positioned under
each weep hole of the window.
3. If the sill adapter covers weep holes, notch for proper drainage.
Mull Joints The first 8" beyond mull joints, on both sides,
must be fastened through each nail fin hole.
Continuous Head and
Sill above PG35
The first 4" from center, on both sides, must
be fastened every 2"
Slider frame picture window
shown from the side
Drill clearance
hole here
Interior
Exterior
Track ller
Drill clearance
hole here
Picture
frame
shown from
the side
Interior Exterior
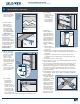
Installation
clip
3/8" Clearance
hole
Jamb
Exterior
Jamb
Cutaway
From Top