
User Manual


INSTALLATION INSTRUCTIONS
for Vinyl Windows without Nailing Fin (JII011)
6
INSTALL WINDOW - CONTINUED
4
b. If installing a
window with
fasteners through
the jambs,
secure with a #8
screw until fully
seated (without
deforming vinyl).
3. If installing a
window using the
stop in method, this
installation assumes
installation from the
interior with exterior
stops applied before
window installation.
All stops must over
hang the window
frame by a minimum
of 1/8".
a. Mill and install
exterior stops in the desired location if necessary for the side and
head jambs.
b. Apply sealant to the interior side of the side and head jamb
exterior stops and verify it is properly shimmed until square, level,
and plumb.
c. Apply backer rod and sealant or low expansion foam on the
interior between the window frame and rough opening on all
foursides.
d. Install interior stops on all four sides.
4. Inspect window for square, level and plumb (adjust shims or remove
and reinstall if necessary).
5. Fasten window in a similar manner through the remaining corners,
and then through the rest of the fastener locations. If installing
fasteners in the sill, apply silicone sealant to the screw threads and
the head of the screw in the window frame (use more sealant as
necessary to completely seal the screw head to the frame), or use a
gasketed head screw.
6. Insert plugs into fastener holes not located in any operating track.
Seal plugs in the sill with silicone. Replace track llers if applicable.
7. On some double
hung operating units
only, jamb adjuster
hardware is mounted
in the middle
installation holes to
allow for some jamb
adjustment. Install
jamb adjuster screws
until captured (rst
‘click’), the screw
may then be screwed
in or out to adjust
the jamb as needed.
Replace lower sash.
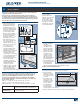
4. Center the head
expander (optional)
over the head of the
window as shown.
5. From the interior,
apply sealant to
the inside edge of
the outside stop.
Set window with
a sill adapter fully
against the outside
stop. Continue with
“AllInstallations.”
If installing into an
Existing Frame or Rough
Opening with a Flat Sill:
Center the head
expander (optional) over
the head of the window.
Set new window into the
existing window frame
or rough opening.
Continue with “All
INSTALLATIONS.”
ALL INSTALLATIONS
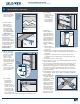
1. Shim the side jambs
between the rough
opening or existing
frame and the new
window at each
fastener location.
Shims must be set 1/4"
back from the interior
of the window frame.
Secure shims with
sealant.
2. Secure one upper
corner as follows (skip
to step 3 if using the
stop in method:
a. If installing a
window with
installation clips,
drive a screw
through the clip
until the screw head
contacts the clip. Do
not bend the clip
toward the rough
opening (applying
a shim between clip
and rough opening can be helpful to prevent bending the clip).
Sealant
Outside stop
Head expander
Head
Sill
Sill adapter
Accessory groove
Window
Frame and
Accessories
Shown
from the
Side
Jamb
Cutaway
From Top
Interlock
Center
Shim
Jamb
Rough
opening
1/4" Sealant
gap
Interior
Installation
clip
Sealant gap
Center
3"- 6"
3"- 6"
1/8"
min.
Stop
Jamb Adjuster
Turn
clockwise
to rst
click and
adjust as
needed