
Owner manual


INSTALLATION INSTRUCTIONS
for Wood Double Hung Sash Replacement Kits (JII028)
Read these installation instructions thoroughly before beginning. They
are designed to work in most existing applications. However, existing
conditions may require changes to these instructions. If changes are
needed, they are made at the installer’s risk. For installations other than
indicated in these instructions, contact a building professional.
Thank you for selecting JELD-WEN products. Attached are
JELD-WEN’s recommended installation instructions for double-hung
sash replacement kits, designed to be installed into an existing
window frame. Replacement sashes are installed from the interior,
and interior detail work is needed to complete the installation.
Consult your local building department for applicable building codes
and regulations (particularly regarding minimum egress requirements).
Local building code requirements supersede recommended installation
instructions.
The installation of a sash replacement kit will not eliminate installation
or maintenance problems with an existing window. Problems such
as wood decay and water leaks around the existing frame must be
investigated and fixed prior to installing a sash replacement kit.
Please Note! Installation such that the window sill is higher than 35
feet above ground level or any window installation into a condition
not specifically addressed in these instructions must be designed by
an architect or structural engineer. Failure to install into a square,
level and plumb condition could result in denial of warranty claims for
operational or performance problems.
Note to Installer: Provide a copy of these instructions to the building
owner. By installing this product, you acknowledge the terms and
conditions of the limited product warranty as part of the terms of the
sale.
IMPORTANT INFORMATION & GLOSSARY
GLOSSARY
Balance System
A system of ropes and pulleys (older) or springs (newer) used to counter
balance the weight of a sash.
Clutch
A part of the balance system into which the pivot pins are inserted or
engaged.
Head Jamb
The horizontal frame element at the top of the window.
Jamb Liner
An assembly of vinyl and various types of springs that ts inside the side
jambs of the frame and allows the sash to operate smoothly.
Pivot Pin
The pin on the bottom corners of the sash that engages the balance
system and allows sash to pivot for easy removal and installation.
Sash
An assembly comprised of stiles (vertical pieces), rails (horizontal pieces)
and the window’s glass.
Sash Lock
The primary lock on the sash that secures the window opening.
Side Jambs
The vertical frame elements on either side of the window.
Sill
The horizontal frame element at the bottom of the window.
Stop
A moulding used to hold, position or separate window and door parts.
Can also be called a trim stop or parting stop and can be located on any
side within the frame.
Window Frame
The outer assembly (side jambs, head jamb and sill) that contains the
sash(es) and attaches to the rough opening.
NEEDED MATERIALS & TOOLS
Estimated Install
Time for New
Construction
First Time: 2 hrs
Experienced: 1.5 hrs
Professional:
1 hr
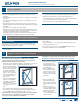
12
6
1
11
2
10
3
9
8 4
7 5
INCLUDED PARTS
•Upperandlowersash
•Woodheadjambcoverwithweatherstrip
•Jamblinerswithhardware
•Twofoamjamblinergasketsorchimneyplugs
•SitelineEXkitsincludeanoptionalheadjambller
•TraditionPluskitsincludesixblackrubbersnubbers
•Customkitsincludetwofoamsheetspacingmaterialforusebehind
the jamb liners
NEEDED MATERIALS
•Finishnails
•Siliconesealant
TOOLS
•Hammer
•Screwdrivers
•Puttyknifeorprybar
•Nailset
•Utilityknife
•Tapemeasure
•Level
•Drill(optional)