
User Manual
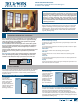

INSTALLATION INSTRUCTIONS
for Wood Bay & Bow Windows with Nailing Fin or Exterior Trim (JII032)
5
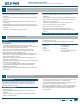
1. Fold the head board piece
lengthwise into “L” shape.
Center and apply one leg
to head board and the
other to the wall above the
rough opening header. Cut
the corners to allow the
ashing to lay at against
the wall.
2. Starting 2" above the
header, apply the side
pieces and overlap the
drain mat on the sill as
shown.
3. Center and apply the
header piece above the
header, overlapping the
side pieces as shown.
4. Press the ashing down
with a J-roller, being
careful to remove any gaps
or bubbles beneath self-
adhesive ashing (remove
and replace if necessary).
Cut four pieces of self-adhesive ashing as follows:
• One head board piece 6" longer than the head board
• One header piece 12" longer than the header
• Two side pieces 7" longer than each side
SPRAY ADHESIVE/PRIMER
Apply spray adhesive/primer
as instructed to nailing n,
sheathing and building wrap
at the sides and head as
shown.
APPLY THE SELF-ADHESIVE FLASHING
Note! Keep the edge of the self-adhesive ashing as close to the
window frame as possible and apply over the nail n.
FLASH WINDOW - WINDOWS WITH A NAILING FIN INSTALLED INTO STUD-FRAMING ONLY
6
S
p
r
a
y
A
d
h
e
s
i
v
e
6"
Fold
down
Cut
2"
6"
6"
2"
1. If the window has a pre-
installed cable support
system, follow the
instructions provided by
the manufacturer.
2. If the cable support system
is not used, build seat
board bracing to support
at least 750 lbs. of total
weight (window plus
window contents). Primary
support should be provided
under the mull joints of the
unit.
3. Remove temporary support
after full support is
installed.
4. Release the building wrap
from above the header
(previously taped up)
and overlap the header
ashing. Seal the ends with
self-adhesive ashing or building wrap tape.
5. Seal all four corners of the window with a 1/4" bead of sealant. Tool
into a llet shape.
6. The head and seat boards should be protected and insulated with a
structure designed and built as required by local code.
COMPLETE INSTALLATION
7
Bracing Under the Mull Joints
Seal corners
Please visit www.jeld-wen.com for warranty and care and maintenance information.
Thank you for choosing
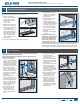
7. Create a continuous air seal
on the interior between
the rough opening and the
window frame with low
expansion polyurethane
foam or backer rod and
sealant. On the sill, the
foam or sealant must
create this air seal by
integrating the back of the
drain mat with the window
frame and the rough
opening.
AFTER INSTALLATION
1. Adjust window for best operation.
2. Install exterior wall surface within 30 days of window installation.
3. Maintain gap of 3/8" between window frame and nal exterior wall
surface (siding, stucco, etc.).
4. Remove protective lm from cladding (if present) immediately after
installation; remove from glass within one year.
5. Protect recently installed units from damage from plaster, paint, etc.
by covering the unit with plastic.
6. Finish all exposed wood surfaces immediately following installation.
(05/14)
©2014 JELD-WEN, inc.; This publication and its contents are owned by JELD-WEN, inc. and are protected under the U.S. Copyright Act and other intellectual property laws. All trademarks, service marks,
logos and the like (whether registered or unregistered) are owned or controlled by JELD-WEN, inc. or others. Unauthorized use or duplication of JELD-WEN intellectual property is prohibited.
JELD-WEN reserves the right to change product specications without notice. Please check our website, jeld-wen.com, for current information.
Framing
Shim
Back of
ashing
Continuous
air seal