
User guide

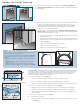


12
Trouble Shooting
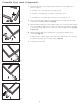
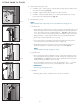
Problem #1
Reveal between door and lock side jamb is too tight (Fig. 42).
Causes:
1. Hinge leafs not set ush into jamb and door.
2. Hinge leafs bent at knuckle, pushing door towards jamb.
3. Hinge side jamb over-shimmed at hinge locations, pushing door towards
lock jamb.
4. Lock side jamb over-shimmed.
5. Door not anchored properly to stud at top hinge location.
Problem #2
Reveal between door and jambs is too wide (Fig. 43).
Causes:
1. Check reveal on hinges side to see if door is sagging in opening. Sagging
may be due to the following:
A. Door not anchored properly to stud at top hinge location.
B. Top hinge leaf is bent at knuckle.
C. Top hinge not set ush into jamb or door.
2. Jamb not square. Check the following:
A. Sill for level.
B. Head jamb for level.
C. Jamb over-shimmed.
Problem #3
Top or bottom corner of door projects into house past jamb (Fig. 44).
Causes:
1. Hinges not all set tight against back set of hinge prep on jamb or door.
2. Jamb is racked, one side of jamb kicks into the house while the other jamb
kicks outside. This can be checked by using a 6-foot level on each jamb, or
cross sighting the jambs with a string. The strings should just touch where
they cross in the middle. If there is a gap between these two strings, this
is the distance the frames are racked.
Fig. 42
Fig. 43
Fig. 44
Weatherproofing the Door
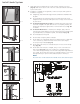
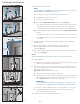
Drip Cap installation
1. Cut a piece of galvanized drip cap the length of the header brickmold plus 1/4" to allow for
1/8" overlap past the ends of the header brickmold.
• Apply 1/4" bead of sealant to top of the header brickmold along the front and side edges
(Fig. 45A).
• Nail drip cap in place; apply sealant to side edges (Fig. 45B).
2. Drive all nails into the brickmold completely but do not overdrive; do not dent brickmold; set
the nail below the surface.
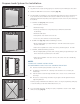
3. Apply sealant to the two upper corners as follows:
• Follow sealant manufacturer’s instructions for surface preparation and application.
• Apply bead 1/4" wide to corners extending 1" along both legs of the corner.
• Use the back of a spoon (or similar shape) to form sealant into llet shape (Fig. 46).
4. Apply additional sealant as follows:
For doors with step-down landing:
• Apply a 1/4" bead of sealant underneath the sill, leaving a 1" gap 6" from each end (Fig.
47).
For doors on continuous slab:
• Apply a 1/4" bead of sealant around the nose of the sill where it makes contact with the
slab or step leaving a 1" gap 6" from each end of the sill nose.
Fig. 46
Fig. 45A & B
Fig. 47
Please visit www.jeld-wen.com for warranty, nishing instructions and care and maintenance information.
Thank you for choosing
(05/14)
© 2009, JELD-WEN, inc. | JELD-WEN Reliability for Real Life, and the JW icon are trademarks or registered trademarks of JELD-WEN, inc., Oregon, USA.
All other trademarks are the property of their respective owners.