
User guide


6
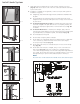
Assemble Door Jamb Components
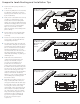
1. Lay jamb components out on a at protective surface prior to assembly (refer to
photos on page 1):
A. SYSTEMS 1 & 2 – Two jamb legs, one header, one sill.
B. SYSTEM 3 – Two jamb legs, one mull post, one header, one sill
C. SYSTEMS 4 & 5 – Two jamb legs, two mull posts, one header, one sill.
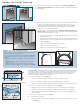
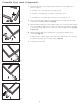
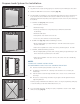
2. Prior to assembly, apply a light bead of caulk along all connecting surfaces of jamb
components for sealing and adhesion (Fig. 10).
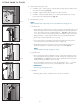
3. Attach and fasten jamb legs to the head jamb, using 1-1/2" screws into the pre-drilled
holes on the jamb leg. Make sure the edges of the head and side jamb line up and are
even with each other. Snug screws so corners are square and tight, with no gaps (Fig.
11 & Fig. 12).
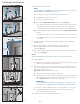
4. Attach and fasten jamb legs to sill using 1-1/2" screws into pre-drilled holes on
outside jamb (Fig. 13).
SYSTEMS 3, 4 & 5 – Attach mull post into notch at sill. Fasten using 1-1/2" screws into
pre-drilled holes from bottom of sill into mull post (Fig. 14).
5. Clean up any excess caulk.
Fig. 10
Fig. 11
Fig. 12
Fig. 13
Fig. 14