
User guide


7
Install Jamb System
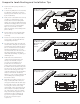
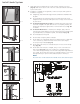
1. With jamb system assembled, tip into rough opening, checking for good t
(Fig. 15). Mark exact location of sill on oor for construction adhesive and future
t, then remove unit.
2. Installation of sidelights (if not applicable, continue to Prepare Jamb System for
Installation on page 11)
A. Sidelight top, bottom and side edges must be sealed before installation into
the jamb.
B. Insert sidelight into the jamb in the direction as marked from the factory.
Sidelight for hinge side has pre-drilled pilot holes for hinge screws. Check for
t, then remove.
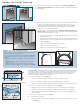
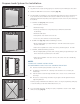
C1. For Custom Fiberglass Doors Only: Insert weatherstrip in the kerfed area
around the sidelight of the jamb. Once the door is completely installed, the
nished trim strip may be applied with a 1-1/2" 6d nish nail. (See Fig. 16.1
for details.)
C2. For Custom Wood Doors: To weatherproof sidelights, apply a bead of
caulk along the inside rabbeted corner the entire length of the sidelight jamb
leg, sidelight mull post, sidelight head jamb, and sidelight sill (Fig. 16).
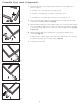
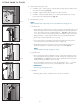
D. Insert sidelights back into jamb.
E. Use bar clamps to tighten jambs to sidelight.
F. Anchor jamb leg to sidelight through back of rabbeted portion of jamb with
1-1/2" screws at top, bottom and center. More anchor screws may be
necessary on larger sidelights (Fig. 17).
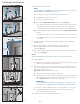
G. Anchor hinge side mull post to sidelight using two 2" brass screws though
hinge (Fig. 18).
H. Anchor strike side mull post to sidelight, using a 1-1/2" screw under lock
strike location (Fig. 19). Anchor top of mull post to sidelight using two
1-1/2" nish nails approximately 2" down from head jamb through rabbeted
face of jamb. Anchor bottom of mull post to sidelight using two 1-1/2" nish
nails approximately 2" up from sill into rabbeted portion of mull post.
NOTE:
No screw holes or nail locations are marked on the strike side mull post.
Fig. 15
Fig. 16
Fig. 17
Fig. 18
Fig. 16.1
Fig. 19