
User guide
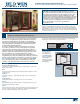


ASSEMBLY AND INSTALLATION INSTRUCTIONS
for Custom Wood & Fiberglass Exterior Folding Door Systems (JII101)
3
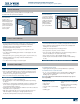
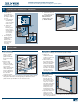
• The exterior face of the rough opening must be in a single plane (E)
with less than 1/8" twist from corner to corner.
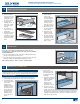
• If using an ADA sill, a
recess will need to be
available in the rough
opening sill for the
channel to sit in and
allow the sill legs to
sit at on the rough
opening.
• If using a U-Channel
sill, Fashion the recess
using the dimensions
shown. Position the
head track in place of
nal installation and
use a plumb bob to
nd the exact location
of the sill recess.
Hang the plumb bob
from the center of
the roller track. The
center of the recess
will be 23/32"from the
plumb line towards the
interior.
3. Measure the width
of the frame and
add 9/16".
Note! The most
important criteria for
a successful job are
a square opening, a
properly engineered
header (evaluated and
structurally designed
to carry the combined
weight of all the panels)
and a clean track.
• We recommended
that the head be
installed with a slight
bow upward (typically
1/8" at the center
of the opening) to
allow for the door’s
weight pulling down.
The frame should be
checked for square and
twist.
• Verify the width and height of the door are each 1/2"- 3/4" smaller
than the rough opening width/height.
• Verify the rough opening is square. The (A) and (B) measurements
should be the same. Maximum allowable deviation from square is 1/4".
• Verify the rough opening is level and plumb (C). The maximum
allowable deviation is 1/8".
• The rough opening sill must not be crowned or sagged (D) and be
level or sloped (positive slope) to the exterior.
2
INSPECT ROUGH OPENING
A
B
D
C
E
Verify Square, Level, and Plumb
REMOVE PACKAGING
Remove shipping materials such as corner covers, shipping blocks
or pads.
INSPECT DOOR
• Cosmetic damage
1
REMOVE PACKAGING AND INSPECT DOOR
• Correct product (size, color, grid pattern, handing, glazing, energy-
efciency requirements, etc.)
If any of the above conditions represent a concern, or if you expect
environmental conditions to exceed the door's performance rating,
do not install the door. Contact your dealer or distributor for
recommendations.
INSTALL SILL PAN
3
A sill pan can be ordered with some products (check with a salesperson),
found in building supply stores or online (search “sill pan”), or fabricated
on the job site (details below) with the proper tools and materials. Note!
Sill pans are not designed to be used with ADA or U-Channel type sills.
Weather-proong these types of sills is the responsibility of the installer.
An adequate overhang and a positive slope are recommend with these
sill types. If installing into a stud-framed wall and using a drip cap, at
each corner of the head, slit building wrap 6" at 45° and tape up. Skip
to Section 6, “INSTALL DOOR.”
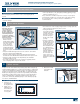
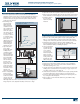
JOB SITE FABRICATED SILL PAN
1. Cut a piece of
sheet material to
the length shown.
2. Lightly crease
folding lines 1/2"
in from the two
short sides and
one long side.
Frame
width
+9/16"
Folding Line
Length of rough opening sill plus 1"
1/2"
1/2"
Measure
frame
width
Interior
1"
7/16"
1/2"
6 9/16"
2 1/8"
Channel
Floor
ADA Sill
U-Channel Sill
15/16"
23/32"
7/8"
Finished oor
Exterior Interior
Sub
oor