
User Manual

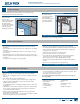

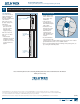

INSTALLATION INSTRUCTIONS
for Fiberglass Gliding Patio Doors with Applied Nailing Fin (JII104)
4
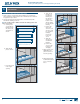
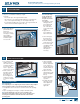
6. Cut a piece of self-
adhesive ashing
the length of the sill
and apply over the
sill pan as shown.
The bottom of the
sill pan should be
completely covered
by the self-adhesive
ashing. For step
down landings,
fold ashing down
as shown. For
continuous slabs,
trim ush with
rough opening.
7. Cut two pieces
of self-adhesive
ashing 6" wide by
the sill pan width +
3" long.
a. For continuous
slab landings
only, cut out
the inside
corner.
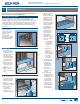
Note! This section covers stud-framed wall instructions. Masonry/buck
instructions begin after with “PREPARE BUCK.”
FOR RETROFIT INSTALLATIONS
Remove the old patio door. If installing into stud framing, remove
sufcient siding to expose at least 9" of intact building wrap. If
damaged, apply new building wrap in a shiplap manner. Verify header
and trimmer studs are structurally sound. If installing into a block wall,
removing the stucco is not necessary if the existing rough opening
is waterproof and the patio door is downsized. Continue with the
instructions.
PREPARE BUILDING WRAP
Cut ush with the
edges of the rough
opening, or follow
building wrap
manufacturer’s
instructions for proper
methods of preparing
the weather barrier.
PREPARE SILL
1. Set the sill pan in
the rough opening,
aligning the front
edge (for continuous
slab, shown) or
folded down edge
(for step down) with
the exterior of the
rough opening.
2. Mark a line across
the front and back
of the sill pan and
remove.
3. Apply three 3/8"
beads of sealant
between the marked
lines.
INSTALL SILL PAN
4. Place the sill pan in
the rough opening.
Firmly press the sill
pan in place with a
J-roller.
5. Apply spray adhesive/
primer to the sill pan
and surrounding
area. Follow
manufacturer’s
instructions for
application methods.
4
PREPARE STUD-FRAMED WALL
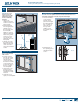
Sealant
b. Adhere the
pieces of
ashing to the
inside corners.
Stretch ashing
as needed to
cover corners
and lay at.
8. Smooth gaps or
bubbles beneath
self-adhesive
ashing with a
J-roller (remove
and replace if
necessary).
9. Seal back corners
of sill pan with
sealant.
10. For step-down
landings only, cut
plastic drain screen
to length of sill
+ 2" and staple
1/2" below sill
edge. The drain
screen provides
a path for air to
dry any incidental
moisture in the
rough opening.
Self-Sealing Corner Flash
Sill
pan
width
6"
3"
6"
Discard
(for
continuous
slab only)
Discard
(for
continuous
slab only)
3"
3"
Step-Down Landing
Continuous
Slab
Landing
Sill pan
width
3"
3"
3"
3"
Sill pan
width
3"
3"
Sealant
1"
1/2"
Sill pan
width
S
p
r
a
y
A
d
h
e
s
i
v
e
6"
3"