
Manual
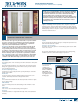


INSTALLATION INSTRUCTIONS
for Swinging French and Patio Doors (JII105)
3
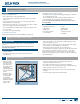
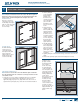
•Verifythewidth
and height of the
door are each 1/2"-
3/4" smaller than
the rough opening
width/height,
respectively. Mulled
units should be 3/4"
smaller.
•Verifytherough
opening is square.
The (A) and (B)
measurements
should be the same.
Maximum allowable
deviation from
square is 1/4".
2
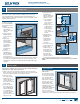
INSPECT ROUGH OPENING
A
B
D
C
E
Verify Square, Level, & Plumb
•Verifytheroughopeningislevelandplumb(C)and(D).The
maximum allowable deviation is 1/8".
•Theroughopeningsillmustnotbecrownedorsagged(D).
•Theexteriorfaceoftheroughopeningmustbeinasingleplane(E)
with less than 1/8" twist from corner to corner.
•Minimumdoublestudsshouldbeusedatallwoodframedrough
openings.
•Theheadermustbesupportedbytrimmerstuds.
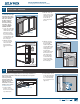
REMOVE PACKAGING
Remove shipping materials such as corner covers, shipping blocks
or pads.
Note! Be sure to remove the shipping clips from the door before
beginning the installation.
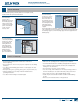
INSPECT PATIO DOOR
•Cosmeticdamage
•Productsquareness(diagonalmeasurementsmustbewithin
1/4" difference)
1
REMOVEPACKAGING&INSPECTDOOR
•Correctproduct(size,color,gridpattern,handing,glazing,energy-
efciency requirements, etc.)
•Splits,cracks,holes,missingsectionsorotherdamagetothenailing
n longer than 6" and/or within 1/2" of door frame
•Adripcapthatextends1/8"pasttheendoftheframeis
recommended for all products; required for side-by-side mulled units.
If any of the above conditions represent a concern, or if you expect
environmental conditions to exceed the patio door's performance
rating, do not install the patio door. Contact your dealer or distributor
for recommendations.
MATERIALS
•#8x3"deck/drywallscrews
•Non-compressibleorwaterdegradableshims
•Sealant(polyurethaneifpainted,100%siliconeifleftexposed)and
backer rod
•Closedcellpolyurethanelowexpansionfoam(DowGreatStuff™
Window and Door or equivalent)
•Plasticdrainscreenwithcrisscrossorwovenpattern(soldin6"widths
to protect rain gutters) for step-down landings
•Sheetmetalashingorbendablevinylsheetingforsillpan(4"wide
for 2" x 4" wall)
•3/8"staplesforstep-downlandings
For installations into a Buck:
Liquid applied ashing (Protecto Wrap LWM 200 or equivalent)
NEEDED MATERIALS & TOOLS
For installations into a stud-framed wall:
•JELD-WEN6"wideself-adhesiveashing(part#08987)orequivalent
(9"ifrequiredbylocalcode)
•ProtectoWrapSafsealSystems5500sprayadhesive/primer(oras
recommended by the self-adhesive ashing manufacturer)
Note! Follow all material manufacturers’ instructions for proper use
and compatibility.
TOOLS
•Cuttingshears(sillpan)
•Tapemeasure
•Utilityknife
•Level(4ft.minimum
recommended)
•J-roller
•Caulkinggun
•Drillwithbits
•Constructionstapler
•Screwdriver