
Installation Guide


INSTALLATION INSTRUCTIONS
for Bifold Doors (JII103)
6
INSTALLATION FOR TYPE C
5
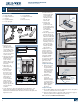
1. If holes are not
drilled in panels,
pre-drill one hole on
each outside corner
of the assembly 7/16"
in diameter and at
least 1½" deep in the
locations shown.
2. Tap pivots into holes
with light hammer
blows as shown.
Secure T-nut by
driving a #8 x 1" pan
head screw through
bothholes.
3. Trim track to t
nished opening
ifnecessary.
4. Insert the hanger
into one end of
the track. Loosen
the screw on the
top pivot bracket
and position on
track with the
screw toward the
jamb. Snap the
snugger onto the
track next to the
hanger, opposite the
top pivot bracket
asshown.
5. Secure the track to the head jamb with the provided #8 x 1" pan
head screws through the pre-drilled holes. Move the top pivot
bracket back toward the track end until it is 1/4" from the jamb and
tighten the screw.
6. Position the lower
bracket in the jamb,
centered with the
track, and secure
with the provided
#8 x 3/4" at
headscrews.
7. Fold the door
assembly and
position the T-nut
to the hanger. Using
the provided wrench,
screw hanger
into T-nut as far
aspossible.
8. Place the upper pivot
pin into the hole in
the top pivot bracket.
Lift the assembly and
place the lower pivot
pin into the hole in
the lower bracket. If
installing a four door
system, repeat for
the other assembly.
Check positioning
and operation.
Verify there is a 1/4"
clearance between
the pivot door and
the jamb. Four panel
assemblies should be
snug at the middle.
If adjustments are
necessary, door panels
should be folded to
gain access to the
adjustment screws.
To adjust horizontally:
9. At the top, loosen
the screw in the
top pivot bracket
and move toward
or away from the
jamb until there
is 1/4" clearance.
Re-tighten.
10. At the bottom,
loosen the
adjustment screw
and move toward
or away from the
jamb until doors are
plumb with jamb,
then re-tighten
thescrew.
To adjust vertically:
11. Lift assembly slightly and rotate the adjustment screw to the right to
raise doors, and to the left to lower them.
12. Slide the snugger until it is against the jamb opposite the top pivot
bracket, or place between hangers in four door sets.
SKIP to Section 8, “COMPLETE INSTALLATION.”
A
B
C
D
E
F
G
H
Snugger
Top pivot
bracket
Hanger
Pivot door
Lead door
Bottom of
pivot door
Pivot hole
7/8"
1-1/4"
Horizontal
adjustment
screw
Vertical
adjustment
screw
Bracket
Horizontal adjustment
screw
Bracket
Pin
Lower
bracket
T nut
Jamb
side
Upper
pivot pin
Lower
pivot pin
1/4"
PARTS INCLUDED
A. Upper pivot pin
B. Hanger with T-nut
C. Snugger
D. Top pivot bracket
E. Lower pivot pin
F. Lower bracket
G. Adjustment wrench
H. Track
Screws (not shown)