
Installation Guide


INSTALLATION INSTRUCTIONS
for Interior Pre-Hung Doors
2
2
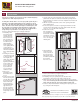
INSPECT ROUGH OPENING
• Verify the width and
height of the door
frame are each 1/2"
smaller than the rough
opening width/height.
• Verify the rough
opening is square.
The (A) and (B)
measurements should
be the same. Maximum
allowable deviation
from square is 1/4".
• Verify the rough opening is level and plumb (C) and (D). The
maximum allowable deviation is 1/8".
• The rough opening sill must not be crowned or sagged (D).
• The exterior face of the rough opening must be in a single plane (E)
with less than 1/8" twist from corner to corner.
• Minimum double studs should be used at all rough openings.
• The header must be supported by trimmer studs.
Do not install the door unless the rough opening meets the above
conditions. Professional assistance may be necessary to correct problems
before installation.
IMPORTANT! The door should be finished either before installation or
immediately after (whichever is more convenient). Note! If removing
the slab from the frame for nishing, remove hinges from the jamb
only, do not remove hinges from the slab.
A
B
D
C
E
Verify Square, Level, & Plumb
MATERIALS AND TOOLS
1
REMOVE PACKAGING AND INSPECT DOOR
REMOVE PACKAGING
Remove shipping materials such as corner covers, shipping blocks
or pads.
Note! Be sure to remove the shipping clips or screws through the
header into the slab from the door before beginning the installation.
INSPECT DOOR
• Cosmetic damage
• Product squareness (diagonal measurements must be within
1/4" difference)
• Correct product (size, color, grid pattern, handing, glazing, energy-
efficiency requirements, etc.)
• Correct Handing. To determine door swing (left or right), face the
door from the side where hinges cannot be seen. Right handed doors
open to the right, while left handed doors open to the left.
If any of the above conditions represent a concern, do not install the
door. Contact your dealer or distributor for recommendations.
PROVIDED MATERIALS
• Two color matched #9 x 2 1/2" screws (for securing the top two hinges
into framing). Applies only to solid core, custom carved and stile and
rail doors.
NEEDED MATERIALS
Note! Follow all material manufacturers’ instructions for proper use
and compatibility.
• 10d Finish nails
• 4d Finish nails
• Shims
• Wood putty
• Sandpaper
• Finishing materials
• 100% polyurethane sealant (for
two piece frames)
NEEDED TOOLS
• Hammer
• Tape measure
• Utility knife
• Level (4 ft. minimum
recommended)
• Circular saw or jigsaw (for
trimming jambs if necessary)
• Nail punch
• Screwdrivers