
How to Guide


PRODUCT GUIDE
Vinyl Single and Double-Hung Windows (JPG006)
5
BALANCE REPLACEMENT AND ADJUSTMENT - CONTINUED
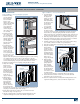
IPEX CONSTANT FORCE BALANCE REMOVAL AND INSTALLATION
Depending on the weight of the sash, single balances may be used
or if the sash is heavier, additonal balances are attached as needed.
Remove the stops (pry out with a at screwdriver) to see the balance
conguration and note location and number of balances. Have this
information ready before ordering new balances.
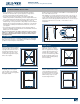
BALANCE REMOVAL
Lower Sash Balance – Access opening at top of jamb
1. Remove both
sashes. Double hung
windows require
the lower sash be
removed before the
upper sash.
2. Remove the stop in
the interior channel
at the head by
prying it up from the
bottom and out.
3. To unlock balance,
insert a 1/4" at
screwdriver in the
pivot bar opening
of the balance, hold
rmly to prevent
the balance from
ying upward, and
rotate 90
o
. Slowly
allow the balance to
fullyretract.
4. Remove the screw(s)
from the mounting
bracket, and,
using needle nose
pliers, disengage
the mounting
bracket from the
balance spring(s),
andremove.
5. Slide the balance to
the access opening,
and remove from
the jamb. For help
pulling the old
balance cases out,
drive a #8 x 3"
drywall or deck screw
into the friction
adjustment screw
hole and pull out
from the top.
6. Multi-spring balances
are connected by
means of the “dog
bones” at the top of
each balance section.
Pull each additional
unit up to clear the
access opening and
then straight out,
sliding the dog bone connectors apart.
BALANCE REMOVAL - CONTINUED
Upper Sash Balance – Access opening at bottom of jamb
1. Remove both sashes. Double hung windows require the lower sash be
removed before the upper sash.
2. Remove the stop in
the exterior channel
at the sill by prying
it up from the top
andout.
3. To unlock balance,
insert a 1/4" at
screwdriver in the
pivot bar opening
of the balance, hold
rmly to prevent
the balance from
ying upward, and
rotate 90
o
. Slowly
allow the balance to
fullyretract.
4. Remove the screw(s)
from the mounting
bracket, and,
using needle nose
pliers, disengage
the mounting
bracket from the
balance spring(s),
andremove.
5. Slide the balance to
the access opening,
and remove from
the jamb. For help
pulling the old
balance cases out,
drive a #8 X 3"
drywall or deck screw
into the friction
adjustment screw
hole and pull out
from the top.
6. Multi-spring
balances are connected by means of the “dog bones” at the top
of each balance section. Pull each additional unit up to clear
the access opening and then straight out, sliding the dog bone
connectorsapart.
Locking case
Locking case
Dog bones
Dog bones
Second spring
Second spring
Stop
Stop
Interior
Exterior
Locked
position
Locked
position
Unlocked
position
Unlocked
position
Friction adjustment
screw hole
Friction adjustment
screw hole
Mounting
bracket
Mounting
bracket