
Instructions / Assembly
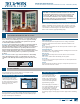


INSTALLATION INSTRUCTIONS
for Wood/Clad Wood Windows with Exterior Trim or Nail Fin (JII024)
3
INSPECT ROUGH OPENING
2
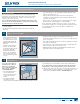
Verify Square, Level, & Plumb
A
B
D
C
E
A
B
D
C
E
• Verify the width and height
of the window are each 1/2"-
5/8" smaller than the rough
opening width and height.
Mulled units should be 3/4"
narrower.
• Verify the rough opening
is square. The (A) and (B)
measurements above should
be the same. Maximum
allowable deviation from
square is 1/8" for windows
20 sq. ft. and smaller, and
1/4" for windows larger than
20 sq. ft.
• Verify the rough opening is level and plumb (C) and (D). The
maximum allowable deviation is 1/16" for every 2' of rough opening
(not to exceed 1/8").
• The rough opening sill must not be crowned or sagged (D). A 5
degree
sloped sill is recommended.
• The exterior face of the rough opening must be in a single plane (E)
with less than 1/8" twist from corner to corner.
• Minimum double studs (king and jack/trimmer) should be used to
support the header at all rough openings.
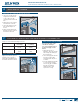
PREPARE BUCK
3
Note! This section applies to
installations into a masonry
wall only. For installations
into a stud-framed wall, begin
with section 4, “PREPARE
STUD-FRAMED WALL.”
1. Seal any joint larger than
1/16" in the buck and
between the buck and the
concrete/masonry with
sealant.
2. Cover the buck and the
surrounding concrete/
masonry at the head and jambs with liquid applied ashing as shown.
3. If installing into a four-sided buck, seal the sill in a similar manner.
Note! Shims must be 1/4" shorter than the depth of the window sill,
should level the rough opening sill and be no more than 1/4" thick.
4. Shim the sill 4" from each corner, at 8" intervals, and on both sides of
mull joints with non water-degradable or compressible shims. Secure
shims with sealant. SKIP to section 5, “PREPARE WINDOW.”
REMOVE PACKAGING
Remove shipping materials such as corner covers, shipping blocks or
pads. If there is a protective lm on the glass, do not remove it until
installation and construction are complete. Cut off any staple legs
exposed on the side of the frame.
Note! Double-hung windows may have banding on the interior of the
unit. Do not remove until the window is secured in the opening to help
keep the sash in place and the unit square.
INSPECT WINDOW
• Cosmetic damage
• Product squareness (diagonal measurements not more than 1/4"
different)
1
REMOVE PACKAGING & INSPECT WINDOW
• Correct product (size, color, grid pattern, handing, glazing, energy-
efciency requirements, etc.)
• Drip cap that extends the length of the exterior trim plus 1/8"
overhang on each end (all units require a drip cap); drip cap may or
may not be pre-installed
• Splits, cracks, holes, missing sections or other damage to the nailing
n longer than 6" and/or within 1/2" of window frame
If any of the above conditions represent a concern, or if you expect
environmental conditions to exceed the window's performance rating,
do not install the window. Contact your dealer or distributor for
recommendations.
Sealant
joints
Liquid
applied
ashing