
Instructions / Assembly


INSTALLATION INSTRUCTIONS
for Wood/Clad Wood Windows with Exterior Trim or Nail Fin (JII024)
6
FLASH WINDOW - CONTINUED
7
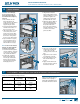
Sealant
COMPLETE INSTALLATION
8
1. Release the building wrap
from above the header
(previously taped up) and
overlap the header ashing.
Seal the ends with self-
adhesive ashing or building
wrap tape.
2. Seal all four corners of the
windowwitha3/8"bead
of sealant. Tool into a llet
shape.
3.Sealanygapsoropeningsat
end of horizontal mull joints
with sealant.
4. Create a continuous air seal
on the interior between
the rough opening and the
window frame with low
expansion polyurethane
foam or backer rod and
sealant. On the sill, the foam
or sealant must create this
air seal by integrating the
back of the drain mat with
the window frame and the
rough opening.
AFTER INSTALLATION
•Installexteriorwallsurfacewithin30daysofwindowinstallation.
•Maintaingapof1/4"-3/8"betweenwindowframeandnalexterior
wall surface.
•Adjust windowforbestoperation.
•Removeprotectivelmfromcladding(ifpresent)immediatelyafter
installation;removefromglasswithinoneyear.
•Protectrecentlyinstalledunitsfromdamagefromplaster,paint,etc.
by covering the unit with plastic.
•Finishallexposedwoodsurfacesimmediatelyfollowinginstallation.
Please visit jeld-wen.com/resources for warranty
and care and maintenance information.
Thank you for choosing
© 2008 JELD-WEN, inc. | JELD-WEN and Reliability for real life are registered trademarks of JELD-WEN, inc., Oregon USA.
All other trademarks are the property of their respective owners.
(11/08)
APPLY THE SELF-ADHESIVE FLASHING
Note! Keep the edge of the
JELD-WEN self-adhesive
ashing as close to the
window frame as possible and
apply over the nail n.
1. If installing a window
ratedaboveDP50,center
andapply6"wideashing
below the sill.
2. A pply the side pieces
starting 2" above the
header and overlap the
drain mat on the sill as
shown.
3.Centerandapplytheheader
piece above the header,
overlapping the side pieces
as shown.
4. P ress the ashing down with
a J-roller, being careful to
remove any gaps or bubbles
beneath self-adhesive
ashing (remove and
replace if necessary).
2"
2"
2"
Drain mat
Flashing
Low expansion
foam
Shim
Drain mat
Rough
opening
Back of
drain mat
Sill