
Installation Guide

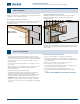
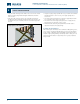
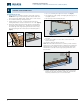
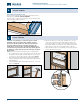

Table Of Contents

PREPARE WINDOW
INSTALL WINDOW
4
5
Separately Supplied Drip Cap
This step applies to nail fin units only, windows with exterior trim will
install drip cap in section 5, “INSTALLWINDOW.”
Lay a 1/4" bead of sealant across the header as shown, and tap the drip
cap into the groove with a wood block.
Groove
WARNING! To avoid injury, use at least two people to install.
Adequately support the window until completely fastened.
Areas such as Florida and the Texas TDI region have different
anchoring requirements based on product certification. For
information on specific products, visit www.floridabuilding.org
or www.tdi.texas.gov and follow the anchoring schedule given in
the drawings for the product instead of the anchoring schedule in
thisdocument.
NOTE: Fastener (anchor) heads must be ush. Do not dent nailing n.
1. Run a continuous 3/8" bead of sealant around the interior side of the
nail fin/trim on the side jambs and head. On the sill, leave at least a
2" gap every 8" where it will contact the rough opening (Fig. A).
2. Place window onto the shimming support and tilt into the rough
opening. The window sill must rest on and be fully supported by the
shimmingsupport.
3. Fasten window through the nailing n/trim between 3"- 7" from one
uppercorner (Fig. B).
Gap
3"- 7"
8" on
center
Center
Interlock
4. Shim at each interlock, or in the center, and within 4"- 6" of each
corner on the side and head jambs. Apply additional shims to the
side and head jambs as necessary to ensure window position within
the opening is plumb, level and square. Larger windows usually need
additional shims. Shims can be secured with sealant oradhesive.
5. Inspect window for square, level and plumb. Test for proper operation
(remove and reinstall if necessary).
Shim
Jamb
Rough
opening
1/4" Sealant
gap
1/2" - 3/4"
Fig. A
Fig. B
Installation Instructions
for Wood/Clad Wood Windows with Exterior Trim or Nail Fin (JII024)
6