
Installation Guide

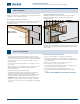
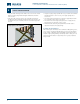
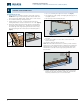
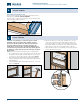
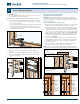

Table Of Contents

INSTALL WINDOW CONTINUED
5
Secure Window
1. Fasten window through the exterior trim/n 4" from the corners and
8" apart all the way around the window.
For units with applied clad trim that covers the n:
2. From the interior, fasten the window through the jambs as follows:
• Mark fastener locations 4" from the corners and 14" apart all the
way around the window.
• At each marked location, drill a pilot hole through the side jamb and
into the framing. Countersink for wood putty or for plug covers.
• Apply sealant to the threads of a #8 x 3" screw and drive through
the side jamb into the framing.
3. If applicable, install #8 screw through each masonry clip and into the
framing. Screws must be long enough to penetrate framing by at
least1".
4. Hung windows must be fastened through the jamb adjusters with
#8 x 2" screws provided. Straighten the jambs per the instructions
provided with the screws.
Interior Trim on Primed/Siteline
Single/Double-Hung Windows
WARNING! This product has a jamb liner cover that cannot be nailed
through. Pay close attention to where you nail the interior jamb leg trim. If
you cover the jamb liner cover with trim, you will have to remove the trim
to replace the jamb liner.
How to install interior trim/casing:
1. Mark a revel line around the jamb; this is typically 1/8" to 1/4" around
the frame (make sure not to nail into the jamb liner cover). Use a
straight edge or square, to mark the line around the perimeter of the
head, jambs and sill. To insure you do not nail through the jamb liner,
measure from the outside edge of the frame to the edge of the jamb
liner cover, this should be approximately 1/2". Place intended fastener
in the center of the 1/2"space for a clad wood window (Fig. A and
B). On an all wood window this measurement should be 5/8" from
the outside edge of the frame. Place intended fastener in the center
of the 5/8" space (Fig. C).
2. Cut the trim/casing with a 45 degree miter (measurements should be
taken at the intersecting lines that are marked on the window frame).
Start with the head cut, proceed to the sill cut, temporarily install
both of these pieces.
3. Cut each jamb piece to t in between the head and sill. Once you
have all pieces cut, work them together for a perfect t.
NOTE: There are other installation types for installing trim/casing. Consult
a professional if your installation methods differ from the above method.
4"
14"
14"
14"
4"
Center
Countersink
Screw with
sealant
Jamb
Adjuster
Interior
Exterior
Sheetrock
Interior
Plywood
Sheathing
Jamb liner
cover
Jamb liner
cover
Center
fastener
within
5/8" from
window
edge to
avoid jamb
liner
Center
fastener
within
1/2" from
window
edge to
avoid jamb
liner
Fig. A
Fig. C
All Wood
Fig. B
Clad Wood
Installation Instructions
for Wood/Clad Wood Windows with Exterior Trim or Nail Fin (JII024)
7