
Installation Guide

INSTALLATION INSTRUCTIONS
for Swinging French and Patio Doors (JII105)
9
Please visit jeld-wen.com for warranty
and care and maintenance information.
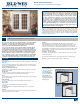
Thank you for choosing
©2015 JELD-WEN, inc.; This publication and its contents are owned by JELD-WEN, inc. and are protected under the U.S. Copyright Act and other intellectual
property laws. All trademarks, service marks, logos and the like (whether registered or unregistered) are owned or controlled by JELD-WEN, inc. or others.
Unauthorized use or duplication of JELD-WEN intellectual property is prohibited.
JELD-WEN reserves the right to change product specications without notice. Please check our website, jeld-wen.com, for current information.
(04/15)
COMPLETE INSTALLATION - CONTINUED
9
Sill extender
Sealant
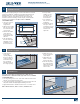
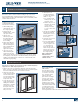
2. The foam wedges
included with French
and Patio doors are
used to complete the
weatherstrip seal at
each bottom corner
of the operating door
panel(s). Doors will
be provided with
one of two types of
wedges. One has an
upturned L-shaped leg
(shown) and the other
is a simple wedge.
For both types, gently
pull the weatherstrip
ap away from the frame and position the wedge behind the
weatherstrip and against the sill so that the thin edge faces the edge
of the door as it swings closed. Remove the backing paper and stick
the wedge to the frame. Apply a bead of sealant at the intersection
of the jambs, brickmoulds, thresholds and oor as shown.
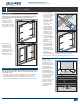
3. Apply sealant at the
bottom where the
sill meets the frame
on both sides. If a
sill extender is used,
apply a bead of
sealant between the
sill and the extender.
Apply sealant around
any mulls at the
intersection of the
mull and door sill.
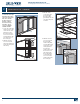
4. Apply sealant around
the outside of the
door unit between the
siding and brickmould and between the brickmould and the jamb.
Also apply sealant between the jamb sides and the threshold. Run a
bead of sealant, leaving 1" gaps every 2', along the front side of the
threshold where it meets the slab/rough opening.
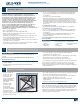
5. Create a continuous air seal on the interior between the rough
opening and the frame with low expansion foam.
Sealant
Corner
pad
Exterior
Stop
Interior
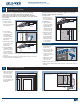
COMPLETE INSTALLATION
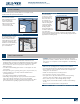
1. Ensure sealant on back dam of the sill pan fully seals to the inside
face of the sill. Apply more sealant as necessary.
2. Install lockset hardware per supplied instructions.
3. On the exterior of step-down landings, install support trim
underneath the sill where it extends past the landing. Position trim
snugly against the bottom of the sill toe.
4. Fill any nail/screw holes in wood and sand smooth.
5. Finish all six sides of the door panel(s) as well as the frame.
AFTER INSTALLATION
• Install exterior wall surface within seven days of installation.
• Maintain gap of 1/4"-3/8" between door frame and nal exterior wall
surface (siding, stucco, etc.)
• Seal this gap on the sides with backer rod and sealant. For step-down
landings, also seal under the door sill with a discontinuous joint. Do
not apply sealant on top of the drip cap.
• Remove protective lm (if applicable) on glass within one year.
• Protect recently installed units from damage from plaster, paint, etc.
by covering the unit with plastic.
• Install any interior trim as desired.