
Instructions / Assembly


WALL
WALL
WALL
WALL
1
2
3
4 5 6
6
JELD-WEN DesignGlide Barn Door Hardware System Installation
(JII-90003)
STEP 3: TOP AND BOTTOM RAIL INSTALLATION
Top
Bottom
Top Rail
Bottom Rail
Predrill bottom rail.
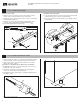
1. Align one of the two rails ③ to bottom of door, in the conguration
shown in Figure 9.
2. Mark the center of holes 1, 3, 4 and 6 as shown in Figure 10, (holes 2
and 5 will not be used on the bottom rail), remove the rail.
Figure 9. Rail Orientation
3. Predrill holes 1 and 6 with an 1/8" bit, 3/4" deep.
4. Predrill holes 3 and 4 with a 5/32" bit, 1 7/8" deep.
Figure 10. Mounting Pattern
Figure 11. Attach Rail to Bottom of Door
5. Realign rail to the bottom of the door in the same conguration
as the door was predrilled.
6. Fasten the rail to the bottom of the door with (2) #14 x 2 1/2"
pan head screws ⑬.
7. Install the end caps into holes 1 and 6 using (2) #10 x 1" pan head
screws ⑫.
Pan Head, #10 x 1" (2)
Pan Head, #14 x 2 1/2" (2)
Predrill top rail.
1. Align other rail ③ with the top of door, in the conguration shown
in Figure 9.
2. Mark the center of all holes, remove rail.
3. Predrill holes 1 and 6 with an 1/8" bit, 3/4" deep.
4. Predrill holes 2, 3, 4, and 5 with a 5/32" bit, 1 7/8" deep.
Figure 12. Attach Rail and Hangers to Top of Door
5. Realign rail to the same conguration as the door was predrilled.
6. Place hangers ⑭ with the stem of the hanger aligned with the at
wall of the rail.
7. Fasten the hangers in place through holes 2, 3, 4, and 5 using
(4) #14 x 2 1/2" at head screws ⑮.
Flat Head, #14 x 2 1 /2" (4)
③
③
or
⑪
③
⑬
⑫
⑫
⑭
③
⑮
⑮
⑬