
Installation Guide

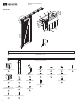


5
Barn Door Instructions
(JII114)
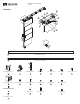
RUSTIC KIT
Next, install the handle.
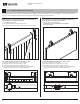
1. Use the Rustic Kit Pre-drill diagram (Page 9) to locate & pre-drill the
holes required to fasten the handle
Handle can be installed on either side of door, depending on the
sliding direction (Pre-drill diagram is universal)
2. Locate the diagram’s rustic reference line 40-3/4" from the top of
the door
3. Fold the diagram around the door as indicated and pre-drill for the
handle using a 1/8" bit, roughly 5/8" deep, into the door
4. Secure handle using the (4) #8 x 3/4" wood screws
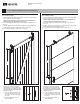
MODERN KIT
Next, install the handle.
1. Use the Modern Kit Pre-drill diagram (Page 10) to locate & pre-drill
the holes required to fasten the handle
Handle can be installed on either side of door, depending on the
sliding direction (Pre-drill diagram is universal)
2. Locate the diagram’s modern reference line 43" from the top of
the door
3. Fold the diagram around the door as indicated and pre-drill for the
handle using a 1/4" bit, through the door
4. Secure handle using the (2) M6 X 55mm machine screws
40 3/4"
43"
Figure 7. Pre-Drilling Modern Handle
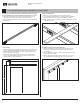
STEP 1: DOOR HARDWARE INSTALLATION (CONT.)
If the door is used in a passageway
that requires access from either side,
the next step is to install the included
nger pull using the supplied pre-drill
diagram on page 11.
1. Locate the diagram's nger pull
reference line 45" from the top
of the door and drill a 3/4" hole
5/8" deep
2. Press nger pull into place as
shown in gure 6
Figure 6. Pre-drilling for Finger Pull
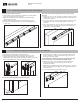
If the door is used in a passageway
that requires access from either side,
the next step is to install the included
nger pull using the supplied pre-drill
diagram on page 11.
1. Locate the diagram's nger pull
reference line 45" from the top
of the door and drill a 3/4" hole
5/8" deep
2. Press nger pull into place as
shown in gure 8
Figure 8. Pre-drilling for Finger Pull
Figure 5. Pre-Drilling Rustic Handle