
Use and Care Guide


PRODUCT GUIDE
Interior & Exterior Doors (JPG013)
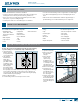
INSTALL NEW GLASS INSERT
Note! The exterior frame is attached to the glass and does not have
holes; the interior frame has screw holes.
are holding the unit together, separate the interior and exterior
portion of the
exterior frame
and glass on the
lower edge of the
door opening.
Horizontally center
the frame and glass
into the opening
and tilt up until the
frame is ush against
the door.
frame in the opening
using the press t
alignment pins
located on the frame.
halves together by
driving the screws
through the interior
frame and into
the exterior frame
screwdriver until
must then be checked with a hand screwdriver.
7. Clean glass with mild soap and water.
REMOVE OLD GLASS INSERT
Note! Handling glass can be dangerous. Glass inserts can be heavy and
awkward. Use additional help and always wear protective clothing.
1. If the old insert has
screw plugs over
the screw heads in
the interior frame,
drive a drywall screw
into the screw plug
until it is loose from
all remaining screw
plugs in the same
manner.
insert while removing
screws to keep it
the screws from the
interior frame from
the bottom up.
are removed, slide
the edge of a putty
knife between a top
corner of the interior
frame and door.
entire perimeter until
the interior frame is
loose.
insert and set aside in a safe location.
the old weatherstrip and then wipe again with a clean rag.
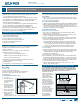
ASTRAGAL WEATHERSTRIP
1. Open active door all
the way.
weatherstrip.
and gently pull out
of kerf.
4. Cut new weatherstrip
to length.
barb into the kerf
from one end to the
other.
FOAM WEDGES
The foam wedges are
used to complete the
weatherstrip seal, at
each bottom corner
of the operating
are provided with
one of two types of
wedges. One has an
and the other doesn't
for the appropriate
replacement. For both
types, the thin edge
faces the edge of the
door as it swings closed.
brickmoulds, thresholds and oor as shown.
Threshold
weatherstrip