
Installation Instructions
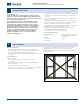
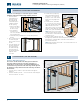

INSPECT ROUGH OPENING (R.O.)
2
A
D
C
E
B
Installation Instructions
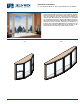
for Vinyl Bay/Bow Windows with Integral Nailing Fin (JII-90025)
4
• Verify the width and height of the rough opening is 1/2"-5/8" larger
than the window width and height.
• Verify the rough opening
is square. The (A) and (B)
measurements should be the
same. Suggested deviation
from square is no more
than1/4".
• Verify the rough opening is
level and plumb (C, D and
E). Suggested deviation from
square is no more than 1/8".
• The rough opening sill should
not be crowned or sagged
(D), but rather level or sloped
(positive slope) to the exterior.
• The exterior face of the rough opening should be in a single plane (E)
with less than 1/8" twist from corner to corner.
For Retrot Installations
After removing the old window, remove sufcient cladding (siding, stucco,
etc.) to expose enough intact building wrap to install the window in a
weatherproof manner. If damaged, apply new building wrap in a shiplap
manner. Verify the rough opening framing is structurally sound. Contact
your local waste management entities for proper disposal or recycling of
products being removed.
This installation guide only addresses sheathed wall and open-
stud construction. If installing into an opening other than what is
identied, consult a building professional.
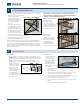
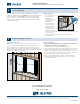
Header
Trimmer
studs
Sheathing
King
stud
Verify Square, Level and Plumb
Open-Stud
Construction
Sheathing is absent and
building wrap is applied
atop of the wall framing.
The window will be
mounted ush against
building wrap and/or
framing members (studs).
Fully Sheathed Wall
Construction
Sheathing is applied to
the exterior of the wall
framing. The window will be
mounted ush against the
sheathing or building wrap
in a weatherproof manner.
INSTALL SILL PAN
3
Prepare Sill
1. Install a sill pan in a weatherproof manner on the rough sill (refer to
ASTM 2112 for types of sill pans). Always allow water to drain out of
the pan and onto the building wrap, drainage plane or to the exterior.
NOTE: For a Bay and Bow window, self-adhered ashing is
recommended to create the sill pan (rather than a ridged sill pan).
2. If using self-adhered
ashing to create the
sill pan, measure the
width of the frame
from the interior to
nailing n and subtract
1/4". Transfer this
measurement from
the outside edge of the rough opening sill and draw a line all along
the rough opening sill. The line will address where the back of the
ashing will sit.
Shim the Sill
1. Place the shims in the
sill pan as needed
to level the window
and prevent sagging
or bowing. Shims
should be aligned as
dened by the label
on the window or as
statedbelow:
• Shims (1/4" maximum) should be placed near the exterior edge
of the sill pan.
• Place one shim 3/4" to 1" from each side of the rough
opening (if the rough opening is sized correctly, this should be
approximately 1/2" from the corner of the window).
• Shim in a manner that evenly supports the window.
• For mulled units, ensure there is a shim located 1/2" on each side
of the mull joint (see comments below).
• There should always be a drainage path to the exterior out of the
sill pan.
• Shims can be held in place with sealant.
3/4" to 1" from side
of rough opening
Depth of window
minus 1/4"
Shims
Flashing
Interior
Measure frame
width