
Installation Instructions

Installation Instructions
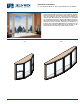
for Vinyl Bay/Bow Windows with Integral Nailing Fin (JII-90025)
5
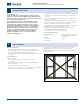
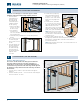
TEMPORARILY FASTEN AND SHIM PRODUCT
4
WARNING! To avoid injury, use at least two people to install.
Adequately support the window until completely fastened.
1. Fastener locations
around the interior
perimeter should
be pre-drilled and
countersunk prior to
setting the window
into the opening.
• Pilot holes should be
located 1 1/2" from
the interior edge.
• Holes should be
located 4" from
each corner and then 12" on-center and applied on all four sides
of the window frame.
• Countersink each pre-drilled hole to accept a #10 pan head
fastener.
2. Run a continuous bead
of sealant along the
interior surface of both
nail ns.
3. Place the window onto
the shims and tilt into
the rough opening.
The shims must fully
and evenly support
the sill of the window.
Adjust the shims
as needed.
4. From the exterior, temporally
fasten the window by placing
a fastener 3"- 6" from one of
the upper corners of the nail n.
Make sure to fully support the
window.
5. From the interior, shim within
4"- 6" from each corner on both
sides of the window frame. Apply
additional shims to the sides
and head as necessary to ensure the
window position within the opening is
plumb, level, square and without twist.
NOTE: Shims can be secured with
sealant. All shims must be set back
from the interior of the window frame
a minimum of 1/4".
6. Fasten the jambs, head and seat board
through the pre-drilled and countersunk pilot holes using #10 pan
head fasteners. A shim should be located near each fastener to
prevent frame deection.
NOTE: Shims should be cut back 1/4"- 1/2" from the interior face of
the main window frame.
3"- 6"
Framing
Shim
Interior
Seat
Board
1/4" sealant
gap
Countersink
1 1/2"
4"
Sealant
Exterior
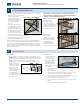
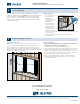
FASTEN PRODUCT (SIZE AND SPACING)
5
3"- 6"
8"OC
Common Window Fastening
Areas such as Florida and the Texas TDI region have different
anchoring requirements based on product certication. For
information on specic products, visit www.oridabuilding.org
or www.tdi.texas.gov and follow the anchoring schedule given in
the drawings for the product instead of the anchoring schedule in
thisdocument.
1. From the exterior, continue to place the fasteners through the
nailing n.
2. Fasteners should be placed 3" – 6" from each end of the nailing n
and no more than 8" on-center.