
Installation Instructions
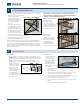
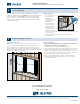

CREATE “INTERIOR” AIR SEAL
7
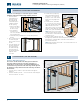
INSTALL DRIP CAP
6
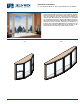
Installation Instructions
for Vinyl Bay/Bow Windows with Integral Nailing Fin (JII-90025)
Please visit jeld-wen.com for warranty
and care and maintenance information.
Thank you for choosing
JII-90025 02/19
©2019 JELD-WEN, Inc. This publication and its contents are owned by or licensed to JELD-WEN, Inc. or its afliates or third parties, and are protected by copyright, trademark, and other laws. Unauthorized use
or duplication is prohibited. JELD-WEN reserves the right to change product specications without notice. Please visit our website at jeld-wen.com for current information. All rights reserved.
The use of a drip cap on all window/door products is recommended,
regardless if supplied. A drip cap is required on any vertical mulled/joined
products, regardless if supplied. NOTE: A drip cap may not be suitable
for some product lines (e.g. brickmould vinyl, ush n, vinyl at casing),
regardless these product lines need to be incorporated into the wall in a
weather-shedding manner.
Continuous Air Seal
NOTE: Shims may need to be cut back, so the interior air seal is
“continuous" between the window frame and the rough opening.
Create a continuous air seal on the interior by integrating the rough
opening and the window frame with low expansion polyurethane foam or
backer rod and sealant. If needed, apply additional sealant between the sill
pan or rough sill and the window frame.
After Installation
• Ensure weep holes/channels are clear of debris for proper water
drainage. Do not seal weep holes/channels.
• Install exterior wall surface per manufacturer’s guidelines.
• Leave an expansion/contraction gap of approximately 3/8" between the
window frame and nal exterior wall surface (siding, stucco, etc.). For a
nished look and additional protection, seal this gap on the sides with
backer rod and sealant. If sealant is applied above the drip cap ensure
the sealant bead is discontinuous to allow for drainage.
• Protect recently installed units from damage from plaster, paint, etc.
• The head and seat board should be protected (e.g. roof, skirt) and
insulated with rigid foam.
Low expansion foam
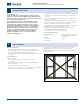
Bracing Installation
1. If the window has a
pre-installed cable
support system,
follow the instructions
provided by the
manufacturer.
2. If the cable support
system is not used,
build a seat board
bracing to support at
least 750 lbs of total
weight (window plus
window contents). Primary support should be provided under the mull
joints of the unit.
3. Remove any temporary support after the full bracing has
been installed.