
Operating Guide
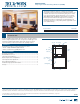


PRODUCT GUIDE
Vinyl Single and Double-Hung Windows (JPG006)
2
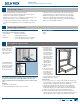
NEEDED TOOLS
Note! Each tool is not required for every task.
NEEDED MATERIALS
NEEDED TOOLS & MATERIALS
Tape measure•
Level•
Putty knife•
Flat head screwdriver•
Phillips head screwdriver•
Spiraladjustmenttool(askyoursupplier•
for one) or locking needle-nose pliers
String•
Tape•
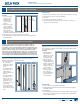
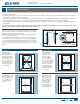
SASH REMOVAL & INSTALLATION
A tilt sash has thumb
latches (sash retainer
latches) on the top
two corners of the
sash and can vary in
shape and size.
A side load sash does
not tilt, is removed
from the side, and has
metal take-out clips
inthesidejambjust
above the lower sash.
TILT SASH REMOVAL & INSTALLATION
Note: Double-hung windows require the lower sash be removed before
the upper sash and the upper sash installed before the lower sash.
Label top and bottom sash for reinstallation. The lock is on the bottom
sash.
REMOVAL
1.Opensashatleasthalfway.
2. Press sash thumb latches toward center of window.
Follow all manufacturers’ instructions and labels.•
Use proper and safe equipment and precautions if servicing the •
exterior side of windows above ground level.
Window insect screens are not security devices and will not prevent •
children, other people, or pets from falling through.
Use extra care when driving screws near glass unit to avoid breakage.•
Use caution when tightening screws to avoid stripping the screw •
holes.
PRECAUTIONS & SAFETY
Sashremovalcanbeawkwardandcouldcausephysicalinjuryor•
product damage; we recommend the help of a second person.
Maintain a strong grip on balance when removing or installing. •
Balances are spring-loaded and they will decompress quickly if
released,possiblycausingpersonalinjuryand/orproductdamage.
Beware of oil causing slippery surfaces.•
3.Pullsashtoward
the interior and
hold horizontally
while tilting out to
keep the balance
shoe from releasing
and popping up.
Take note of which
jambchannelthe
sash is in (the sash
will need to be
reinstalled in the
same channel).
4. Tilt sash toward
interior at a 90º
angle.
5.Liftonesideofsash
to release pivot pin
from balance shoe
inthesidejamb.
Notice the position
of the balance shoe
inthesidejambforreplacement.
6. Slightly swing sash to remove.
INSTALLATION
1.Insertonepivotpinononecornerofthesashintothebalanceshoe
inthesidejamborslidethepivotpinintothebalanceshoefromthe
top depending on conguration of pin/shoe combination.
2. Carefully slide engaged pivot pin and balance shoe downward or
upward until pivot pin on the opposite side can be aligned and
inserted into balance shoe. Sash should be horizontal at this point.
3.Tiltthesashupintoplaceandengageboththumblatches.
4. Test the sash operation. If the sash does not move freely in the
window frame, the pivot pins may not be engaged properly. Remove
and reinstall taking care to engage the pivot pins on both sides.
Thumb
latch
Take-out
clip
Lower
sash