
Operating Guide
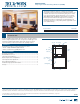


PRODUCT GUIDE
Vinyl Single and Double-Hung Windows (JPG006)
4
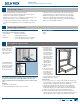
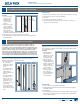
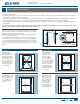
BLOCK & TACKLE TYPE B & C BALANCE WITH LOCKING SHOE
Types B and C are used on single and double-hung windows with thumb
latches on both sides of the sash top.
REMOVAL
1.Removesash.The
balances are now
exposed in side
jambs.
2. Locate screw (or
hook) at top. The
balance is under
tension, so remove
carefully. Hold the
end with pliers and
either remove the
screw or unhook
the hook. Slowly
allow the tension to
release.
3.TypeCbalances,on
the bottom, have a
locking balance shoe.
Turn the locking
balance shoe 90° to
a horizontal position
with a at head
screwdriver to unlock
it.
4. Take note of each
balance's position in
eachsidejamband
then tilt out from
top.
5.Twistuntilthe
balance shoe clears
track and remove.
INSTALLATION
1.Withbalance
horizontal, insert
balance shoe into
trackinsidejambin
the same position
they were removed
from. Twist to lock in
place.
2. Tilt top end of the
balance up into
track.
3.Onthebottom
of type C balances, turn the locking balance shoe 90° to a vertical
position with a at head screwdriver to lock it.
4.Alignmetalscrewtabattopofbalancetoscrewholeinsidejamb;
insert and tighten screw, or, re-attach hook into hole.
5.Reinstallsash.
6. If the sash does not move freely in the window frame, the balance
system may not be installed correctly or the pivot pins on the sash
may not be properly engaged. Remove and reinstall the sash and/or
balances again and take care to engage the pivot pins on both sides.
BALANCE REPLACEMENT & ADJUSTMENT - CONTINUED
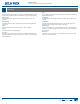
SPIRAL BALANCE
A spiral balance system is made up of a tensioned spiral-shaped rod
extending from a steel tube down into a balance shoe that grips the
rod and holds the tension. Replace with caution. Tension must be set for
proper operation on a new balance.
Anexistingbalancemayonlyneedadjustment(notreplacement)for
properoperation.Adjusttensionequallyoneachbalance.Adjustment
tools and balances may vary in shape and size.
REMOVAL
1.Removesash.
2. Remove sash stop (if
present) by pulling
on one end until it
comes out.
3.Liftandpulloff
balance cover (if
present) to expose
balance.
4. Grip bottom end
of spiral rod with
adjustmenttool.
Pull down then
lift out of balance
shoe (balance shoe
remains in channel).
Note! If you do not
have a spiral balance
adjustment tool,
use locking needle
nose pliers, but with
extreme caution.
5.Tightlyhold
adjustmenttooland
allow spiral rod to move up and unwind.
6. At the top, unscrew and remove balance.
INSTALLATION
1.Screwtopofnewbalanceintoplaceinsidejamb.
2.Gripbottomendofspiralrodwithadjustmenttool.Pulldownand
rotate clockwise two turns to set tension. Maintain grip on tool for
next step.
3.Pullspiralroddownandfullyengageintobalanceshoe.
4. Replace balance cover (if present).
5.Replacesashstop(ifpresent).
6. Reinstall sash and test operation.
ADJUSTMENT
1.Removesashanddisconnectspiralrodfrombalanceshoewith
adjustmenttoolasdescribedabovein“spiralbalanceremoval.”
2.Adjustasfollows,butdonotexceedmorethantwofullturnsata
time:
If sash drops, rotate clockwise to add tension. Add tension to both •
sides equally.
If sash pops up, rotate counter-clockwise to decrease tension.•
3.Reconnectspiralrodtobalanceshoe.
4. Reinstall sash and test operation. If necessary, repeat process until
sash operates smoothly.
Type C Locking shoe
in unlocked position
Type C Locking shoe
in locked position
Type C
Locking
Shoe in
Locked
Position
Balance
shoe
Sash
stop
Balance
cover
Balance
shoe
Adjustment
tool
Spiral
rod
Spiral
Balance
Adjust-
ment
Tool