
How to Guide


PRODUCT GUIDE
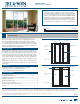
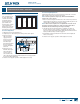
Vinyl Patio Doors (JPG008)
2
NEEDED TOOLS
Note! Each tool is not required for every task.
NEEDED MATERIALS
NEEDED TOOLS & MATERIALS
•Phillips head screwdriver
•Allen wrenches
•Tape measure
•2' or 4' Level
•Putty knife
•String
•Tape
•Follow all manufacturers’ instructions and labels.
•Use proper and safe equipment and precautions when cleaning and
servicing the exterior side of patio doors above ground level.
•Insect screens are not security devices and will not prevent a child,
other person, or pet from falling through.
•Use extra care when driving screws near glass unit to avoid breakage.
PRECAUTIONS & SAFETY
•Use caution when tightening screws to avoid stripping the screw
holes.
•Panelremovalcanbeawkwardandcouldcausephysicalinjuryor
product damage; we recommend the help of a second person.
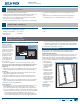
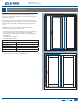
SLIDING INSECT SCREEN REMOVAL, INSTALLATION & ADJUSTMENT
It may be helpful to
remove insect screen
before other panel(s).
Adjustmentscrewsare
located at each corner
of the door screen and
may be located on
the end of the screen
or on the face. Face
adjustmentscrews
can either be on top
of the lower rail or
accessed through a
hole as shown.
1.Turnallfouradjustmentscrewstoretractrollersintothescreen.
Note! If door screen has weatherstrip covering adjustment screw, pull
out only enough to expose screw, then press back into place after
adjustment.
2. Grip both sides of the screen and lift up and over the screen track (if
needed, use putty knife to help lift rollers over track) and remove.
Installation
1.Thoroughlycleansilltrackandheadframechannel.Thesillcanbe
lightly lubricated with silicone if necessary.
2.Turnallfouradjustmentscrewstoretractrollersintothescreen.
3.Orientthescreensothengerleveronthescreenlatchfacesthe
inside.
4. Grip both sides of the screen and lift up and over the screen track (if
needed, use putty knife to help lift rollers over track) and remove.
5.Adjusttherollersasexplainedbelow.
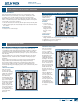
Roller Adjustment
1.Idealadjustmentisaslowaspossiblebutjusthighenoughtoavoid
drag.Adjustmentscrewsarelocatedateachcornerofthedoor
screen.Turntheadjustmentscrewinquarterturnincrementsuntil
thecorrectadjustmentisachieved.Somerollerswillrequireopposing
rotations to move the roller in the same direction as the other rollers.
•Ifscreendoorisushtosidejambbutneedstoberaisedor
lowered,adjustbothbottomrollersthesameamountandinthe
samedirection.Adjusttoprollersifneededtoapplyslighttension.
End Adjusted Roller
Face Adjusted Roller
Adjustment Screw
Locations
•Ifscreentoptouchessidejambrst,extendtherollerclosesttothe
sidejamb,andretracttherollerfarthestfromthesidejamb.Make
oppositeadjustmentsifthescreenbottomtouchessidejambrst.
2.Testoperationandreadjustasneeded.
SLIDING SCREEN & PANEL
REMOVAL & INSTALLATION
SLIDING/ROLLING PATIO DOORS
Panelremovalcanbeawkwardandcouldcausephysicalinjuryor
product damage; we recommend the help of additional people.
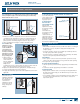
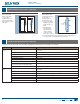
OPERATING PANEL REMOVAL
Operating panel(s) normally remove to the interior. Some doors have a sill
riser that will prevent the panel from being removed to the interior. The
xed panel(s) will need to be removed and the operating panel will then
be removed to the exterior. Follow the instructions for xed panel removal,
if necessary, before attempting to remove the operating panel(s).
1.Ontheinterior,
unlock panel and
slide to the middle
or further past the
anti-lift blocks in
the head.
2. Lift panel up and
over bottom track
and remove to the
interior. The rollers
may need to be
adjustedupintothe
panel and then held
with a putty knife
or similar at tool
in order to clear the
sill track.
INSTALLATION
To install, reverse
removal steps.