
How to Guide
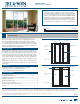


PRODUCT GUIDE
Vinyl Patio Doors (JPG008)
4
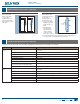
HARDWARE ADJUSTMENT - CONTINUED
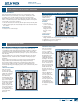
LOCK ADJUSTMENT - CONTINUED
IF THE LOCK DOES NOT PROPERLY ENGAGE THE STRIKE PLATE
Loosen the strike plate
screws and move up or
down until the latch
engages properly.
IF THE DOOR DOES
NOT LOCK OR IS
LOOSE WHEN LOCKED
Turn the latch
adjustmentscrew(s)
in1/2turnincrements
clockwise to
extend the hook,
loosening the locking
mechanism, or
counterclockwise to
retract the hook and
tighten the locking
mechanism. Premium
doors have a double
latchandtwoadjustmentscrews.
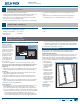
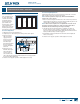
ROLLER ADJUSTMENT
Note! Adjusting door too high may allow water and air leakage. Adjust
rollers just high enough to clear sill track and keep the weatherstrip
hidden when the door is closed.
1.Buildersdoorshaveanadjustmentscrewoneachlowerendofthe
operating panel(s). Premium doors (and some older Builders doors)
have access holes on the face of each lower end of the operating
panel(s). Remove small vinyl plugs from each hole (if present).
2.Openoperatingpanelenoughtocomparewithframejamb.
Note! Builders roller
adjustment screws
are in close proximity
to the attachment
screw. Adjust only
the lower screw (as
shown); loosening the
attachment screw will
detach the roller from
the operating panel.
3.Liftthepanelto
take the weight off
of the roller and
turn theadjustment
screw with a #2
Phillips head
screwdriver (do not use a power driver). Clockwise rotations raise the
panel, and counterclockwise rotations lower the panel.
4.Adjustasneededuntilinterlocks,gridpatterns,andjambslineup.
5.Testtheoperatingpanelforproperoperation.
6.Re-applythesmallvinylcapsovertherolleradjustmentscrewholesif
applicable.
LOCK ADJUSTMENT
Some locks are not
adjustable.Adjustable
locks will have a lock
hookadjustment
screw and non-
adjustablelockswill
not. Keepers vary in
design, but operate
similarly.
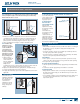
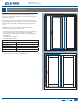
BLINDS BETWEEN THE GLASS
OPERATION
•When blinds are fully tilted closed, you will not be able to see through
the blinds at eye level, only when looking down. Shades provide
complete privacy.
•For easiest operation, operate at a medium speed and keep the slats
in a fully open position while operating.
•It is normal to have a small gap at the bottom at full drop. The blinds
may also not be perfectly level when fully open.
ADJUSTMENTS
1.Iftheoperatorcomesoffofthetrack,holdtheoperatoratasharp
angle to the glass and reinsert the two legs under the track opening.
2. Re-couple the operator magnets.
RE-COUPLE OPERATOR MAGNETS
1.Slidetheoperatorpastthehalf-wayengagementpointuntiltherst
click.
2. Continue to the full engagement point until the second click.
TROUBLESHOOTING
•Most problem conditions can be corrected by exercising the blinds in
the fully open position. Fully cycle the blind from top to bottom and
repeat if necessary).
• If de-coupling continues to the point the blinds cannot be fully raised
or lowered, an internal failure has occurred. Please contact us for
replacement options.
Raise
panel
Lower panel
Attachment
screw
Endadjustment
Face
adjustment
Adjustment
screw
Strike
plate
Lock hook
adjustment
screw
Lock hook
adjustmentscrew
Lock hook
adjustmentscrew