
Installation Guide


INSTALLATION INSTRUCTIONS
for Replacement Exterior Entry Doors (JII113)
4
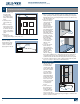
PREPARE EXISTING OPENING
3
COMBINATION SILL
1. Remove existing sill by cutting through the middle and prying out
of the opening as carefully as possible to limit damage to the jambs.
Existing fasteners at each side jamb may need to be cut. Remove any
old sealant, debris, etc.
2. Cut a new support
block from oak or
other waterproof
material. This
block should be
fashioned to be
long enough to fit
in between both
side jambs beneath
the stops and any
trim and extend the
full width of the
previous threshold.
From the exterior,
slide in place under
the jamb stops
and secure with
screws if on wood
or construction
adhesive if on
concrete.
3. Cover the support
block and any
exposed subfloor
with liquid applied
flashing or self
adhesive flashing.
If using self
adhesive flashing
that requires multiple pieces, begin from the exterior and work in,
overlapping the previous piece (shiplap method). Run a bead of
sealant on both ends where the blocking material meets the jambs.
4. Test fit the replacement door in the existing jambs. Notch the jamb
stops as necessary to allow the new threshold to fit.
BOTH INSTALLATIONS
1. Shim the strike jamb
so that the door
is centered in the
opening. Tack shims
to the existing jamb
just above or below
each pre-drilled
hole in the frame
and between the
latch and deadbolt
strike plates. Either
measure each screw
hole location and
transfer to the jamb
or use the frame
as a template as
shown.
2. On the bottom of
the replacement
threshold, apply
a full length bead
of sealant to each
leg or measure the
locations and mark the existing opening sill. Apply a continuous 3/8"
bead of sealant to each line.
1. On the inside, score
through paint/
sealant around
the existing casing
(trim) with a utility
knife.
2. Carefully remove
casing with a pry
bar.
3. Remove existing
slab from the frame.
The hinge pins can
be driven out with a
punch or the hinges
unscrewed from the
jamb.
4. Remove all
hardware from the
existing jambs (hinges, strike plates etc.).
SEPARATE COMPONENT SILL
Remove existing
threshold (not entire
sill) by removing the
screws or nails and
prying up from the sill.
Score here
Sill
Subfloor
Finished
floor
Threshold
(remove
this only)
Existing
frame
stop
Pre-
punched
hole
Shim
Shim
New
frame
Sealant
Support
block
Support
block
thickness
Sealant
joints
Sub
floor
Stop
Stop