
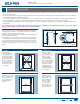
Dimensions Guide
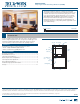


PRODUCT GUIDE
Vinyl Single and Double-Hung Windows (JPG006)
6
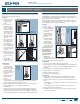
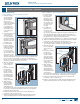
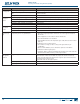
BALANCE INSTALLATION
LowerSashBalance–Accessopeningattopofjamb
1. Installthelocking
case rst with the
spring exiting the
case toward the
interior of the
window, the locking
collar in the unlocked
position and any
excess spring tail
length wraped over
the dog bone end
of the locking case
assembly.
2. Insert the bottom end
of the locking case
assembly into the
access opening and
pull downward until
the balance case and
spring tail fully enter
thejambpocket.
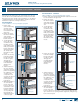
3. Formulti-spring
balances, slide the
locking case upward
until the dog bones
arejustabovethe
lower edge of the
access opening. Place
the tail of the second
spring in the pocket,
adjacenttotherst
spring tail and align the dog bones of the locking case with the dog
bone slots of the second spring case. Slide the second spring case
into the access opening. For triple spring balances, connect the third
spring case by the same method as the second.
4. Align the mounting
holes of all springs,
using needle nose
pliers.
5. Graspthemounting
bracket with a
needle nose plier
(inset), insert the
upper hook of the
mounting bracket
through the upper
holes of all springs
(make sure to
engage all springs).
6. Whileholding
back the balance
assembly, pull the
springs upward
approximately1/4"
(1)withthebracket,androtatethebracketaboutahorizontalaxis,
to insert the second hook through the lower holes of all springs (2 -
behind the pliers in the image).
7. Rotate the bracket about a vertical axis, to insert the back tab
beneaththeedgeofadogbone(3).
8. Slidethecompletebalanceassemblyandmountingbrackettothe
original mounting position, and secure with the original screw.
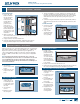
BALANCE REPLACEMENT & ADJUSTMENT - CONTINUED
Upper Sash Balance – Access opening at the sill
1. Formulti-spring
balances, install
the uppermost
spring case (short
tail spring), and
slide upward until
the dog bone slots
arejustbelowthe
top of the access
opening.
2. For additional
balances, insert
the bottom of the
second case into
the opening, and partially engage the dog bones into the rst case.
Grasp the spring tail with a needle nose plier, between the two
holes, and push the spring tail down, until the end can be inserted
through the access opening, alongside the rst case.
3. Pushthespringtailandthebalancecasefullyintothejambpocket.
4. Slidetheassemblyupthejambpocket,andbackdown,tofacilitate
feeding the second spring tail past the rst spring case.
5. Installthelockingcaseassemblyinthesamemannerifthelocking
case assembly contains a medium or long tailed spring.
6. Alignthemounting
holes of all springs,
using needle nose
pliers.
7. Grasp the mounting
bracket with a
needle nose plier
(inset), insert the
upper hook of the
mounting bracket
through the upper
holes of all springs
(make sure to
engage all springs).
8. Whileholding
back the balance
assembly, pull the
springs upward
approximately1/4"
(1)withthebracket,
and rotate the
bracket about a horizontal axis, to insert the second hook through
the lower holes of all springs (2 - behind the pliers in the image).
9. Rotatethebracketaboutaverticalaxis,toinsertthebacktab
beneaththeedgeofadogbone(3).
10.Slidethecompletebalanceassemblyandmountingbrackettothe
original mounting position, and secure with the original screw.
Interior
Locking case
Second spring
First case
Spring
mounting hole
Spring
mounting hole
2
2
1-up
1/4"
1-up
1/4"
3
3
Mounting
bracket
Mounting
bracket