
Installation Guide

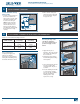

Opposing
shims
3/8"
clearance
hole
Double-Hung Jamb
Cutaway from Top
Framing
Screw
Nail
n
Jamb
Exterior
S
p
r
a
y
A
d
h
e
s
i
v
e
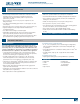
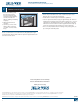
SPRAY ADHESIVE/PRIMER
Protect window from
overspray and apply spray
adhesive according to
instructions on the product to
nailing n and building wrap
around the window as shown.
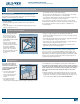
APPLY THE SELF-ADHESIVE FLASHING
Note! Keep the edge of the
self-adhesive flashing as
close to the window frame as
possible and apply over the
nail fin.
1. Apply the side pieces
starting 3" above the header
and overlap the ashing on
the sill as shown.
2. Install drip cap if required.
Pre-drill through the nailing
n if required.
3. Center and apply the header
piece above the header,
overlapping the side pieces
as shown.
4. Press the ashing down with
a J-roller, being careful to
remove any gaps or bubbles
beneath self-adhesive
ashing (remove and
replace if necessary).
INSTALLATION INSTRUCTIONS
for Vinyl Windows with Integral Nailing Fin (JII001)
6
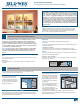
For PG50 OR ABOVE Tilt Hung
Windows ONLY
1. From the interior, just above
the interlock (where the
sashes meet at center), align
with shims and drill a 3/8"
clearance hole through
ONLY the rst wall of the
interior jamb (as shown).
This will allow the screw
head to pass through. Do
not drill all the way through
the jamb into the rough
opening.
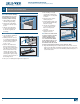
Cut pieces of self-adhesive ashing as follows:
MIN. SIZES OR
OTHER SPECIFIED
PG50 or below
(4" flashing)
Above PG50
(6" flashing)
One header piece 10" longer than the
header
14" longer than the
header
Two side pieces 8" longer than the
jamb
12" longer than the
jamb
FLASH WINDOW - WINDOWS INSTALLED INTO STUD-FRAMING ONLY
3"
1"
1"
Flashing
2. Drive one #8 x 1 1/4" pan/
washer head screw through
the jamb and shim. Repeat
for opposite side.
5
6
INSTALL WINDOW - CONTINUED